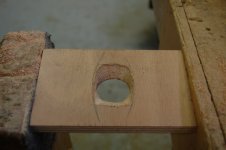
Art,The original SynTripP throat adapters were filed by hand to avoid any sharp edge discontinuity at the junction of the driver.
Your CNC routing should be adjusted to the particular driver you use.
thank you for clarifying!
Carl
Hi all! I have made a cutsheet in metric for those who need it :
https://drive.google.com/drive/folders/1Uc8v5Qk3jz8snis_ovhLCcN1j12PVRWf?usp=sharing
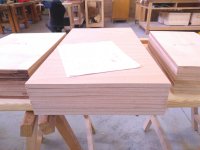
There's an extra 5cm to all widths and lengths. This is for 4 syntriPs. I can make one for 2 if I'm asked.
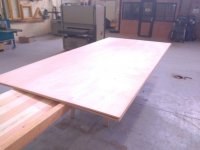
I've started making my first syntriP in the shop here. I Don't know whose plans I am using. They are labeled as "plans recommended by art" in the drive. I think they might be @ab01ns ' plans.
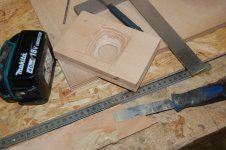
I went the oldschool route for the throat adapter.
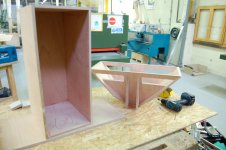
My horn is about 5mm too short in width compared to the enclosure... So I'm going to add some thin strips to hide my mistake on this first one, won't be a problem on the next")
Next step will be going to the fablab for the routing of the horn sides .
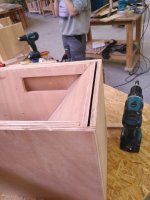
I've noticed there is a misalignment between the ports in the side panels and the top and bottom panels, I will correct that so they're aligned. No idea what caused that, although I was unsure of certain angles on the side panels. (the ones coming out of the throat adapter)
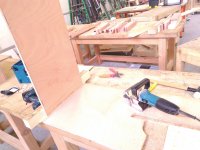
I didn't get the best plywood unfortunately. And I've learned that 4mm thick screws cause significant splitting.
Speaking of the side panels. As I noticed in ab01ns' build pics, the routing for the speaker comes really close to the edge of the sides of the horn, but it doesn't on the PDF. Son there's an incoherence there somewhere. Probably those uncertain angles I was talking about. I'm guessing it should be wider there.
Anyway lots of fun!!
https://drive.google.com/drive/folders/1Uc8v5Qk3jz8snis_ovhLCcN1j12PVRWf?usp=sharing
There's an extra 5cm to all widths and lengths. This is for 4 syntriPs. I can make one for 2 if I'm asked.
I've started making my first syntriP in the shop here. I Don't know whose plans I am using. They are labeled as "plans recommended by art" in the drive. I think they might be @ab01ns ' plans.
I went the oldschool route for the throat adapter.
My horn is about 5mm too short in width compared to the enclosure... So I'm going to add some thin strips to hide my mistake on this first one, won't be a problem on the next
Next step will be going to the fablab for the routing of the horn sides .
I've noticed there is a misalignment between the ports in the side panels and the top and bottom panels, I will correct that so they're aligned. No idea what caused that, although I was unsure of certain angles on the side panels. (the ones coming out of the throat adapter)
I didn't get the best plywood unfortunately. And I've learned that 4mm thick screws cause significant splitting.
Speaking of the side panels. As I noticed in ab01ns' build pics, the routing for the speaker comes really close to the edge of the sides of the horn, but it doesn't on the PDF. Son there's an incoherence there somewhere. Probably those uncertain angles I was talking about. I'm guessing it should be wider there.
Anyway lots of fun!!
Attachments
-
 horn next to the enclosure.JPG273.6 KB · Views: 211
 -
 horn total width just a bit small.jpg274.4 KB · Views: 219
 -
 port alignment 1.jpg238.7 KB · Views: 211
 -
 port alignment 2.jpg159.1 KB · Views: 199
 -
 throat adapter part A filed 1.JPG270.4 KB · Views: 209
 -
 throat adapter part A and B assembled.JPG412 KB · Views: 204
 -
 plywood stack.jpg320.1 KB · Views: 220
 -
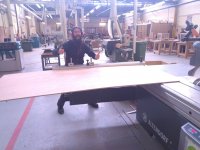 cutting up plywood sheets on the altendorf.jpg353.1 KB · Views: 213
 -
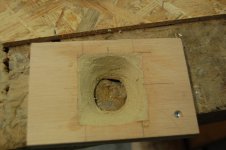 coating the throat adapter with wood filler - will be sanded down.JPG313.1 KB · Views: 229
 -
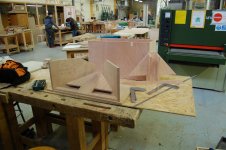 assembling the horn 2.JPG372.3 KB · Views: 219
 -
 assembling the enclosure with makita lamello.jpg354.1 KB · Views: 200
 -
 all parts rough cut with +5cm in length and width.jpg324.1 KB · Views: 182
 -
 3 plywood sheets for 4 syntrips.jpg223.2 KB · Views: 212
No Tone,
Glad you are having fun!
As you found, pre-drilling pilot holes and countersinking them prior to screwing is required to avoid splitting thin plywood, - probably should have included that in the assembly instructions...
The plans you are using eliminate the grill frame, which I definitely never recommended.
Art
I’ll do everyone one better! From a gig in September, probably 500+ people here in a warehouse, my 2 SyntripP, 2 front fill and well… 6 18s and 2 21s. Biggest issues was wanting MORE sub headroom, syntripPs had no issues keeping up, and I was nowhere near running out of headroom on them. If I was doing it again, I’d add in two more 21s and two more 18s. Would something like a PM90 be nice? Sure but with sensible tuning and genre dependent the syntripPs are a very capable box. Drum and bass really does have an insane amount of energy in the low end same goes for Tekno.If you are using four 15" tops as a comparison, you probably will be underwhelmed by the output of a pair of SynTripP in the 100 Hz range. I'm not a fan of adding a different mid bass to the set up, if you want more output than a 2x10" cabinet, you should go with something louder, like Peter Morris PM90 or PM 60 designs.
https://soundforums.net/community/forums/diy-audio.28/
That said, for 50-200 people, using four 18" bass reflex or a pair of Keystones, a pair of SynTripP probably would keep up for genres with most of the energy below 100 Hz.
Art
As an aside, im working on my own spin on the SyntripPs DSP preset Art talked about early on, experimenting with out of band EQ and FIR phase correction. Given how driver and processor specific it if I don’t know if I will ever release it, especially the FIR coefficients but I will update with where I’m taking the processing side of things when the weather gets nicer and I can start doing ground plane work again.
I’ve switched to running RCF ND2530s in my boxes and they’re a ton better than the ferrite Celestion compression drivers I was using before.
With the better part of a year of shows on these, I’d say for those wanting to build my advice would be get the absolute strongest and high output in the low corner compression driver you possibly can. The lower it goes the easier the crossover work is
Last edited:
Fellow Swede! Have you found any good place to source plywood here in Sweden? I am waiting for delivery on CDX14-3050 and B&C 10CL51 😁 If you like I can look into getting throat adaptors machined the same time as mine if they are to be the same and depending on your time budget?Art,
thank you for clarifying!
Carl
Hey! Just got the drivers and tweeters assembled with Mr. Speakers' 3d-printed chassis. Curious about wiring and power for 2x 10CL51-8 and Eminence N314X-8. Not sure whether to run the tweeter and midrange separately or if we wire them together. Do we use a passive crossover built into the cabinet or do we run a rack pa crossover such as the Behringer Super-X Pro CX3400 V2.
We printed in Black ASA (we think, asked for white and our printer service messed up) and assembled using the best guesstimate of hardware from home depot. Very happy with how they came out so far!
Was hoping to catch Mr. Speakers at CanJam NYC to answer some questions about his SyntripP build, but heard he couldn't make it. (Hope you're well.)
| Questions for Mr. Speakers NYC CanJam2023 |
| 1. Did you use an aftermarket crossover? What was the most optimal crossover frequency for your system? |
| 2. Did you apply any paint to the 3D-printed horn for environmental protection? How is it holding up? |
| 3. What subs pair best with the Syntripps from your experience? (Besides Keystones) |
| 4. What did you use to fasten each horn half together, other than the 4 screws? |
| 5. What did you do for sound treatment within the box? |
| 7. If you had to rebuild the system from scratch, what would you have done differently? |
| 8. If you could pair the Syntripp with any DIY sub, which would you build? (Keystone included) |
| 9. Using the Syntripps as main mid-tops, what would you recommend for DJ monitors? Anything in the DIY space that resembles a smaller Syntripp? |
The woofers and compression driver are powered separately using an active crossover and various EQ settings, the Eminence N314X-8 will require different DSP settings than the HF driver I used in the original SynTripP cabinets.Curious about wiring and power for 2x 10CL51-8 and Eminence N314X-8. Not sure whether to run the tweeter and midrange separately or if we wire them together. Do we use a passive crossover built into the cabinet or do we run a rack pa crossover such as the Behringer Super-X Pro CX3400 V2.
Post #9 lists the tests undertaken between 10/14/14 and 11/5/14, and basic DSP settings used with the horn extender.
4" Fiberglass was stapled to the sides, bottom and back of the cabinet interior.
The 10CL51-8 can be wired in parallel, around 600-1200 watts peak at 4 ohms. The Eminence N314X-8 can use around 150-300 watts peak at 8 ohms.
Art
Saw this first now! I'll DM you!Fellow Swede! Have you found any good place to source plywood here in Sweden? I am waiting for delivery on CDX14-3050 and B&C 10CL51 😁 If you like I can look into getting throat adaptors machined the same time as mine if they are to be the same and depending on your time budget?
Edit: apparently I can't DM. Anyways, I buy my plywood from WBP in Arlöv (Malmö). You need to order as a company though.
The plywood I have bought have been of good quality, a heads up though, some of the 18mm sheets I received was birch plywood only on the outside layers and pine inside (due to baltic birch shortage because of the war). After discovering, I was offered to return the sheets. 9, 12, and 15 mm was birch all through though.
I might take you up on the throat adapter CNC:ing, when are you doing that? I was planning to CNC plywood at a local makerspace but aluminum would perhaps be nicer
/Carl
Last edited:
We’d like to share some of our experiments with additive manufacturing methods, i.e. large scale 3d printing with pellets instead of filament. We have made a keystone subwoofer quite some time ago, you can find it in the keystone thread.
We have adapted the SynTripp design to make it printable. Also we’ve adjusted the throat horn curve a tiny bit, as well as the extension. We've increased the extension length by a bit to increase directivity to lower frequencies. Here are some photos of the build process. We nickname it the "SynTripPp" with the last p for printed.
It feels really dead and stiff. It's made of a composite which has a substantially higher tensile strength than baltic birch. The downside, the way we designed it, it is also heavier than made off wood. You can't have it all
What are your thoughts?
Last edited:
The SynTripPp looks very nice, but still not a fan of leaving all those holes unprotected by a grill.We’d like to share some of our experiments with additive manufacturing methods, i.e. large scale 3d printing with pellets instead of filament. We have made a keystone subwoofer quite some time ago, you can find it in the keystone thread.
We have adapted the SynTripp design to make it printable. Also we’ve adjusted the throat horn curve a tiny bit, as well as the extension. We've increased the extension length by a bit to increase directivity to lower frequencies. . We nickname it the "SynTripPp" with the last p for printed.
The printed Keystone response was quite different than the original, have you done any measurements of the SynTripPp polar response?
Cheers,
Art
Thanks for the compliments all. 
Yes indeed, the results for the Keystone were quite different. We made some design choices that resulted in (1) air leaks (2) a lot of cabinet resonances. The poor thing was vibrating so much. It was a good prototype, because of what we learned, not how it performed.
We have made some larger double 18" compound horn subs (paraflex like), where we eliminated that. Also by leveraging geometrical bracing and a composite sandwich construction. So stiff! It is surreal to not feel any vibrations on the enclosure while feeding it ~89 volts delivering ~2kW over 4 ohms continuously.
We made an effort of getting some polars, but that failed. The room was too small to do it properly. Now waiting for some good weather to take them outside. We will share the results in this space.any measurements of the SynTripPp polar response?
The printed Keystone response was quite different than the original
Yes indeed, the results for the Keystone were quite different. We made some design choices that resulted in (1) air leaks (2) a lot of cabinet resonances. The poor thing was vibrating so much. It was a good prototype, because of what we learned, not how it performed.
We have made some larger double 18" compound horn subs (paraflex like), where we eliminated that. Also by leveraging geometrical bracing and a composite sandwich construction. So stiff! It is surreal to not feel any vibrations on the enclosure while feeding it ~89 volts delivering ~2kW over 4 ohms continuously.
Wow, what a find this thread is! Was looking at building a Paraflex but now excited to build a SynTripP to replace the two-way in my portable battery powered sound system alongside my Tham 12… I’ve studied this thread and wanted to float a couple of ideas I had to simplify the build given my limited tools and skills!
1) for the filler cone, thinking of using 2-part resin… I’ll line my speaker cone with cling film and pour the epoxy in (or maybe cast it in plaster of Paris and use that to make a silicone mould). This method should allow me to get as tight a fit with the cone as I like. But what’s best? Art’s plans seem to suggest 19mm from the side horn panel to the curved centre part of the speaker shape (whatever that’s called!)… is that optimal? Or is there another way to determine the best depth of the cone to fill with my epoxy mould?!?
2) Im considering using thermoplastic to mould the throat adapter piece from the circular driver to the rectangle throat.. hoping to simply mould it by hand while it’s warm enough to be pliable and then let it cool hard in that shape. Is it reasonable to just mould it into a smooth transition or is the profile super critical?
3) I want to go as light as possible because this will be carried on my back. Hoping I can get away with 9mm ply for the top and bottom and no pole mount ( or a very simple top-hat shaped plastic insert) Any issues with the 9mm? Any other weight saving ideas?
Thanks for any ideas… I’m so impressed and inspired by this thread. Looking forward to getting building 😁
Last edited:
- Home
- Loudspeakers
- Multi-Way
- SynTripP: 2-way 2-part Virtual Single Point Source Horn