* Disclaimer - Perform the following procedure at your own risk. Not responsible for damage to your own driver !!! *
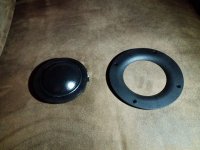
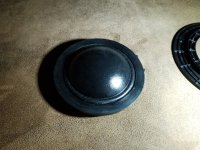
I finally decided to take a chance at removing the mounting flange on one of my D7608-9200 dome mids. I'm documenting this so others can attempt the same. Again, please use caution doing this by yourself. This procedure is reversible if you're careful.
To start with, the flange is held onto the driver assembly with very tenacious contact adhesive. Do the following to pull the driver element away.
I started by grabbing the flange with the dome facing away from me, using two thumbs to push / bend the flang away from the magnet, little by little, opening the gap up. Once you start weakening the adhesive bond at the gap, working your way around the flange, you'll notice it starting to gradually separate, until the motor assembly can be completely pulled away by hand, holding onto it by the outer flange and motor / magnet assy edge. I dont recommend prying between the flange and inner edge, as this clamps the entire dome and motor together - you can damage the inner thin plastic ring which holds down and terminates the dome surround to the motor. Also watch the 3 clips on the side of the dome assy, which can break fairly easily when prying away the flange, especially at first as you start bending away the flange for the first time.
This whole process only took a few minutes to accomplish, but removing the left over adhesive was the hardest part, not having identified a suitable solvent to simply loosen and remove the glue. I ended up using some naphta (lighter fluid or BBQ charcoal starting fuel) to scrape away the bulk of the factory contact adhesive. This took about 30 minutes to do. DO NOT USE aromatic HC based solvents, as it will attack the plastic, which appears to be made from ABS.
If you're careful not to damage the flange upon removal, it can be reattached later on with some 3M weather strip adhesive or other contact cement.
Sorry for the lousy pictures.
- more D7608 info here to follow soon !
Attachments

Thanks @profiguy
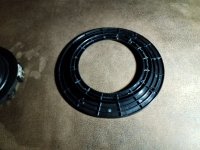
Just to add, for some users who may want one without the flange, Scan used to sell it as model number D7608/9200-00
Also the flange was available as a spare part, at the usual places that sell would Scan-Speak bucking magnets, flow resistors, replacement rubber/foam surrounds, foam front for D2010 tweeters etc.
Item is usually called "Scan front plate D7608/920010"
It's still largely available in EuropeScan used to sell it as model number D7608/9200-00
Hi Profiguy,
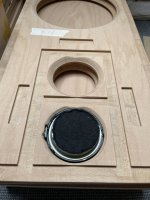
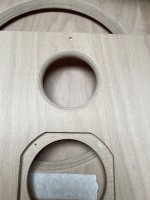
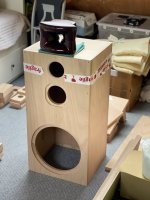
I am getting close to building a beastly sealed DIY 4 way; horns 3D printed and finished, they look quite nice in candy black cherry (preliminary tests sound great), 25mm Beech ply wood cut, remaining bits and other used drivers on their way, some images attached.
Have you tried custom waveguides/horns for the D7608? I have made a chamfer to radius 9*, 14mm depth. It is not the same as the original waveguide, so I am second guessing changing the angle or purchasing the original waveguides to use, any recommendations on waveguiding the D7608l, is there improvements over the stock WG?
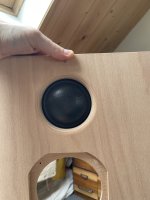
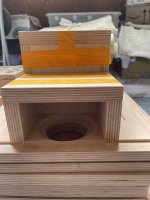
Iv been following keenly your D7608 exploits and tweaks after purchasing a used pair for the heavenly price of €70, attached is an image of the rear chamber, 1.2 ltrs, its also made of 25mm ply, the felt will be removed from the rear of the D7608, acoustic foam immediately behind the D7608, followed by a layer of loose Merino wool, then a layer of slightly denser merino wool. Outside of rear chamber side will have a layer of acoustic bitumen damping, with wool sheet on top and sides with only wool sheet damping. Do you have any recommendations on the chamber setup?
Jules
I am getting close to building a beastly sealed DIY 4 way; horns 3D printed and finished, they look quite nice in candy black cherry (preliminary tests sound great), 25mm Beech ply wood cut, remaining bits and other used drivers on their way, some images attached.
Have you tried custom waveguides/horns for the D7608? I have made a chamfer to radius 9*, 14mm depth. It is not the same as the original waveguide, so I am second guessing changing the angle or purchasing the original waveguides to use, any recommendations on waveguiding the D7608l, is there improvements over the stock WG?
Iv been following keenly your D7608 exploits and tweaks after purchasing a used pair for the heavenly price of €70, attached is an image of the rear chamber, 1.2 ltrs, its also made of 25mm ply, the felt will be removed from the rear of the D7608, acoustic foam immediately behind the D7608, followed by a layer of loose Merino wool, then a layer of slightly denser merino wool. Outside of rear chamber side will have a layer of acoustic bitumen damping, with wool sheet on top and sides with only wool sheet damping. Do you have any recommendations on the chamber setup?
Jules
Attachments
Last edited:
Nice looking build! I recommend removing the OE felt if you have a lighter density F15 type wool felt to replace it with. The mid needs some air flow restriction to reduce the secondary 1k peak as much as possible. Use progressive density wool inside the chamber, getting denser as you get to the back end and sides.
The factory WG only affects the higher frequencies off axis and reduces effects of edge diffraction. It does very little in terms of changing FR. Your added WG by means of chamfering the baffle opening may subtly change off axis FR depending on its depth, but you'd have to measure it to be sure. I wouldn't worry too much about it, but consider the acoustic center of the HF driver. Rear chamber size is ok, but you may need to adjust volume a bit to optimize the acoustic HP rolloff slope along with the total Qtc, which can affect mechanical power handling.
The factory WG only affects the higher frequencies off axis and reduces effects of edge diffraction. It does very little in terms of changing FR. Your added WG by means of chamfering the baffle opening may subtly change off axis FR depending on its depth, but you'd have to measure it to be sure. I wouldn't worry too much about it, but consider the acoustic center of the HF driver. Rear chamber size is ok, but you may need to adjust volume a bit to optimize the acoustic HP rolloff slope along with the total Qtc, which can affect mechanical power handling.
The C2C spacing is not ideal, im going to have a play and see if it will work without chapping a notch out the horn body and mounting it closer to the D7608, that would be a shame though considering the filling, painting and clear coating that went into the horns. C'est la speaker building : )Nice looking build! I recommend removing the OE felt if you have a lighter density F15 type wool felt to replace it with. The mid needs some air flow restriction to reduce the secondary 1k peak as much as possible. Use progressive density wool inside the chamber, getting denser as you get to the back end and sides.
The factory WG only affects the higher frequencies off axis and reduces effects of edge diffraction. It does very little in terms of changing FR. Your added WG by means of chamfering the baffle opening may subtly change off axis FR depending on its depth, but you'd have to measure it to be sure. I wouldn't worry too much about it, but consider the acoustic center of the HF driver. Rear chamber size is ok, but you may need to adjust volume a bit to optimize the acoustic HP rolloff slope along with the total Qtc, which can affect mechanical power handling.
Would you recommend 400 gm2 wool sheet instead of F-15 felt? Not totally sure what F-15 means, but it is a nifty jet.
I will keep you updated on the wood waveguide, some ideas are knocking around.
Your latest project sounds pretty incredible, is it for home listening or more commercial settings? Please post audio pornography pics of the progress!
any link to this build I've loads of questions ?Hi Profiguy,
I am getting close to building a beastly sealed DIY 4 way; horns 3D printed and finished, they look quite nice in candy black cherry (preliminary tests sound great), 25mm Beech ply wood cut, remaining bits and other used drivers on their way, some images attached.
Have you tried custom waveguides/horns for the D7608? I have made a chamfer to radius 9*, 14mm depth. It is not the same as the original waveguide, so I am second guessing changing the angle or purchasing the original waveguides to use, any recommendations on waveguiding the D7608l, is there improvements over the stock WG?
Iv been following keenly your D7608 exploits and tweaks after purchasing a used pair for the heavenly price of €70, attached is an image of the rear chamber, 1.2 ltrs, its also made of 25mm ply, the felt will be removed from the rear of the D7608, acoustic foam immediately behind the D7608, followed by a layer of loose Merino wool, then a layer of slightly denser merino wool. Outside of rear chamber side will have a layer of acoustic bitumen damping, with wool sheet on top and sides with only wool sheet damping. Do you have any recommendations on the chamber setup?
Jules
@Shertzy @jccart The build I'm planning is being sort of kicked around in my head to address all the baffle layout and driver spacing concerns. Its going to require some compromises, but I've been running some old school calculations to verify a decent power response with 4 large mid domes arranged in a circle around the tweeter. The mid flanges will be removed and the domes mounted in a separate baffle to make get CTC closer and assembly / wiring access easier. Top and bottom mids will run from 600 to 2500 hz with the outer domes shaded from 600 hz tapering 1st order to 2500 hz, then 3rd order LP from there with the other two. The plan may still be tweaked a bit depending on measurements and sims.
Attachments
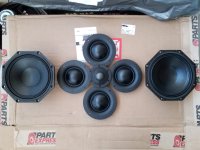
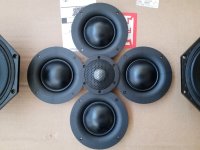
I've been planning this build for a few years now. I finally bought the additional mids I needed after using the last 2 pairs on other customer's 3 way builds. Back chambers will be 3d printed with a meta material damped and tapered TL section to house each dome. I just need to find someone with enough CAD design chops to draw it up. Sadly I'm not good at Autocad or Fusion360.
Circular arrays of mid domes aren't common for obvious reasons having to do with unnecessary complexity and challenges - sure, you could achieve similar goals with fewer cone drivers, but the D7608 has this specific beauty in resolution and detail most cone drivers don't have. I've done some research many years ago implementing the idea of anular arrays. There are some challenges to overcome with lobing and combing, but if you get it right, the rewards are big.
Four of these mids have the surface area of an 8" driver. The calculated sensitivity is around 96 - 97 dB / 2.83V and can approach 120 dB peaks with little diaphragm excursion. This allows for a 600 hz HP with second order slope.
The two 8NDL51s will HP at either 100 hz running in 4 way configuration using dual 12"" LF or all the way down without extra LF help.
The outer two domes running shaded with tapered upper mid response will be angled outwards with the tweeter sitting on a narrow front baffle in between. This will compensate for less baffle area and improve power response at the low to mid transition point.
I was originally going to use 6 mids instead of 4, but at $120 each, the cost was getting out of hand. I've already got $1k into the mids and all the drivers add up to $3600, excluding the cost of crossovers and enclosures. The Speaker Power plate amps are another $1200, so the finished product will end up at around $5500 without any outside labor. The wife is very tolerant of my hobby, but she often doesn't know how much of my work projects overlap into those of hobby. I used to spend most of my money on car projects, but my health is now prohibiting any car work, so its just audio now.
This is going to be sweet, it's practically end game mids! Keeping an eye on this one, please keep us updated with graphic material.@Shertzy @jccart The build I'm planning is being sort of kicked around in my head to address all the baffle layout and driver spacing concerns. Its going to require some compromises, but I've been running some old school calculations to verify a decent power response with 4 large mid domes arranged in a circle around the tweeter. The mid flanges will be removed and the domes mounted in a separate baffle to make get CTC closer and assembly / wiring access easier. Top and bottom mids will run from 600 to 2500 hz with the outer domes shaded from 600 hz tapering 1st order to 2500 hz, then 3rd order LP from there with the other two. The plan may still be tweaked a bit depending on measurements and sims.
@jccart No link or thread for this build, could do if others would be interested, anyhow, you can always send me a message : )
Jules
Make a measurement how strong the midranges influence the frequency response of the tweeter! Just make a few blind plates (3D print etc).@Shertzy @jccart The build I'm planning is being sort of kicked around in my head to address all the baffle layout and driver spacing concerns. Its going to require some compromises, but I've been running some old school calculations to verify a decent power response with 4 large mid domes arranged in a circle around the tweeter. The mid flanges will be removed and the domes mounted in a separate baffle to make get CTC closer and assembly / wiring access easier. Top and bottom mids will run from 600 to 2500 hz with the outer domes shaded from 600 hz tapering 1st order to 2500 hz, then 3rd order LP from there with the other two. The plan may still be tweaked a bit depending on measurements and sims.
I was surprised how strong the influence of only 2 M74 was ...
I don't get your concept. You have everything very wide radiating and then cross over to a horn?Hi Profiguy,
I am getting close to building a beastly sealed DIY 4 way; horns 3D printed and finished, they look quite nice in candy black cherry (preliminary tests sound great), 25mm Beech ply wood cut, remaining bits and other used drivers on their way, some images attached.
Have you tried custom waveguides/horns for the D7608? I have made a chamfer to radius 9*, 14mm depth. It is not the same as the original waveguide, so I am second guessing changing the angle or purchasing the original waveguides to use, any recommendations on waveguiding the D7608l, is there improvements over the stock WG?
I once tried something similar for PA but less extreme, 6" midrange to small B&C horn. While the sound was pretty good behaviour in the room was pretty bad ... discard that idea and prototype.
@IamJF I realized that with the last 3 way I built with the D7608 and TW034. I did a test baffle with countersunk drivers and a chamfered baffle. I then decided to move the mid about 20mm closer to the tweeter and it created a weird dip and peak which was hard to tame. It didn't model that way at all. There must be more off axis energy radiated from the tweeter than one would think.
- Home
- Loudspeakers
- Multi-Way
- Scanspeak D7608-9200 mid dome disassembly tips and other info