Hi Rabbitz,
Nice portrait you got there")
Did I understand you right!? You flush mount the tweeter, and let the mid/woofer physically overlap, to get the units as close as possible!?
Doesn't the edge of the mid (partly?) spoil the effect of flush mounting the tweeter?
...or isn't the flush mount (in terms of less reflections/difractions) of the tweeter neccessary in your oppinion?
Nice portrait you got there
Did I understand you right!?
You flush mount the tweeter, and let the mid/woofer physically overlap, to get the units as close as possible!?Doesn't the edge of the mid (partly?) spoil the effect of flush mounting the tweeter?
...or isn't the flush mount (in terms of less reflections/difractions) of the tweeter neccessary in your oppinion?
Hi Jennice
Like the self portrait hey.
There those that state that diffractions are insignificant as they get swamped in a room anyway but IMO, that's no reason not to try and get rid of them.
It's all a matter of compromise, as most of speaker building is, where the builder's priorities are, their own personal quirks, the application. I tend to place more importance on getting the tweeter to mid/woofer centre distance to suit the wavelength of the crossover than the diffractions. If the crossover is low enough, I will make all efforts to meet this requirement as I do believe it pays off with better imaging. A few manufacturers such as Dynaudio, Kef do the same thing by overlapping drivers so I'm not totally nuts. I still like to have a tweeter rebated and even if part of it is spoiled by an overlapping driver but not all is lost as every little bit helps.
Even if the mid/woofer is rebated, there is still a step when you hit the surround and other parts of the basket. B&W with their tapered tube thingy tweeters sit on top of the cabinet so diffractions bump into that right away. A coaxial driver's tweeter doesn't have a smooth run to the outside. I don't know, but I'd guess the diffraction are more of a nuisance in the horizontal than the vertical plane.
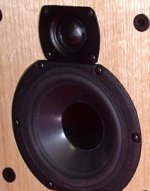
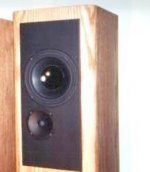
That's one reason I liked the HDS drivers with the side cuts or as I use them the top and bottom cuts. It allows me to get the drivers closer together. Below is an extreme example where I've taken advantage of a Vifa D26NC tweeter to get the drivers even closer together to suit a higher crossover.
Like the self portrait hey.
There those that state that diffractions are insignificant as they get swamped in a room anyway but IMO, that's no reason not to try and get rid of them.
It's all a matter of compromise, as most of speaker building is, where the builder's priorities are, their own personal quirks, the application. I tend to place more importance on getting the tweeter to mid/woofer centre distance to suit the wavelength of the crossover than the diffractions. If the crossover is low enough, I will make all efforts to meet this requirement as I do believe it pays off with better imaging. A few manufacturers such as Dynaudio, Kef do the same thing by overlapping drivers so I'm not totally nuts. I still like to have a tweeter rebated and even if part of it is spoiled by an overlapping driver but not all is lost as every little bit helps.
Even if the mid/woofer is rebated, there is still a step when you hit the surround and other parts of the basket. B&W with their tapered tube thingy tweeters sit on top of the cabinet so diffractions bump into that right away. A coaxial driver's tweeter doesn't have a smooth run to the outside. I don't know, but I'd guess the diffraction are more of a nuisance in the horizontal than the vertical plane.
That's one reason I liked the HDS drivers with the side cuts or as I use them the top and bottom cuts. It allows me to get the drivers closer together. Below is an extreme example where I've taken advantage of a Vifa D26NC tweeter to get the drivers even closer together to suit a higher crossover.
Attachments
Interesting... and nice woodwork, BTW.
Isn't it a (theoretical) aim to get the tweeter/woofer center-center spacing less than a certain fraction of the cross-over frequency? I met this before... but can't remember if it's 1/2 or 1/4 wavelength, and if it's independent of the order of the filter.
Can you enlighten me?
I have considered "as-close-as-possible" spacing also, but have been concerned about the stiffness of the baffle if so much material is removed. I will be using 19mm MDF for my project.
Jennice
A quote from the LDC.
"The wider the separation the worse the lobing. The only solution is to minimize driver separation and make certain no low-pass / high-pass driver combination is separated by a distance greater than one wavelength at the crossover frequency".
So basically you try and have the driver centres less than the wavelength m<345/Hz (xo freq).
That also combines with the horizontal driver offset to give a tilt up or down (ZDR), but that's another story which has been posted before and has the greatest effect on 1st order crossovers.
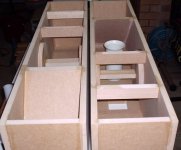
Don't worry about the baffle as all you need is a brace behind it like this.
"The wider the separation the worse the lobing. The only solution is to minimize driver separation and make certain no low-pass / high-pass driver combination is separated by a distance greater than one wavelength at the crossover frequency".
So basically you try and have the driver centres less than the wavelength m<345/Hz (xo freq).
That also combines with the horizontal driver offset to give a tilt up or down (ZDR), but that's another story which has been posted before and has the greatest effect on 1st order crossovers.
Don't worry about the baffle as all you need is a brace behind it like this.
Attachments
*doing the happy-dance for office chairs*
Thanks for the advise
I was once told by a friend that 2khz would be one of the good compromises (which also happens to suit my drivers ).
I was warned about going much higher (although quite a few do that), because it would place the XO-frequency in the region of the important (!?) over-tones.
I don't know what to think... except that there is a lot of woodoo in audio, and that it's a matter choosing, which compromise you feel best with.
I think I will stick with my drivers (HDS134 PPB and Scanspeak D2905/970k, supplemented with dual SLS-213 below 200hz).
I know 3-ways aren't the easiest, but I feel confident, as I have a proff. to assist with the XO-design. He even suggested a 4th order (that would be massive (and costly! )). Hmm... We'll see. First I gotta' build and then measure the freq.response for each driver in the enclosure.
Jennice
Thanks for the advise
I was once told by a friend that 2khz would be one of the good compromises (which also happens to suit my drivers
).I was warned about going much higher (although quite a few do that), because it would place the XO-frequency in the region of the important (!?) over-tones.
I don't know what to think... except that there is a lot of woodoo in audio, and that it's a matter choosing, which compromise you feel best with.
I think I will stick with my drivers (HDS134 PPB and Scanspeak D2905/970k, supplemented with dual SLS-213 below 200hz).
I know 3-ways aren't the easiest, but I feel confident, as I have a proff. to assist with the XO-design. He even suggested a 4th order (that would be massive (and costly!
)). Hmm... We'll see. First I gotta' build and then measure the freq.response for each driver in the enclosure.Jennice
Bullseye!Jennice said:I don't know what to think... except that there is a lot of woodoo in audio, and that it's a matter choosing, which compromise you feel best with.
Have fun with them Jennice and it's not until you start the building that everything starts to fall into place.
My mains were around 2 weeks to design and build and then a further 6 months to test, modify and tweak... there's no rush as it's the fun and end result that's important.
My mains were around 2 weeks to design and build and then a further 6 months to test, modify and tweak... there's no rush as it's the fun and end result that's important.
Jennice said:I think I will stick with my drivers (HDS134 PPB and Scanspeak D2905/970k, supplemented with dual SLS-213 below 200hz).
I know 3-ways aren't the easiest
Woofers XOed that low should really be active, which changes the 3-way XO system, to a 2-way with active woofers.
dave
Thanks, Rabbitz!
The "rough" woodwork is done. There are a few pieces that need 1mm trimmed, but that shouldn't take long. Then the actual construction work should start this weekend.
Oh, also bought a new jigsaw (bosch PST 750PE) - really nice thing. I will need to test it on a few more scrap pieces before it gets important, but so far it behaves excellent.
As for the routing / recessing the units, I was suggested to put 3mm felt (the fabric) on the baffle (outside), in stead of routing recesses. Does anyone have excperiences with this?
Jennice
Hey Jennice,
What are you using the jig saw for? I have a Bosch 1587 and it is stellar, but I can't think of a way to use it for speaker building. I have a few rip fences, but I wouldn't trust a jig for cabinet plank straight cuts. Maybe the cutout hole, but if you have a router, that would be best with a jig.
Rgds,
Paul
Jennice said:Thanks, Rabbitz!
The "rough" woodwork is done. There are a few pieces that need 1mm trimmed, but that shouldn't take long. Then the actual construction work should start this weekend.
Oh, also bought a new jigsaw (bosch PST 750PE) - really nice thing. I will need to test it on a few more scrap pieces before it gets important, but so far it behaves excellent.
As for the routing / recessing the units, I was suggested to put 3mm felt (the fabric) on the baffle (outside), in stead of routing recesses. Does anyone have excperiences with this?
Jennice
HI I wish to dispell a little confusion........router reference books would be useful....any available from your local material supplier....take a look... magazines like ShopSmith, WoodWorker etc. are a good source of info as well....
To rout speaker holes:
if you want to recess the speaker rim then you must make the decision as to what depth brings the speaker to the surface.
then if you wish to recess the rim, you set the router to the required depth. eg. I have an 8" diameter pyramid driver with a rim thickness of .25" .... I set a 1/2"(cutter diameter) router bit to a cutting depth of .25"(1/4") then using a hole cutting jig(you should be able to fabricate one out of 1/4" material or buy one) set to a diameter of 8" cut the dado for the rim, first pass
ok now... cut another pass to give the width of the rim plus overage, in the direction of the centre..... speaker has rim width of .55" .... mmmm 2 passes to a cut dado of say .75" wide ..
Its now time to cut the inside diameter(inside rim) that would allow the speaker to sit flush.......this puts the speaker at say 7" .... THIS PART OF THE DADO WILL BE CUT TO DEPTH BUT NOT THROUGH .... LEAVE A 32ND OR A 64TH OF AN INCH TO MAINTAIN THE ROUTER SUPPORT.....remove the router/circle jig and use a sharp knife to clear the remaining hole waste...... or if you have access to a CNC router you don't have to worry about any of this...
good luck in cutting your holes
xyrium said:Hey Jennice,
What are you using the jig saw for? I have a Bosch 1587 and it is stellar, but I can't think of a way to use it for speaker building. I have a few rip fences, but I wouldn't trust a jig for cabinet plank straight cuts. Maybe the cutout hole, but if you have a router, that would be best with a jig.
Rgds,
Paul
Hi Xyrium,
Either my router or the bits aren't good enough, but I don't have the temperment to wait while the bits grind slowly through 19 mm MDF.
I draw a circle, and cut along the line with the jigsaw. The holes get fine enough for me, and the small tolerances are hidden by the driver anyway.
I used scrap pieces of MDF to test on before the real thing, but I find that there's pretty good control over the cut with the jigsaw.
I got a thin wood-blade with rougher teeth, but which can make small radius cuts, and I noticed that there were no splinters at all. I also like the result of using a metal-workig blade (finer "teeth"), which almost acts like a powerful grinding file.
Btw. circle-making accessories do exist for jigsaws, although I found I didn't need it.
In case you're wondering: The drivers will not be recessed. I decided on that after consideration of all the inputs from different people, but I'll use felt on (maybe just part of) the baffle front.
Jennice
If you are not going to recess the drivers in the baffle, have a look at this clever solution that Bob Brines uses on the Peerless pipes.... very smart.
http://www.geocities.com/rbrines1/Pages/PP_Construction.html
http://www.geocities.com/rbrines1/Pages/PP_Construction.html
Hi Rabbitz,
Thanks for the link. My english isn't native, so I need help on "translation"/explanation on two issues:
What's truck bed lining?
The enclosures look nice, but I can't understand what he's done around the drivers (anmd the pictures don't let me get the clue, either).
Could you be so kind and explain, please?
Jennice
Hi again Jennice
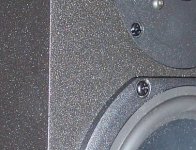
What Bob has done is installed the drivers on the baffle without a rebate but has made a panel with the thickness to suit the driver's faceplate, cut holes for the drivers and installed it so it looks like the speakers are rebated. Could be any material, plywood, contrasting timber veneer, painted MDF etc.
I just think it's very clever and looks effective.
Here's a brightened pic and Bob might be able to post a better one.
Attachments
- Status
- This old topic is closed. If you want to reopen this topic, contact a moderator using the "Report Post" button.
- Home
- Loudspeakers
- Multi-Way
- Routing the recess?