Pass DIY Addict
Joined 2000
Paid Member
Hi Vince,
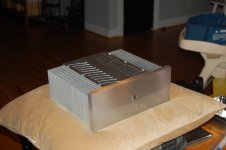
Its a 1" thick multi-layer ply with a real wood veneer. The heatsinks are bolted directly to the side panels - no additional isolation or spacers were used. There are multiple holes drilled in the bottom panel and the top panel is hinged for easy open. The hinges and and felt pads where the top panel rests provide some "elevation" to the top panel so it does not close tightly on the four sides. Thus, there is an air gap of about 1/4" all of the way around the top to let heat from the transformer/rectifiers to escape. Here is a better picture of the sinks.
The wood chassis does get warm, but typically stays close to body temperature - 100F. From time to time, I've thought about adding a copper/aluminum plate to the underside of the top panel just above my DIY heatsinks for the rectifiers, but I've never gotten around to it. The wood is very slightly more dried directly above the rectifiers - you can see several small cracks in the surface if you look closely, but it doesn't cause any concern for me.
Hope this helps!
Eric
Its a 1" thick multi-layer ply with a real wood veneer. The heatsinks are bolted directly to the side panels - no additional isolation or spacers were used. There are multiple holes drilled in the bottom panel and the top panel is hinged for easy open. The hinges and and felt pads where the top panel rests provide some "elevation" to the top panel so it does not close tightly on the four sides. Thus, there is an air gap of about 1/4" all of the way around the top to let heat from the transformer/rectifiers to escape. Here is a better picture of the sinks.
An externally hosted image should be here but it was not working when we last tested it.
The wood chassis does get warm, but typically stays close to body temperature - 100F. From time to time, I've thought about adding a copper/aluminum plate to the underside of the top panel just above my DIY heatsinks for the rectifiers, but I've never gotten around to it. The wood is very slightly more dried directly above the rectifiers - you can see several small cracks in the surface if you look closely, but it doesn't cause any concern for me.
Hope this helps!
Eric
My dual output F5. My first attempt at amplifier assembly. Thanks to the information on this forum, it worked first shot and sounds better than I deserve. Heatsink at 50 degrees with case open and drain of mosfet at 63 degrees (fluke thermal probe).
F5 - a set on Flickr
F5 - a set on Flickr
Claro 09. It was a special version made for me with taller platter and a bespoke mounting for the SME V. I use a Nottingham Analogue Wave Mechanic with it and it sounds brilliant. With the Koetsu Rosewood it sounds better than the Xmos/BuffaloIII/Legato 3 digital front end in my system") .
.
.Beautiful work Cornelius! Congrats.My dual output F5. My first attempt at amplifier assembly...http://flic.kr/s/aHsjz2yZoW
If I may ask - what are those rectifier bridges that you are using, and the slow-start circuit?
Thank you. The rectifiers are IXYS Fred 68A 600V bridges
http://www.partsconnexion.com/PDF/l363.pdf
and the slow start is the SSM module from Avondale Audio
soft start electronics for audiophile hifi audio amplifiers : avondale audio
http://www.partsconnexion.com/PDF/l363.pdf
and the slow start is the SSM module from Avondale Audio
soft start electronics for audiophile hifi audio amplifiers : avondale audio
Unfortunately not:-(. The plan was to populate one pair of outputs initially and then add the second pair later, but was to impatient. My speakers (various PMC's) are 4-8 ohms, so I probably need the higher current to stay in class A. The F5 drives my speakers better than my Krell KAV400xi.
Pass DIY Addict
Joined 2000
Paid Member
10.080" profile from heatsinks USA?
how did you do the top vents?
Yup. 4" tall. Amp is biased @1A . Perfect for high efficiency FR. Uses the AJ where it is strongest. The top was done with small 7 1/2" chop saw on 22.5° angle. Turned out real nice, i think. Auto enamel as top coat for a little shine. Looking for something tougher. Any suggestions.
- Home
- Amplifiers
- Pass Labs
- Pictures of your diy Pass amplifier