Heres a couple of cabs I painted for a SNA member .He wanted a satin finished that could be cleaned .So i mixed 10% flatten base into the paint & the last couple of coats I thined it down a little bit more .
An externally hosted image should be here but it was not working when we last tested it.
Don't forget painting satins and matts its very hard getting dust out of the paint without
painting the surface again .
Cheers
Holy crap you'd need ear muffs to listen to that lot
")
What type of paint did you use on the topcoat?
They were painted in a Wurth stone guard first for texture .
Cheers
Wouldn't that make the topcoat easy to damage?
Wouldn't that make the topcoat easy to damage?
Yes and No . Acrylic is easy to fix if damaged ,if you want something stronger go with a 2K system ,but harder to spot repair .Anyway there inside what are you going to be doing ,playing footy inside
.The Wurth had a nice surface finish but just alittle to much on the matt side .So if you went to clean it ,it would sheen up . Some stone guards and a satin to gloss finish .
I used acrylic with flatten base to give it an even cleanable finish .
If cost isn't an issue I would use a base coat clear system and use a flat
2K clear finish .
David you could use an acrylic charcol grey metalic then clear it with 10% of flatten base in the clear . But keep the dust down .
And that system flows out the window small speakers in a small room debate
Cheers
Last edited:
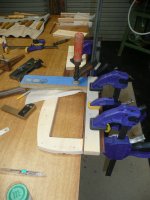
What a guy could try is reversing the feed of the work in those areas. Get a good hold on the work as the bit will want to climb out of the cut. Last, light clean-up pass should be the regular feed direction for the whole piece. Try to cut your end grain sections first. The pass on the long edges will clean up minor break outs this way. ... and you're moving too slow. Scorching will result if you dwell in spots. Keep the piece moving or get it out of the cutter. Takes practice. Use some candle wax on the bed if that is adding additional drag to the piece you're machining. The work piece should just glide along without any effort.I have cut Tasmanian Blackwood to about 5mm thick & laminated it on the front face. Unfortunately when I route the curve on the edges the grain gets raised in the sections that the router bit is running against the grain. There is no way of avoiding going against the grain. I am using a brand new bit but still the grain gets raised & dug out.
I will try modifying an old bit tomorrow to see if I can improve things. As yet I have not cut the full curve. I was hoping to avoid using too much sandpaper as it will take the crispness off the curve, but I don't think I will have much chose.
The plywood edges will be black at the end of the day.
What I REALLY hate is having my fingers so close to the router bit when I'm curving the head section, scary stuff
Don't fear the bit ... respect it.
Last edited:
What a guy could try is reversing the feed of the work in those areas. Get a good hold on the work as the bit will want to climb out of the cut. Last, light clean-up pass should be the regular feed direction for the whole piece. Try to cut your end grain sections first. The pass on the long edges will clean up minor break outs this way. ... and you're moving too slow. Scorching will result if you dwell in spots. Keep the piece moving or get it out of the cutter. Takes practice. Use some candle wax on the bed if that is adding additional drag to the piece you're machining. The work piece should just glide along without any effort.
Don't fear the bit ... respect it.
Puppet
All very good advice especially the "Don't fear the bit ... respect it" I have tried what you recommended, as I have been doing this sort of thing for a long time. Unfortunately it's the nature of this timber. this morning I am going to try & sharpen a bit with a shallower cutting angle to try & reduce the tearout.
Thanks for the advice, I will try & "respect the bit", it seems the older I get the more nervous I'm getting with this sort of thing, 37 years of doing this sort of thing & only bumps & scratches to show for it, I don,t want to ruin my good record, I like my fingers as they are
56
What was that hammer tone finish you used, I'm having second thoughts. Can I spray it out of a gun? What sort of nozzle do you need?
Evening D
The brand I used was Galmet , I buy it buy the litre .
ITW Home Page
I found the aerosol can finish didn't have as nice a finish .
I would use a 1.8mm to 2.0mm nozzle set up.
Spray it on wet to get a good pattern of hammertone .
Cheers
Mal
Hmm, interesting, thanks
What undercoat did you use for the hammer tone? did you put it over timber?
Hmm, interesting, thanks
What undercoat did you use for the hammer tone? did you put it over timber?
I painted it over alloy & steal plate ,used an etch primer first then a normal acrylic primer .
What are the cabinets made of ply , mdf or solid timber .
Cheers
I painted it over alloy & steal plate ,used an etch primer first then a normal acrylic primer .
What are the cabinets made of ply , mdf or solid timber .
Cheers
MDF, I used it because it already has a smooth finish until plywood, oh and it's cheaper, this hobby's killing me
MDF, I used it because it already has a smooth finish until plywood, oh and it's cheaper, this hobby's killing me
A cost effective 2K high fill primer I used on the pro ply cabs was the
HiChem Iso-Free Primer- Isolator 4:1 .
HiChem, MOTOSPRAY automotive refinishing paints and associated products
The build was very good and it sanded really well ,sprayed on well through a 1.8mm nozzle with 10% reducer added . If your gun is set up with a 2.0mm nozzle you could get away with less reducer or non .
Cheers
Whats the 2K stand for?
Whats the 2K stand for?
2K paint is an epoxy type paint consisting of the base plus a catalyst to start the chemical reaction that the paint needs to cure
CHeers
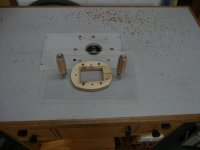
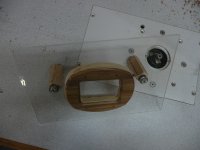
I decided discretion was the better part of valuer, so I made a holder to protect my fingers while rounding the head pieces
Attachments
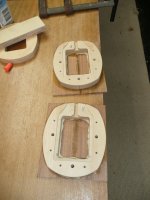
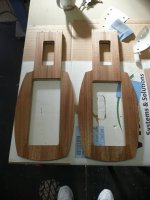
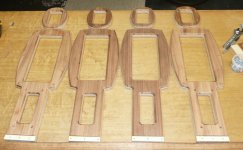
All routed, drilled & ready for sanding.
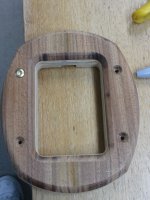
I tried to think of a way to invisibly join the two half's, but in the end had to surrender & go with screws that will show in the back half. I did come up with one method, which was using the rare earth magnets fixed into both halves & dowels for fine alignment but figured all those stray magnetic fields would probably be detrimental to the speaker performance & you would probably never get them apart again
 it's amazing how strong they are.
Finding the right screw & then getting them was a MAJOR song & dance. The importer offered to import some specially for me but in the end even he failed, as the German manufacturer said they didn't have any to send???.
I scoured the web but drew a blank at all points & inquiries. Finally I posted a HELP please here on diyAudio & a very nice German man (thanks Andy) found them at the local hardware & posted them to me.
I tried to think of a way to invisibly join the two half's, but in the end had to surrender & go with screws that will show in the back half. I did come up with one method, which was using the rare earth magnets fixed into both halves & dowels for fine alignment but figured all those stray magnetic fields would probably be detrimental to the speaker performance & you would probably never get them apart again
Finding the right screw & then getting them was a MAJOR song & dance. The importer offered to import some specially for me but in the end even he failed, as the German manufacturer said they didn't have any to send???.
I scoured the web but drew a blank at all points & inquiries. Finally I posted a HELP please here on diyAudio & a very nice German man (thanks Andy) found them at the local hardware & posted them to me.
Attachments

- Status
- This old topic is closed. If you want to reopen this topic, contact a moderator using the "Report Post" button.
- Home
- Loudspeakers
- Multi-Way
- OB Project Design Started, Help Requested.