Modelling in horn response rather than golden ratio.
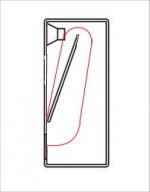
The length of a TL, similar to what you had drawn previously is approximately 327 units. The closed portion is approximately 109 units, whilst the open end is approximately 218 units long. or put another way. This is pretty much a classic TL. So all that is required is to determine the length based on the driver of choice. This essentially the same as a Voigt pipe. Then determine the area needed behind the driver to set the distance from the driver.
Or just use someone else's dimensions for your driver.
Attachments
Charcoal, that is a nice looking speaker, mind sharing the dimensions with me?
Do you have already speaker driver you want to use? If yes, TL should be designed according to its parameters.
If you just want to estimate aprox. dimensions, on that photo you can see driver is 7inches.
if you want really compact and simple, but with perfect sound, just limited with bass capability, just make this: http://www.sonido.hu/adat_pdf/diy-swr145-reflexbox.pdf
with this driver: http://www.sonido.hu/adat_pdf/swr-145a.pdf
Just now this driver is better than showed in PDF, there is textile surround, and highs are extended to 20K because of upgrading flat wire coil.
Istvan Varga from Sonido send them overseas easily and give all needed customer support.
with this driver: http://www.sonido.hu/adat_pdf/swr-145a.pdf
Just now this driver is better than showed in PDF, there is textile surround, and highs are extended to 20K because of upgrading flat wire coil.
Istvan Varga from Sonido send them overseas easily and give all needed customer support.
revisited
WHERE I LEFT OFF:
Well I did go ahead and make version 1 of my compact, bluteooth/wifi/boombox. it worked pretty well but I noticed a few situations where I heard strange static or noise and I didn't know what to change. I got frustrated with specs and after significant amounts of digging, decided to try a more "experimental" approach")
WHAT I HAVE NOW:
So, lets say I am ignorant, and more practical. On a whim, I decided to experiment with a few components and figured by doing this, I could create a better reference point for future comparisons and builds. Here is a list of what I have sitting on my workbench:
-2x HiVi B3Ns
HiVi B3N 3" Aluminum Driver Round Frame | 297-428
-2x Mylar Dome Shielded Tweeter
1/2" Mylar Dome Shielded Tweeter 8 Ohm with 3.3 Ohm Resistor | 279-001
-1x Speaker Crossover 2-Way 8 Ohm 5,000 Hz 150W
Crossover 2-Way 8 Ohm 5,000 Hz 150W | 260-198
-1x Class AB 10W Mono Power Amplifier Kit TDA2030
Class-AB 10W Mono Power Amplifier Kit TDA2030 | 320-336
-1x 2x8W at 4 Ohm TPA3110 Class-D
2x8W @ 4 Ohm TPA3110 Class-D Audio Amplifier Board Only | 320-329
-1x Lepai Class T Amplifier
Amazon.com: LP-2020A+ Lepai Tripath Class-T Hi-Fi Audio Mini Amplifier with Power Supply: Electronics
I also finished making my CNC, which has a cutting area of about 12”x16” (I think it is bigger but I will just say its that to be safe). I plan on using that to help me make as much of this project as possible.
WHAT I WANT FOR VERSION 2:
This build still should be as compact as possible. I believe v1 had a footprint of 12”x 5.5” x 5” and I am looking to go smaller (that would include the driver and all the electronics). I am thinking a mono setup would suffice because I plan on just putting this in a random corner of the room while I walk around and work or cook.
Any recommendations for a starting geometry and how I should try and use/implement the components that I have? (please don’t say “start by throwing them in the trash” )
WHERE I LEFT OFF:
Well I did go ahead and make version 1 of my compact, bluteooth/wifi/boombox. it worked pretty well but I noticed a few situations where I heard strange static or noise and I didn't know what to change. I got frustrated with specs and after significant amounts of digging, decided to try a more "experimental" approach
WHAT I HAVE NOW:
So, lets say I am ignorant, and more practical. On a whim, I decided to experiment with a few components and figured by doing this, I could create a better reference point for future comparisons and builds. Here is a list of what I have sitting on my workbench:
-2x HiVi B3Ns
HiVi B3N 3" Aluminum Driver Round Frame | 297-428
-2x Mylar Dome Shielded Tweeter
1/2" Mylar Dome Shielded Tweeter 8 Ohm with 3.3 Ohm Resistor | 279-001
-1x Speaker Crossover 2-Way 8 Ohm 5,000 Hz 150W
Crossover 2-Way 8 Ohm 5,000 Hz 150W | 260-198
-1x Class AB 10W Mono Power Amplifier Kit TDA2030
Class-AB 10W Mono Power Amplifier Kit TDA2030 | 320-336
-1x 2x8W at 4 Ohm TPA3110 Class-D
2x8W @ 4 Ohm TPA3110 Class-D Audio Amplifier Board Only | 320-329
-1x Lepai Class T Amplifier
Amazon.com: LP-2020A+ Lepai Tripath Class-T Hi-Fi Audio Mini Amplifier with Power Supply: Electronics
I also finished making my CNC, which has a cutting area of about 12”x16” (I think it is bigger but I will just say its that to be safe). I plan on using that to help me make as much of this project as possible.
WHAT I WANT FOR VERSION 2:
This build still should be as compact as possible. I believe v1 had a footprint of 12”x 5.5” x 5” and I am looking to go smaller (that would include the driver and all the electronics). I am thinking a mono setup would suffice because I plan on just putting this in a random corner of the room while I walk around and work or cook.
Any recommendations for a starting geometry and how I should try and use/implement the components that I have? (please don’t say “start by throwing them in the trash”
)- Status
- This old topic is closed. If you want to reopen this topic, contact a moderator using the "Report Post" button.