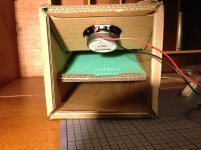
Update on the laser cut cardboard
Quick Update, I collected the laser cut on Friday evening") Here's some initial thoughts / photos
Here's some initial thoughts / photos
What worked well
What didn't work well
What I still need to do
What would I do differently next time
Quick Update, I collected the laser cut on Friday evening
Here's some initial thoughts / photosWhat worked well
- etching actually scored the surface, making deeper cuts easy and precise
- quality of the cut is excellent, no trimming or clean-up was required
- using flaps gave me tolerance needed to compensate for the larger folding radius of thick cardboard / imperfect gluing
- a little PVA goes a really long way, I've only used about 20ml diluted with a little water and spread with a brush
- completely silent build, great diy for people with sleeping neighbours
What didn't work well
- double layer cardboard is really stiff and does not fold easily. It needs to be scored on the outside and creased on the inside to fold more than 45 deg
- the cardboard thickness and <45 flaps left air gaps in the internal and external structure - am thinking to seal these with Silicone Mastic or putty
- laser cut edges are initially ashy, it can transfer to your hands and then onto other surfaces (soft pencil eraser / toothbrush will remove)
What I still need to do
- stuffing
- driving mounting
- sealing air gaps
What would I do differently next time
- single layer cardboard
- cost up using more prints on a smaller material (meaning more pieces to glue) size like A3 which is cheaper
- put the Karlson slot in the middle of the net, giving a tidy looking flush front and opening at the back
Attachments
-
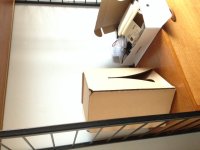 photo.JPG100.1 KB · Views: 522
 -
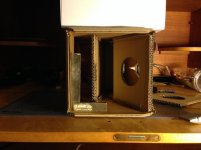 image027.jpg39.4 KB · Views: 199
 -
 image025.jpg47.5 KB · Views: 167
 -
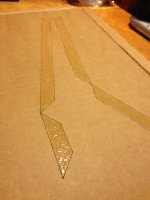 image021.jpg67.2 KB · Views: 169
 -
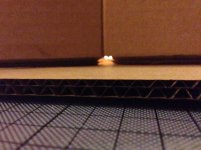 image013.jpg52.6 KB · Views: 211
 -
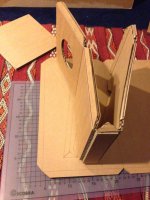 image011.jpg95.2 KB · Views: 515
 -
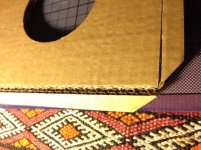 image009.jpg70.1 KB · Views: 518
 -
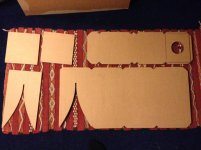 image003.jpg47.2 KB · Views: 528
 -
 image001.jpg58.3 KB · Views: 529
Quick Update, I collected the laser cut on Friday evening
What worked well
- etching actually scored the surface, making deeper cuts easy and precise
- quality of the cut is excellent, no trimming or clean-up was required
- using flaps gave me tolerance needed to compensate for the larger folding radius of thick cardboard / imperfect gluing
- a little PVA goes a really long way, I've only used about 20ml diluted with a little water and spread with a brush
- completely silent build, great diy for people with sleeping neighbours
What didn't work well
- double layer cardboard is really stiff and does not fold easily. It needs to be scored on the outside and creased on the inside to fold more than 45 deg
- the cardboard thickness and <45 flaps left air gaps in the internal and external structure - am thinking to seal these with Silicone Mastic or putty
- laser cut edges are initially ashy, it can transfer to your hands and then onto other surfaces (soft pencil eraser / toothbrush will remove)
What I still need to do
- stuffing
- driving mounting
- sealing air gaps
What would I do differently next time
- single layer cardboard
- cost up using more prints on a smaller material (meaning more pieces to glue) size like A3 which is cheaper
- put the Karlson slot in the middle of the net, giving a tidy looking flush front and opening at the back
Very nice - thanks for sharing. I had same challenges with cardboard. Use a rounded end dowel to make crease in cardboard prior to folding. I used hot melt glue to seal corrugation channels for air tightness. Use hot melt glue for construction as PVA takes too long to dry. That way your fingers are the clamps for 40 seconds. Can laser cutting work on foam core?
X - - regarding the mini-K, although I commented on that a couple of years back, I don't remember seeing the assembly- as you say the front is totally segregated by the misinterpretation of the shelf. The article he's working from is hosted at a radio site. For fun, make a mini Klam front and tape to one of your Hypercube speakers.
Last edited:
thanks freddyi, I have listened to strings a lot, check out the same speakers mr 2 version. you can hear what im talking about. there is too much going on in that recording and it distorts. music content has a lot to do with it. I want to listen to led zeppelin not diana krall. I believe the height adjusted and now foam contributes to vibration changing sound. I guess im old school when it comes to this. xrk971 I am not dissing your efforts. I am positive john karlson would be pleased.
for wood wings, I think "Arauco" might be less apt to ring high Q than Baltic birch. There should be a laminate that works. The original Karlson cabinets often had a "Karlsonite" (Formica type) finish which stiffened and damped the wood pretty effectively. My first "Karlsonette" had a laminate of 1/8" hardboard to 5/8" fir plywood. Transylvania and others who built the little 15" coupler employed 3/8" allthread though the whole cabinet from back panel to wings - that did a good job of damping the Russian birch wings. Wing movement can be a problem which introduces modulation problems. My new cheap solid state amp is 1KW per channel so some bracing is appropriate
Quick Update, I collected the laser cut on Friday evening
What worked well
- etching actually scored the surface, making deeper cuts easy and precise
- quality of the cut is excellent, no trimming or clean-up was required
- using flaps gave me tolerance needed to compensate for the larger folding radius of thick cardboard / imperfect gluing
- a little PVA goes a really long way, I've only used about 20ml diluted with a little water and spread with a brush
- completely silent build, great diy for people with sleeping neighbours
What didn't work well
- double layer cardboard is really stiff and does not fold easily. It needs to be scored on the outside and creased on the inside to fold more than 45 deg
- the cardboard thickness and <45 flaps left air gaps in the internal and external structure - am thinking to seal these with Silicone Mastic or putty
- laser cut edges are initially ashy, it can transfer to your hands and then onto other surfaces (soft pencil eraser / toothbrush will remove)
What I still need to do
- stuffing
- driving mounting
- sealing air gaps
What would I do differently next time
- single layer cardboard
- cost up using more prints on a smaller material (meaning more pieces to glue) size like A3 which is cheaper
- put the Karlson slot in the middle of the net, giving a tidy looking flush front and opening at the back
Despite the teething issues, that looks great! Have you managed to get a driver stuffed into it yet for a listen?
Single thickness cardboard seems appropriate for this. The internal dividers and sides would be stiff enough I think. The front and back could probably make use of the doubling, but as it's still a cardboard speaker in the end, I'd err on the side of easy.
PVA is appropriate for this IMHO. I always manage to burn myself when using hot melt glue.
FWIW Weldbond grabs very quickly for a PVA.don't forget cellphones - "A No Cost Acoustic Cabinet For Transistor Portables"
original article Jan. 1963 http://www.americanradiohistory.com...lustrated/Electronics-Illustrated-1963-01.pdf

original article Jan. 1963 http://www.americanradiohistory.com...lustrated/Electronics-Illustrated-1963-01.pdf
...Can laser cutting work on foam core?
It cuts the surface paper very neatly, but the foam will shrink back from the cut line, so the edge has a u-shaped valley, paper high on the edges and foam low in the middle. I thought about gluing in a dowel to connect two pieces of laser-cut foam, so you could have a variable angle. Haven't gotten around to trying yet.
If using PVA with cardboard, don't use too much - the cardboard gets weak if the glue dampens it too much. Works ok if there is no real pressure on the joint until it dries out.
Freddi, have you ever tried this little one?don't forget cellphones - "A No Cost Acoustic Cabinet For Transistor Portables"
original article Jan. 1963 http://www.americanradiohistory.com...lustrated/Electronics-Illustrated-1963-01.pdf

Ok Here are cad models, check to make sure my dimensions are right. File is readable by all (EASM file).
File is 7 MB i.e. too big for forum. I'm hosting it on google drive for you guys.
https://drive.google.com/file/d/0B7szSmvCsEm4eF95aFJWV1hfejg/view?usp=sharing
If you're sketched out by the exe, that's because it is a self executable assembly file meaning you don't have to install software, the reader is embedded.
For those who have solidworks E-drawings already here is the .easm file. (attached)
Attachments
Ok Here are cad models, check to make sure my dimensions are right. File is readable by all (EASM file).
File is 7 MB i.e. too big for forum. I'm hosting it on google drive for you guys.
https://drive.google.com/file/d/0B7szSmvCsEm4eF95aFJWV1hfejg/view?usp=sharing
If you're sketched out by the exe, that's because it is a self executable assembly file meaning you don't have to install software, the reader is embedded.
For those who have solidworks E-drawings already here is the .easm file. (attached)
Some of us have older versions of SW (2009) and cannot open this file. You may just want to post images or CAD drawings as pdf or png files...
pdf files would be great
The file is a self contained program, getting all the dimensions back to a 2d drawing pdf would basically be regurgitating what the other user posted. Solidworks edrawings reader is free software...
The purpose of a model is so you can measure things and see how they fit together.
The file is a self contained program, getting all the dimensions back to a 2d drawing pdf would basically be regurgitating what the other user posted. Solidworks edrawings reader is free software...
The purpose of a model is so you can measure things and see how they fit together.
I've noticed that measurement is (accidentally) disabled in the e-drawings file, bear with me as the next time I can alter the file such that measurement is enabled will be this weekend. I'm just as frustrated because opening the file in the previous year solidworks doesn't let me annotate at all. I will have to guestimate the angles I put in.
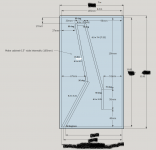
I found a way to measure the angles, so here is a side view with all pertinent pre-cut (meaning before you cut the angle) lengths with the respective angles for each.
6.5 x 6.9 [6.81] means 6.5 wide 6.9 tall finishing to 6.81 tall after angle (note all internal pieces are the same and all dimensions given in decimal inches, because I'm American and well they make more sense in my head, until I get on the CM hype train.
One thing to note, all dimensions given on longer side (For angled pieces)
For the k-wing the curve starts at 3 inches from the full size top piece and has a radius of 15 inches, more details will be included when I can get the full model working.
Attachments
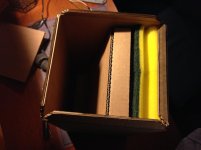
Stuffed, driver in and hooked up to an amp + source Very happy! Thanks guys!
I´ve finally used kitchen cleaning sponges for stuffing, was easier to work with and sounded better to my ears than packaging closed cell foam or craft felt.
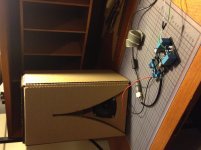
Am driving with a stock YJ Danzz amp powered by a Lenovo 20W switching PSU. I´d like to mount the amp and a pot in the back like Fran
I´ve not connected the pot yet, so am controlling volume via source. Using a laptop / phone and listing to a range of music it sounds open, clear, crisp and very neutral at all volumes that I can comfortably listen to in a 5 x 4m room (still not even close to the max volume). Sound very comparable to B&W DM601 S3 which blows my mind and what perfect is to my ears.
With this setup though, a stock Raspberry Pi B+ is unusable, noise overpowers signal. Might be a low source volume + high amplification issues as this wasn´t the case when testing with an old inherited Tivoli Audio - Model One table radio (also with a 3 in driver)
Next step: pot, amp, and hopefully pi mounting. Who needs you Sonos
Very happy! Thanks guys!I´ve finally used kitchen cleaning sponges for stuffing, was easier to work with and sounded better to my ears than packaging closed cell foam or craft felt.
Am driving with a stock YJ Danzz amp powered by a Lenovo 20W switching PSU. I´d like to mount the amp and a pot in the back like Fran
I´ve not connected the pot yet, so am controlling volume via source. Using a laptop / phone and listing to a range of music it sounds open, clear, crisp and very neutral at all volumes that I can comfortably listen to in a 5 x 4m room (still not even close to the max volume). Sound very comparable to B&W DM601 S3 which blows my mind and what perfect is to my ears.
With this setup though, a stock Raspberry Pi B+ is unusable, noise overpowers signal. Might be a low source volume + high amplification issues as this wasn´t the case when testing with an old inherited Tivoli Audio - Model One table radio (also with a 3 in driver)
Next step: pot, amp, and hopefully pi mounting. Who needs you Sonos
Despite the teething issues, that looks great! Have you managed to get a driver stuffed into it yet for a listen?
Single thickness cardboard seems appropriate for this. The internal dividers and sides would be stiff enough I think. The front and back could probably make use of the doubling, but as it's still a cardboard speaker in the end, I'd err on the side of easy.
PVA is appropriate for this IMHO. I always manage to burn myself when using hot melt glue.
Attachments

Guess this explains why there aren´t any composite materials available from the commercial makers. I started out trying to find Foam Core, but settled with cardboard. They do offer felt and mountboard, a combination of which could get you close, but I guess then you loose both the rapid prototyping (FC) and hassle free (lasercut) qualities..
Thanks for warning about leaving the joins to dry before stressing!
Thanks for warning about leaving the joins to dry before stressing!
It cuts the surface paper very neatly, but the foam will shrink back from the cut line, so the edge has a u-shaped valley, paper high on the edges and foam low in the middle. I thought about gluing in a dowel to connect two pieces of laser-cut foam, so you could have a variable angle. Haven't gotten around to trying yet.
If using PVA with cardboard, don't use too much - the cardboard gets weak if the glue dampens it too much. Works ok if there is no real pressure on the joint until it dries out.
Thanks, it´s a great learning experience!
Bit of a mix, laser cut and some additional work to compensate for me not knowing the material.
It was laser cut at Razorlab (a Ponoko affiliate here in London) for £19.06 incl. materials. Not crazy cheap, but I think with a bit of tweaking it´d be possible to get everything on a single piece probably halving the cost.
(The speed / precision of this was really worth the cost, if using hot glue and single layer cardboard you could prob have an assembled speaker in <15mins)
The double layer cardboard was much much stiffer than I´d anticipated and to fold I needed to score the outside of the fold, so even though the sides look like separate pieces here, it´s from my scoring.
On the other side of Christmas, I´d love to try both a more durable material like plywood or acrylic and a single layer cardboard.. but I can see this is a dangerous thing to get into
What do you do with your old prototypes?
Horatio,
Very nice work! This is awesome, and to compare to a B&W?
You got to love cardboard now. Did you cut the cardboard by hand or have one those stores laser cut for you?

- Home
- Loudspeakers
- Full Range
- Mini Karlsonator (0.53X) with Dual TC9FDs