I drew an EL70 ML-TL for Jim. http://www.t-linespeakers.org/download/Griffin-offset-bipole-mltl-100909.pdf
dave
Thanks Dave! Looks like halving it is just what I was after. I hope the alignment is similar to the 10.3 I am currently enjoying.
Great looking enclosure! Happy listening.
Jim
Thanks again for sharing this nice design!
Ping - Jim Griffin - further info on your 10.3 / 10P design
Hello Dr. Griffin,
I purchased the Alpair 10.3M speakers and the 3/4 inch Birch Ply to make a pair of your speakers and have them ready.
Is there a need for internal bracing?
I was considering placing the speakers on the wide dimension and placing some stringers the length of the baffles. I thought an offset from centre 1 inch X 40 inch length of the 3/4 inch material on front and back baffles. Each stringer takes a volume of 30 cubic inches. If I did this should I increase the volume of the cabinet to compensate for each stringer ?
I calculated the enclosure volume as 1800 Cubic inches and 2 of my stringers would take up ~3.5 % of the total volume.
I don't want to compromise your design hence am asking for your direction.
I would also add a few 3/8 inch dowels to tie the front and back baffles together.
Any / all suggestions welcomed.
Thanks
Andrew
Thanks Andrew for your interest in this MLTL design.
My internal bracing philosophy for MLTL designs is to not overdo bracing. We are talking of 0.75" material thickness (your plywood choice is excellent) with 41.5" x 7.5" x 9.0" outside dimensions. So the internal cross sectional area is 6.0" x 7.5". You should not need excess bracing for rigidity.
For similar tall and slim MLTL designs I have found that the high pressure points inside the enclosure are behind the driver and at the top of the box. Thus I would place additional bracing at those locations as my first option.
I use 0.75" or 0.50" square hardwood dowels for braces in designs like this one. Typically I cut pieces of the dowel material so that I have a ring that links front to back and side to side of the box. The first internal brace should be located 1-2" below the driver cutout. This mitigates any excess pressure around the driver and is located near the top of the box as well.
Additional ring braces (2-3 braces in this design) can be spaced below the first brace and should add sufficient stability to the enclosure.
For one MLTL build I added a layer of 0.050" thick Sonic Barrier VE-1 vinyl damping sheet on the inside of all panels. This material has self stick adhesive so it applies easily to the inside of the box. This material adds mass damping so that the structure has more damping.
You can slightly increase the width or depth of the box to account for extra volume of the braces and such but if you are within 3 to 5% of the original design, it is likely not worth the effort to pencil whip the design with revisions.
Let me hear if you have additional questions.
Good listening.
Last edited:
Hello Dr. Griffin,
I have dowels and see where Parts Express sells a 27" X 40" sheet of Sonic Barrier VE-1 which should be perfect with no left over material. The piece of Sonic Barrier from the speaker cutout can be applied to the top of the cabinet and the bottom of the cabinet will be bare.
I will double the cabinet top thickness to 1.5" and will make 2 sets of parallel, perpendicular braces (like a tic-tac-toe game drawing) one as you suggest an inch or so below the speaker and another close to halfway between that brace and the bottom of the cabinet.
A piece of chicken mesh wire will be used below the speaker to keep the damping material in place like I did with your MLTL for the Alpair 6.
I will add a 1/4" to each internal dimension bringing the total internal volume to 1937.5 cubic inches which, less the two braces and Sonic Barrier leaves me ~1782 cubic inches, a 1% volume loss.
I know I do not have 2.5" material for the port but think I have some 3" PVC so will calculate the volume and cut the 3" to size.
Hopefully will start cutting wood this weekend, am traveling to the U.S.A. next week so can order Sonic Barrier and more Acousta-Stuff then from Parts Express.
Many Thanks Dr. Griffin.
Andrew
Andrew, the port tubes that I have used have no or modest flares. I really did not have a ready answer if you have an enlarged flared tube. You may have to experiment with your specific situation and determine if a length adjustment would be needed to adapt your tubes to my design.
You may be able to check out how other designs that have used flared tubes. Determine how the designer changed the tube length to achieve proper performance in their speakers. For the Precision Port flared tube product the on-line Precision Sound Products calculator might be useful if you have their item. You can Google 'flared port tube calculator' for additional assistance.
Jim
Last edited:
Thanks Dr. Griffin.
I will forego the flared tube. Wood is cut and assembly has begun. I doubled the top piece (now 1-1/2") and laminated the front baffles with an additional 1/2" piece of plywood so the baffles are 1-1/4". I wanted some extra thickness as I felt with the ~ 12mm thickness of the speaker flange I would only have ~ 6mm thickness left after the rebate. Should rout for the speaker mounting later today.
When I get some port material I will then do that part - probably next weekend.
I am going to try to get a piece of Aluminium tube for the port.
Andrew
I use 0.75" or 0.50" square hardwood dowels for braces in designs like this one. Typically I cut pieces of the dowel material so that I have a ring that links front to back and side to side of the box.
Jim,
Sorry if this is a newbie question, but I'm not quite sure I understand your ring braces, do you have any pictures?
Is it basically a picture frame made of dowels that are attached to the internal perimeter of the cabinet?
I think I'm just confused when you say it links "front to back" and "side to side", in which case I envision something that looks more like a cross than a ring. Sorry If I'm just not getting it.
Eric
Eric the ring brace is as you state--a frame that is attached to the internal perimeter of the box.
I locate the frame an inch or two below the driver and glue the pieces to the internal walls of the enclosure. Thus a ring is created which ties together the front, rear, and both sides of the structure.
The ring also helps to hold the stuffing in the top of the box without falling into the bottom cavity of the box.
Musical heaven
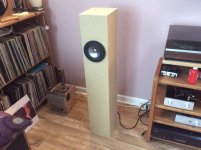
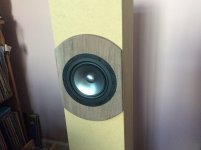
I have just put together mdf cabinets for this mltl, and with 200-300 hours on the drivers, the results are quite stunning.
The 10.3s are surface mounted while they run in and I am about to make a couple of walnut "collars" to effectively flush mount the drivers. In the current configuration, these provide the flattest fr down to 40hz that I have experienced in my room.
There is a 2-3db bump above 2.5khz but not too troublesome.
The only bracing I used were two hardwood dowels across the longer sides 3" and 14" below the driver.
Thanks, Jim for making this available.
Cheers
Peter
Attachments

- Home
- Loudspeakers
- Full Range
- Mark Audio Alpair 10.3/A10p MLTL