Gnobuddy,
As an alternative to a track saw, I like a small (5.5"?) circular saw and a clamping straight edge. Lay some sacrificial foam on the floor or your work table and you don't have to wrestle unwieldly sheets of plywood thru the table saw.
That and a router table and router should do you. Get a Jasper circle jig, plunge bit, flush trim bit, roundover and a 45 degree bit for it.
You can insure that parts are identical by tacking them together and using the flush trim bit on your router. Same with the sides - make them oversize and use the flush trim bit afterwards - instant great joinery!
-Tom-
I cant get a 8 foot by 4 foot plywood sheet in my car so have to get them cut down anyway. I get strips cut the right size for the cab then they slide nicely into the car with the back seat down. I also buy 2" by 2" for bracing and they just fit between the dash and boot lid.
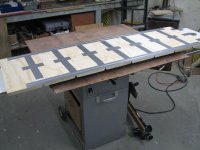
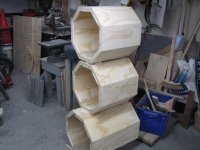
And I sometimes turn the table saw into a workbench.I make my boxes without a work bench.
")
Attachments
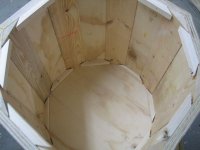
I have always managed to get away with a jig saw for the speaker cut outs.
I use a strip of wood with two screws in it to draw the circle. One screw goes into the wood to hold it steady and the other is used as a scribe to mark the circle.
Then, with great care, go slowly and cut out the speaker hole.
Don't do what I did when mounting the speaker, I had a screwdriver at the front and a spanner at the back of the mounting bolts. The screw driver slipped and went straight through the cone ! I managed to pull back the damaged paper cone and sealed it with glue.
Oh yes, and CLAMPS! You can't have too many clamps!
I usually use just two. I use corner blocks so the clamps are only there to hold the wood while I fire in the brad nails. Makes for very fast construction.
I was thinking exactly this a few days ago, as I was trying to glue together a quick-n-dirty 4 foot wide (approx 122 cm) shelf made from pine planks.Oh yes, and CLAMPS! You can't have too many clamps!
-Tom-
I have no clamps long enough to deal with a 4 foot wide object, and neither does the little wood shop at my apartment complex.
So I wrapped a loop of thin nylon rope around the whole thing, looped a pencil through it, and twisted the pencil to get some clamping pressure. Very medieval, and you have to protect the wood to keep the rope from digging into the corners, but it did work to clamp the bits together while the glue dried.
-Gnobuddy
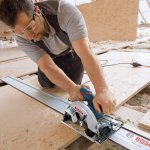
I find a professional circular saw with a rail system much better than a miter when sawing has to be precise.
With the circular saw and rail I get 0.5mm or better precision.
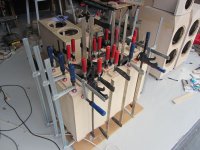
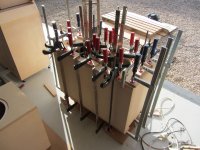
After some speaker projects, I finally start to have enough clamps, almost
With the circular saw and rail I get 0.5mm or better precision.
After some speaker projects, I finally start to have enough clamps, almost
Attachments
Last edited:
I was thinking exactly this a few days ago, as I was trying to glue together a quick-n-dirty 4 foot wide (approx 122 cm) shelf made from pine planks.
So I wrapped a loop of thin nylon rope around the whole thing, looped a pencil through it, and twisted the pencil to get some clamping pressure. Very medieval, and you have to protect the wood to keep the rope from digging into the corners, but it did work to clamp the bits together while the glue dried.
-Gnobuddy
I often use cling film/pallet wrap as a clamp, especially with awkwardly shaped objects. It is possible to exert a considerable amount of pressure, and to place the pressure exactly where it is needed. Also, most glues, such as pva or epoxy, do not adhere to cling film. Very useful when combined with a tourniquet made of nylon rope, or wetted twine.
Kindness tapestryofsound
Great idea.So I wrapped a loop of thin nylon rope around the whole thing
And another.I often use cling film/pallet wrap as a clamp
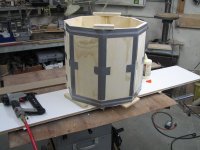
You guys will note my use of duct tape as 'hinges' and fiberglass tape as the clamps in post 46. You do what you have to, to make things work right? I then added the inside joint supports just for the fun of it. Those inside supports were some tough cuts on the saw. Had to bring out the rip blade and be creative. They started out as 2x4's.
Attachments
You guys will note my use of duct tape as 'hinges' and fiberglass tape as the clamps in post 46. You do what you have to, to make things work right?
Yep, by whatever means possible. It is surprising what will actually work, often using very little by way of resources. Especially money, the less the better. Or should I say, spently wisely.......at PoundLand DIY
Kindness tapestryofsound
No big loss… you shouldn’t be using MDF for speaker boxes if you can avoid it.
dave
No big loss… you shouldn’t be using MDF for speaker boxes if you can avoid it.
dave
Mdf is perfectly ok for a simple bass reflex in my opinion / experience.
Clamps?? A flat surface with peg holes and wedges at about fifteen degrees are all you need. If you need a special clamp a board with end stops and a pair of wedges will do.
I like the Jorgensen 3/4" pipe clamps. For large projects I have ten foot long pipes. But normally three footers. I find the 1/2" versions slip.
Next we can discuss the use of paste wax on all tool surfaces. Keeps away rust and glue. Properly applied doesn't stain the wood.
Now if you want to amuse the weak minded, set up a small table level with a small hole in the center. Now suspend a string through the hole with a modest weight. Now you have a precision right angle. You can use test block circling around the string to check your level and right angle.
And keeps away glue from all the freshly cut wood surfaces too? Not what we want, surely?...use of paste wax on all tool surfaces. Keeps away rust and glue.
In my experience, wax on wood is about as bad as silicone on a surface you were hoping to paint. It won't clean up. The contamination is virtually impossible to get rid of.
-Gnobuddy
And keeps away glue from all the freshly cut wood surfaces too? Not what we want, surely?
In my experience, wax on wood is about as bad as silicone on a surface you were hoping to paint. It won't clean up. The contamination is virtually impossible to get rid of.
-Gnobuddy
You are using way too much wax if it is getting onto your work piece! Rust on a steel table is more likely to stain your work.
- Status
- This old topic is closed. If you want to reopen this topic, contact a moderator using the "Report Post" button.
- Home
- Loudspeakers
- Full Range
- Making a box is harder than one might think.