I standardized PCB mounting hole spacing and board sizes so I can drop various circuits onto that size and have common mechanicals for future projects.
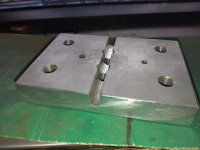
I was fretting on how to trim the heatsinks to size and get a mirror finish cut. Well a slitting saw on the mill works fantastic. In the video I'm using a slitting blade on the mill with Anchor Lube.
Previous to this cutting operation I drilled the mounting holes and fins on the CNC. I'll be making about 30 of these for future boards. And probably come up with a few other standardized sizes and hole spacings for bigger boards. It should save time over mechanicals all having random mounting holes. A pet peeve I have about people who offer nice PCB's for sale regulators, preamps, stages, etc. then when they upgrade the version they change all the mounting hole spacings! I guess they don't want people to upgrade their projects to the new board version, because they are making people re-drill their chassis a huge inconvenience over just mounting the new version board.
The mill is by Little Machine Shop basic mill a very supportive outlet for upgraded small machine shop lathes and mills. A bandsaw with variable 6 / 10 tooth blade will give the next best finish over this. I'm too picky on squareness the mill will be square to within 2 / 10000 of an inch, I've never been able to get perfect sqareness on my other types of saws.
https://littlemachineshop.com/
https://littlemachineshop.com/
Last edited:
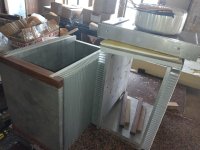
Over the last couple of years, I've used a woodworking type pull/mitre saw with a blade made for cutting aluminium (£25). Using WD40 as a lube it seems to work very well. Not mirror finish, or perfect squareness I suppose, but quite adaptable (using the normal depth stop to cut wire pathways). I've cut copper bars and ali from 12" X 1.5" heatsinks to 5/8 inch thick ali plate (as below) which was cut from a large (20" X 80") piece. Never had any issues, (cut thick material in stages). Make sure you do use goggles and ear defenders though as the swarf flys all over the place and it's quite noisy.
Attachments
Last edited:
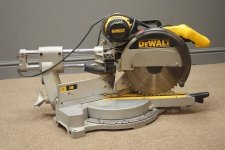
I have the Makita version of that trim saw and was thinking of putting a blade made for aluminum into it too. Those are some hefty heatsinks there! I'm starting out with my smallest one first to find out what blades/methods are best. I have some heavy material that is 5/8 inch thick to use as side panels that I'll investigate next. milling next.
Did you cut the heat sink fins with that too? I used a similar saw just to cut heat sinks to size, but just came to think that maybe making heat sinks from massive alu-pieces would be possible too?PS. Some chassis under way, not all but most cuts done on the pull saw.
Hi. I bought it as a second hand aluminium heat sink extrusion (EBay) . Though I suppose it is possible to cut many slots, if you look at my first picture (the smaller ali block) you will see that, though OK for channeling wires, the bottom of the slot is not very flat. When I did a slots on the chassis front and rear plates, (5/8 thick ali and each slot is 11mm deep X 10mm wide) though it is better (I'd had some practice by then!) it would still in my view require tidying up, possibly with a router if it were to be visible.
I would use something like this instead.
https://www.ebay.co.uk/itm/134686209527?itmmeta=01HR2HCT5Y9KEAEYA9S4TG8RNV&hash=item1f5bec75f7:g:fasAAOSwpLVly40P&itmprp=enc:AQAIAAAA0CpZ8eOdhPegV1FqovF8RRydQ+/PJtFENBnG4cAij8kHqIWyF6RD/na+h2deo8gQsQXXv13eyXEPLPfdLl3yH03dlB9x7HEyFzt2kS3gmWjqD+TdDLoQDpGs+VcU1MQFEQ4Rp3UX8ZPmEbDi0tfjHrkxsiU982da0pwT7AWayftXdVnmrzeO4kXGjxzffF04Z/rYboeOvC9QLrlR18DCVCsHm4ugmvieSWTrniYM5ByXWsCWunxeH/W7noNYWwxPWWLnEsFVCmT6Rx/Lqm1Incg=|tkp:Bk9SR5ijs9HAYw
(I would think other sizes are available in Sweden)
And then cut it in half to get two heatsinks 250 tall x 300 wide x 45 thick. Taken carefully, the fins are cut cleanly with no pushover and only very small burrs.

One thing that worked surprisingly well was making the trays and base, they were in 3mm ali. I did not have a bender, so I cut half way through with the saw, and was then able to bend up the sides etc by hand! (It's still plenty strong enough). If you look carefully you can see that on the second picture.
How do you mount these 'standardised' modules into a chassis? Do you have a standardised chassis?I standardized PCB mounting hole spacing and board sizes so I can drop various circuits onto that size and have common mechanicals for future projects.
I've used the method of cutting a score then bending sheet aluminum too. If you anneal the aluminum along the score it will bend perfectly with no stretch marks. Tempered 6061 is hard to bend unless you anneal it a little at least. Square up the bend perfectly by clamping some aluminum squaring squares on each side, then to get full strength and permanent bend you can run a bead of low temperature aluminum brazing across the backside of the bend. No welding torch needed for this just a MAP gas torch and some low temp aluminum brazing rod. The advantage of scoring then bending is that you can get perfect squareness of the bend relative to the sheet, easier bend, less stress. The disadvantage is you lose strength, but a bead of brazing fixes that and locks it into a perfect 90 degree bend that stays put at 90 degrees. It only takes 10 minutes to anneal the path of the bend, use candle soot and a torch to bring it to nearly H1 H2 hardness.
How do you mount these 'standardised' modules into a chassis? Do you have a standardised chassis?
Well in diy I decided to standardize hole spacings simply so I can re-use PCB's across projects without having to redesign all the mechanicals. Having the holes spaced the same means I can stack boards with spacers, end cap them with heatsinks, bolt patterns in chassis can be the same, etc. I dislike the usual PCB heatsinks that stick up as they are tall and you wouldn't want to expose them aesthetically, and heatsinks work best exposed to outside the chassis. A rectangular hole in a wood or metal chassis side allows me to expose flat type heatsinks nicely and the PCB just bolts to the same heatsink. It's all about re-use, and modularity I guess for me, I only have 10 years or so left in this hobby, so not having to deal with everybody's idea of PCB sizes and holes saves time. Basically when I sit down to make a new PCB I choose one of my standard sizes and mounting hole ones, and I make the circuit fit those mechanical constraints, now modules can be coupled mechanically on predictable hole centers and PCB sizes.
Last edited:
Modularity seems a really good idea, as I'm using other peoples PCB's (not clever enough myself), I just make the metalwork in whatever way takes my fancy at the time. This present set up is for a pair of mono "SIT-3X's" as designed by lhquam, and using his PCB's too. (Sorry to say I don't think these are available any longer. (I'm sure though that ZM's are also wonderful!)
- Home
- Design & Build
- Construction Tips
- Machining heatsinks