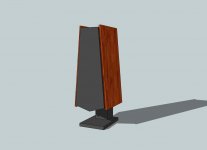
love the design. I've been thinking of the side panel 'legs' route but couldn't make it elegant. Your version with the angled bottom is sweet.
Just one thought - could you change the mid/tweet enclosure so the back of it is a sheet that fills the enclosure top to bottom, side to side and then cut circular holes in it to open up the air volume for the bass driver? It would then be a much stronger 'holey brace' (like Planet10 uses) AND the back of the mid/tweet enclosure (badly worded but I cant think of another way at the mo)
Just one thought - could you change the mid/tweet enclosure so the back of it is a sheet that fills the enclosure top to bottom, side to side and then cut circular holes in it to open up the air volume for the bass driver? It would then be a much stronger 'holey brace' (like Planet10 uses) AND the back of the mid/tweet enclosure (badly worded but I cant think of another way at the mo)
Last edited:
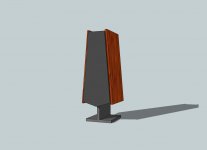
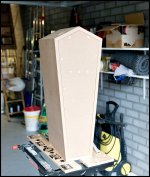
Legs on the side don't work IMHO, it was also one of the alternatives I tried. Another option is to make a small central stand/foot. Maybe you like this even better (see attachment), this central stand/foot got me in doubt and I'm seriously considering it. It's visually less massive. In this design one has to move the BR pipes from the bottom to the back or front.
Creating the mid-cabinet as you described is certainly an option. However you must make sure that the cut-outs are big enough to prevent that the cut-outs + cavaties are starting to act as resonators (helmholtz).
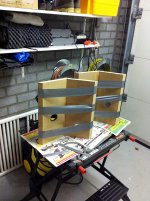
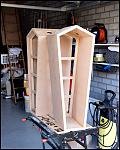
There are many ways to construct the internal bracing. A such one can do the same also for the lower part of the cabinet too.
But as the sidewalls will be glued on to add and extra 18/22mm thinkness to the 22mm cabinet walls I judged that poles left-right-top-bottom-front-back should suffice for bracing.
Creating the mid-cabinet as you described is certainly an option. However you must make sure that the cut-outs are big enough to prevent that the cut-outs + cavaties are starting to act as resonators (helmholtz).
There are many ways to construct the internal bracing. A such one can do the same also for the lower part of the cabinet too.
But as the sidewalls will be glued on to add and extra 18/22mm thinkness to the 22mm cabinet walls I judged that poles left-right-top-bottom-front-back should suffice for bracing.
Attachments
Last edited:
you know i think its looks great on that stand too! especially hiding the vents.
I use a 'holey brace' to good effect in my fullranger project http://www.diyaudio.com/forums/full-range/208347-ladies-gentlemen-emken.html
I use a 'holey brace' to good effect in my fullranger project http://www.diyaudio.com/forums/full-range/208347-ladies-gentlemen-emken.html
you know i think its looks great on that stand too! especially hiding the vents.
The vents are projected into the bottom in the current design, a central stand would block them and when choosing to have a central stand one has to move to vents to somewhere else.
One other design version I looked at was the following: construct the stand from one sheet of MDF running from foot, bottom to the top, then have the 2 sides glued to it and inside the cabinet have enough cut outs to move air around. Vents can stay at the bottom.
Attachments
")
i like this, i also think the vaneered side legs are an integral part of what makes the design good. you could alwats add some under timber with spikes that stop the sides hitting the floor, or some button feet or shape out a half hexagon on each side panel to acuire 4 legs
the initial idea is that the sides/legs will be made of solid timber (birch, beech, walnut, oak still to choose) finished in oil/wax.
But lately I'm also considering sidewalls of high-gloss painted MDF. Maybe some metalic dark/wine/bordeaux red.
Yup, spikes will be integrated into the sidewall/legs
But lately I'm also considering sidewalls of high-gloss painted MDF. Maybe some metalic dark/wine/bordeaux red.
Yup, spikes will be integrated into the sidewall/legs

Watch Him, There might be some bodies in need of those.
Sonus Mortem
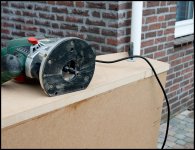
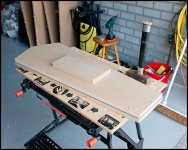
Small update, made the rebate(? is that the correct term) to mount the backpanel against.
yes it is correct.
...Sonus Mortem....Hahahahaha!
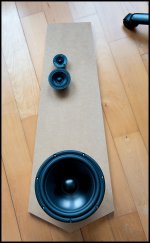
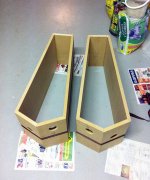
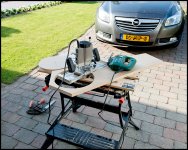
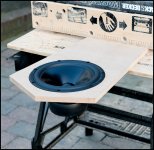
Construction continued over the last few days. After fabricating the shell of the cabinets and internal bracing I moved on and started to work on the baffle. Baffle consists of two sheets op MDF. The sheets that will become the baffle were cut a little bit larger then needed, with a router i trimmed them to the actual size of the cabinet. Next I created a bigger hole in the inner sheet so the woofer can stick through it into the cabinet. Most recent job completed was to create the rebate for the woofers in the outer sheet.
Attachments
- Status
- This old topic is closed. If you want to reopen this topic, contact a moderator using the "Report Post" button.
- Home
- Loudspeakers
- Multi-Way
- Loudspeaker Build Thread