AC Line sniffers...Better ones have adjustable sensitivity...
Yep.
Tried this one as well- great for checking all of the wiring and cables in your setup! But look for the adjustable version.
Ref:
http://www.psaudio.com/ps/tips/15-noise-sniffer
gmphadte said:A crystal receiver, as audio tracer.
Comes handy to find which stage of the amp is faulty
An injection needle comes very handy to probe the pcb.
Gajanan Phadte
Eico 147 Signal Injectors were a collector's item several years back.
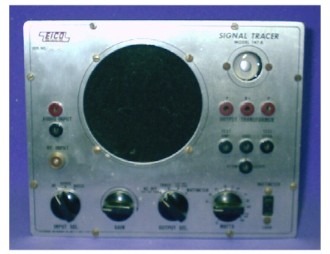
There were also models by Heathkit and Knight
Following is Part One of the results from scanning my system wiring with the various AC "sniffers":
A while back I'd tried the polarity indicator and one of my wall outlets(on a side wall, where I plug in my subwoofer) had to be corrected for reversal of "Hot" and "Neutral". I don't know what (if any) effect this had on the sound, but at least I know that all of the components are seeing similar polarity at the mains.
I tried out the AudioPrism "Noise Sniffer" setup,
http://www.soundstage.com/revequip/db04.htm
which indicates non-60Hz noise at the AC outlet. Each and every one of my outlets had a high level of noise indicated, except for the dedicated 20 amp circuit I had installed for my components.
Turns out that the "Line Conditioner" (a Monster Power unit) I had plugged in was mostly responsible for cleaning up that circuit (measured both from the L.C.'s outlets and the adjacent one at the wall plate). When I tried unplugging the L.C. from the outlet, the AudioPrism unit "went crazy", signalling the return of much noise. My investment in the line conditioner having been justified, I turned to the other outlets in the room.
At each outlet I tried plugging in one of those two-prong "wall wart" noise filters and, while it certainly helped reduce the noise, it wasn't as effective as the Monster Power (some noise was still indicated).
I made up a three-prong filter from a diagram I found on the web* :
http://www.tnt-audio.com/clinica/mains_e.html
This made a much greater difference. The indicated noise was reduced nearly as much as with the expensive Monster unit!
I decided to install the two and three-prong filters at the spare outlet and the subwoofer outlet, respectively. Powerline noise has been considerably reduced, if not eliminated, in my listening room as a result.
-Chas
*Be careful to use only 'X' and/or 'Y' rated capacitors to reduce risk of fire!
Part Two:
Next I tried the “non-contact” AC voltage Detector designed for sensing 50-600v AC when its probe is placed near a suspected (or even unexpected!) source.
I was very surprised when the AC detector gave a reading when held near a group of interconnect (shielded twin-axial) cables at the rear of my preamp! Normally any AC voltage(signal) here is very small. I suspect some inductive coupling was present.
Subsequently, I've rearranged my cables a bit. I had used wire ties to bundle the cables for neatness, as many people have recommended, with similar cables tied together(AC with AC, interconnects together, speaker wires together, etc.).
I found that separating the interconnects of one component from one another and especially keeping them away from the AC cords(which I've replaced with shielded cords), has eliminated that AC reading. I have also done the same for my speaker cables).
While I believe I can hear an improvement (clearer sound/lowered noise floor), at least I know I've improved the measured performance.
Very cool diagnostic check for a minimum invested!
I’ve purchased a pen-type multimeter which includes a non-contact voltage detector. This will replace a couple of items in my test kit.
Another great tester for under $20!
-Chas
P.S. I'll be listing the non-contact voltage detector in the “Marketplace”, along with some other extra items I have lying around.
Part Three:
Next I tried the (Rat Shack) Mini Amp/Speaker. Apparently this is a very sensitive indicator for noise at your components' outputs!
First I connected it to my (15 years old) power amp's speaker terminals using alligator clips, with the preamp muted. There was a shocking amount of 120Hz hum and some buzz as well that vanished into silence as soon as I turned off the amp. Note that this hum/buzz is normally unnoticeable unless I place my ear very near the speaker, and then it's just audible over normal room noises.
This might indicate a need to replace the main filter caps, which may have become leaky over years of use.
Using an adapter with RCA plug, I also checked the outputs of my disc player and preamp. There was a tiny bit of hum (but no buzzing), which was present regardless of which output I checked. I tried reversing the interconnect cables(which have the shield connected at one end) end-for-end, but this didn’t seem to make a difference. Next I tried reversing the orientation of the preamp's two-prong AC power plug, which made a very small change in the noise. I left the AC plug in the orientation which produced the least noise. My other components use shielded 3 prong power cords, so I wasn't able to reverse them.
Note that this test was performed after I had rearranged my leads using the AC detector. I will want to experiment more in the future with different interconnects and cables as a result.
Overall, a very sensitive tester that reveals any system hum!
Not bad for less than $20 !
-Chas
Interestingly(or maybe not), there has been a buzz over at Audio Asylum the past week about the tweak of placing a 1.5"copper pipe union over the IEC plug end of a power cord (butted up against the chassis/rear panel of your component). If it makes you feel better you can even attach a wire to the union, connected to a chassis screw or ground connection.
Back when I tested the "non-contact" voltage detector I had noticed that even on shielded power cords I got a reading at the plug end(s), and this sounds like a handy solution.
This is a cheap tweak that costs maybe $3-4, and it DOES noticeably reduce the EMF at the plug.
Heres a link to a Youtube video demonstrating the use (Please note that I'm not endorsing the other tweaks shown)
http://www.youtube.com/watch?v=piPI_ByD0Q0
As usual, YMMV")
Thanks, WJH, for the tip!
-Chas
Back when I tested the "non-contact" voltage detector I had noticed that even on shielded power cords I got a reading at the plug end(s), and this sounds like a handy solution.
This is a cheap tweak that costs maybe $3-4, and it DOES noticeably reduce the EMF at the plug.
Heres a link to a Youtube video demonstrating the use (Please note that I'm not endorsing the other tweaks shown)
http://www.youtube.com/watch?v=piPI_ByD0Q0
As usual, YMMV
Thanks, WJH, for the tip!
-Chas
Best Tool: an analog scope
Having done audio design and troubleshooting for about 30 years, I think the hands down "ultimate tool" remains a good analog scope. Digital scopes are of no value to me (USB or otherwise, including the $5K DSO's) because quantization error makes everything look noisy, hardly a feature for analog design, although the FFT/spectrum analysis features can be interesting, even if they never help you.
You can get a good cheap analog scope from many sources (the 20Mhz goldstar OS-9020A is excellent for audio, and is under $100 on ebay), and while I personally prefer a Tektronix or Phillips /Fluke scope (with a bigger price tag, but better features), I can only advise that whatever the make, it remains the one weapon that that can reveal literally every type of audio related problem, and do it very quickly. Along with a good fluke DMM, and suitable low distortion signal source like an HP 651A or other (now) low cost generator, you can do almost anything.
having said that, ears and noses find a lot of problems, too. It's just that sometimes one is looking for a finer level of accuracy or discrimination than they can provide
all for now,
walter
where i work, we regularly get Klipsch powered subwoofer amp modules for replacement. along with the amp module comes an LED with 3 wires, one side is blue the other side is th red LED and the center wire is a common cathode. with a couple of 1N4004's and a 33k 2W dropping resistor, and a pair of clip leads, i made one into an "offset sniffer". regularly Pioneer, Yamaha and Denon amps come in with blown channels, and the protection mode only allows a couple of seconds before tripping the power relay off. so hooking up the sniffer to the output lead to each channel and cycling the power makes it easy to go through a 7.1 surround amp and find the blown channel without getting confused by the slow sampling rate of a DMM flashing nearly meaningless numbers (the chances of a DMM sampling exactly when you want it to is slim to none (and Slim is out of town)). a solid red or blue LED while the power is on is a quick indication of a bad channel. it's much more portable than a scope, and not all the techs where i work have one at their bench, especially the "triage" techs the 1N4004's are for "steering" the applied voltage. the device comes in handy for checking for the presence of DC voltages, as well as checking for output signal at the speaker terminals (it glows purple in time with the music). the LED's turn on at about 3V, so it can test for the presence of 3.3V rails, on up to the power supply for the amp.
Attachments
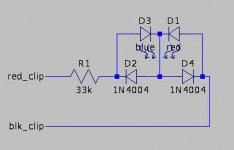
...an LED with 3 wires, one side is blue the other side is red LED and the center wire is a common cathode..with a couple of 1N4004's and a 33k 2W dropping resistor, and a pair of clip leads, I made one into an "offset sniffer".
Excellent!
Another fine example of a CHEAP tester!
I will add one of these to my "arsenal".
Thanks uncle jed!
-Chas
I once made something similar but with two bright LEDs in inverse parallel and in series with a 5w, 15k resistor. Works nicely from 5v to 240v, AC or DC. Add another circuit with a neon bulb in series with a 150k resistor to indicate high voltage.unclejed613 said:where i work, we regularly get Klipsch powered subwoofer amp modules for replacement. along with the amp module comes an LED with 3 wires, one side is blue the other side is th red LED and the center wire is a common cathode. with a couple of 1N4004's and a 33k 2W dropping resistor, and a pair of clip leads, i made one into an "offset sniffer". regularly Pioneer, Yamaha and Denon amps come in with blown channels, and the protection mode only allows a couple of seconds before tripping the power relay off. so hooking up the sniffer to the output lead to each channel and cycling the power makes it easy to go through a 7.1 surround amp and find the blown channel without getting confused by the slow sampling rate of a DMM flashing nearly meaningless numbers (the chances of a DMM sampling exactly when you want it to is slim to none (and Slim is out of town)). a solid red or blue LED while the power is on is a quick indication of a bad channel. it's much more portable than a scope, and not all the techs where i work have one at their bench, especially the "triage" techs the 1N4004's are for "steering" the applied voltage. the device comes in handy for checking for the presence of DC voltages, as well as checking for output signal at the speaker terminals (it glows purple in time with the music). the LED's turn on at about 3V, so it can test for the presence of 3.3V rails, on up to the power supply for the amp.
A crystal earpiece is such a high impedance that you can trace audio across a board just by touching the tip of the jack to the appropriate spots, put heatsrhink over the rest of the plug to prevent shorts.
I have a little battery powered 1Watt amp on the bench with switch selected input gain (and good input protection) that does very well for signal tracing. It is neat because it is fully floating so you can trace for things like bad cathode bypass caps and such easily.
A car headlamp makes a handy dummy load (The value is all over the place, but for some things, who cares).
A 60W light bulb wired in series with a short extension lead reduces the potential for smoke when testing power supplies.
A cheap battery powered CD play makes a convenient source for all sorts of test signals, just put together whatever you need in matlab or octave and burn the signal to CD.
Regards, Dan.
i was using an old clunky laptop and some tone generator software as a signal source works ok, but setup time is too long (plug it in, start it booting, take a coffee break, come back just in time to log it in, take another coffee break while windows gets itself squared away, load the tone generator software and then you're ready to go.....
or burn a disk with various test tones on it. i can make whatever i need for .wav files using LTSpice's .wav out function to build sound files. there's even a frequency modulator function to make sweeped tones or stepped tones. the same function block also has an AM input, so i can make stepped amplitude signals or swept amplitude signals. i add a pot to the cd player output so i can get a variable amplitude on standard test disks that have 0db tones on them
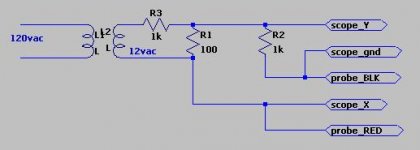
i was going to build the curve tracer adaptor that uses an AC source like a 6v or 12v transformer and a few resistors and a couple of scope inputs to test components in-circuit. i know i can find a few 12V standby supply transformers floating around, only need a few milliamps.... yeah..... kinda like this......
hmm.... got the schematic off the web in a pdf..... something don't seem quite right here.....
or burn a disk with various test tones on it. i can make whatever i need for .wav files using LTSpice's .wav out function to build sound files. there's even a frequency modulator function to make sweeped tones or stepped tones. the same function block also has an AM input, so i can make stepped amplitude signals or swept amplitude signals. i add a pot to the cd player output so i can get a variable amplitude on standard test disks that have 0db tones on them
i was going to build the curve tracer adaptor that uses an AC source like a 6v or 12v transformer and a few resistors and a couple of scope inputs to test components in-circuit. i know i can find a few 12V standby supply transformers floating around, only need a few milliamps.... yeah..... kinda like this......
hmm.... got the schematic off the web in a pdf..... something don't seem quite right here.....
Attachments
A crystal earpiece is such a high impedance that you can trace audio...A cheap battery powered CD player makes a convenient source for all sorts of test signals...
Brilliant!
More excellent CHEAP test tools!
I've been using CD's with test tones for some time; in fact I even sold my signal generator, since I wasn't using it anymore. The pre-recorded tones can be put on 'repeat'; I've used them for checking amps and, with a sound level meter, for basic speaker measurements.
Jed- anything else for those of us without o'scopes ?
-Chas
Old drier elements work good as dummy loads for power amp testing. The pair I have in the basement measure around 10 ohms each, but it should be easy to mod them for other resistances. I got the idea from a magazine article (think it was AudioXpress or predecessor), the person who suggested it said that it barely got warm testing a 300w amp at full power. Since the element runs 3000w at full power, I can believe that. If you need to, put a fan on it and you get a 3kw dummy load. And you can dry your clothes while testing your amp.
Peace,
Dave
And you can dry your clothes while testing your amp. Peace,
Dave
- Status
- This old topic is closed. If you want to reopen this topic, contact a moderator using the "Report Post" button.
- Home
- Design & Build
- Equipment & Tools
- List your favorite(cheap) test tools for audio systems