Hello,
My latest preamp/switcher project and build. This pre offers all the normal functions you'd expect in a pre, along with a couple selectable features. The design and layout of the board was done by fellow DIY'er, jhofland. It is based on the excellent OPA1656 chip, and other support ICs along with a few TH parts, and external breakout boards for volume, selector and headphone. The PCB is double sided and turned out beautifully. It has a fully, self-contained and integrated PSU. No power brick required.
This project had it's roots in my desire to have a matching preamp, to mate with a recently completed Modulus- 86 amp build.
Latest Preamp and Modulus-86 amp.

As mentioned before, the guts of the pre is a double-sided preamp PCB. The design specs feature;
o - Based on TI's OAP1656 opamp chip.
o - Uses TI's OAP1637 fully differential chip.
o - Uses Analog Devices' MAX79220 headphone amplifier.
o - 1 balanced input
o - 3 single ended inputs
o - 1 balanced output
o - 1 singled ended output
o - 1 separate headphone amp
o - 1 subwoofer output w/selectable crossover at, 80, 120, or 200Hz
o - 1 12V Trigger out jack (3.5mm)
o - adjustable gain at 0dB, 6dB, or 12dB (onboard 4-pin DIP)
Other features include;
o - Use of small breakout boards for the;
(1) the volume control pot
(2) the input selector with LED KK connectors
(3) Headphone output jack
Micro-match connectors are used for connection from the main board to the above remote breakout PCBs.
o - All I/O is also available with the use of MolexKK 2 and 3 pin PCB headers.
o - All onboard and integrated PSUs. No power brick to contend with.
o - Integrated IEC connector on read panel.
Top/Bottom view of the PCBs;


Here is what the fully populated board looks like, sans the 5V power module.

The objective of this particular project was to build a general purpose preamp with the features I wanted, and more specifically be a matching 'mate' to my Modulus-86 amp. This, of course, would involve using an identical mini-ITX as pictured above. I like to experiment with new and different enclosures that aren't run of the mill silver and black traditional audio cases. Because of this factor, you're never sure if you'll be successful in getting everything installed in the same sized case. Hence the custom preamp PCB. The PCB is 140mm x 140mm. This doesn't leave any room leftover for other pieces you may need. I had a pretty good idea of what I was dealing with and other remote software module I was planning on using in the build. The PCB turned out great as fabbed by JLCPCB, and fits perfectly in my red case. This mini-ITX HTPC is available online here at Amazon.
Using this type of unconventional enclosure general will require more than just drilling holes. There is a degree of case work that's required in the way of front and/or back panels. I have a 3D printer that works well for creating custom sized panels needed for converting a computer case to a useful piece of audio gear. And, you have to be prepared to modify your design as you go along. This is a very challenging and time consuming process. And if you're a perfectionist well.....you know how it goes.
When considering the features I wanted in the preamp, I wanted to make it as flexible as possible, so that it could be used in various types of situations and enclosures. One of those features is the use of either; (1) RCA jacks that can be soldered directly onto the PCB, or (2) use 3-pin MolexKK headers on the PCB. The former would involve easier case work, as you could simply cut out a rectangle on the back panel and expose all of the pre's I/O more easily, while the latter could be used with casework that already has holes for the I/O. These are simple alternatives depending upon your preference and implementation. This feature is not available for the balanced connectors.
Here's an image of the various I/O connectors and footprint for the RCA jacks.

Another feature I like to have, and is on all late model PC cases - for about the past 20yrs - is the momentary on/off switch on the front or top of cases. To take advantage of such a switch you need some sort of low-voltage switch to trigger the mains, or simply act as an inline switch to a PSU. In past projects, I've used a small softstart switch (also designed by jhofland), that is ideal for a MO switch to turn on new builds. It provides for using a single switch, and even the Power and HDD LEDs also on the front panel of mini-ITX cases. I use these in almost all my projects over the past couple of years.
Remote low-voltage softswitch.

Also designed into this preamp are the breakout boards for the 3 operational features like; (1) Input selector, (2) volume control, and (3) headphone jack. Putting them on breakout PCBs allow for different mounting/placement options. The Micromatch (TE Connectivity) connectors and cables are used to connect them to the main preamp board.
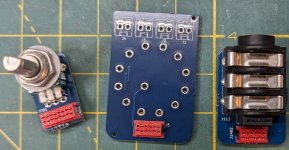
Here are a few images of my build in process.
Final layout of the Back Panel. (4MM thick 3D printed)

Fully wired up preamp.

Fully finished and closed up preamp with smoked glass top.

The dynamic duo.

Temporary living room testing setup with vintage, HP-100 4-way speakers. The combo sounds so awesome, and the dynamics are really something you've got to hear.

If interested in the PCB board for this preamp and/or the low-voltage softstart board PM me for details.
Enjoy,
Rick
My latest preamp/switcher project and build. This pre offers all the normal functions you'd expect in a pre, along with a couple selectable features. The design and layout of the board was done by fellow DIY'er, jhofland. It is based on the excellent OPA1656 chip, and other support ICs along with a few TH parts, and external breakout boards for volume, selector and headphone. The PCB is double sided and turned out beautifully. It has a fully, self-contained and integrated PSU. No power brick required.
This project had it's roots in my desire to have a matching preamp, to mate with a recently completed Modulus- 86 amp build.
Latest Preamp and Modulus-86 amp.
As mentioned before, the guts of the pre is a double-sided preamp PCB. The design specs feature;
o - Based on TI's OAP1656 opamp chip.
o - Uses TI's OAP1637 fully differential chip.
o - Uses Analog Devices' MAX79220 headphone amplifier.
o - 1 balanced input
o - 3 single ended inputs
o - 1 balanced output
o - 1 singled ended output
o - 1 separate headphone amp
o - 1 subwoofer output w/selectable crossover at, 80, 120, or 200Hz
o - 1 12V Trigger out jack (3.5mm)
o - adjustable gain at 0dB, 6dB, or 12dB (onboard 4-pin DIP)
Other features include;
o - Use of small breakout boards for the;
(1) the volume control pot
(2) the input selector with LED KK connectors
(3) Headphone output jack
Micro-match connectors are used for connection from the main board to the above remote breakout PCBs.
o - All I/O is also available with the use of MolexKK 2 and 3 pin PCB headers.
o - All onboard and integrated PSUs. No power brick to contend with.
o - Integrated IEC connector on read panel.
Top/Bottom view of the PCBs;
Here is what the fully populated board looks like, sans the 5V power module.
The objective of this particular project was to build a general purpose preamp with the features I wanted, and more specifically be a matching 'mate' to my Modulus-86 amp. This, of course, would involve using an identical mini-ITX as pictured above. I like to experiment with new and different enclosures that aren't run of the mill silver and black traditional audio cases. Because of this factor, you're never sure if you'll be successful in getting everything installed in the same sized case. Hence the custom preamp PCB. The PCB is 140mm x 140mm. This doesn't leave any room leftover for other pieces you may need. I had a pretty good idea of what I was dealing with and other remote software module I was planning on using in the build. The PCB turned out great as fabbed by JLCPCB, and fits perfectly in my red case. This mini-ITX HTPC is available online here at Amazon.
Using this type of unconventional enclosure general will require more than just drilling holes. There is a degree of case work that's required in the way of front and/or back panels. I have a 3D printer that works well for creating custom sized panels needed for converting a computer case to a useful piece of audio gear. And, you have to be prepared to modify your design as you go along.
When considering the features I wanted in the preamp, I wanted to make it as flexible as possible, so that it could be used in various types of situations and enclosures. One of those features is the use of either; (1) RCA jacks that can be soldered directly onto the PCB, or (2) use 3-pin MolexKK headers on the PCB. The former would involve easier case work, as you could simply cut out a rectangle on the back panel and expose all of the pre's I/O more easily, while the latter could be used with casework that already has holes for the I/O. These are simple alternatives depending upon your preference and implementation. This feature is not available for the balanced connectors.
Here's an image of the various I/O connectors and footprint for the RCA jacks.
Another feature I like to have, and is on all late model PC cases - for about the past 20yrs - is the momentary on/off switch on the front or top of cases. To take advantage of such a switch you need some sort of low-voltage switch to trigger the mains, or simply act as an inline switch to a PSU. In past projects, I've used a small softstart switch (also designed by jhofland), that is ideal for a MO switch to turn on new builds. It provides for using a single switch, and even the Power and HDD LEDs also on the front panel of mini-ITX cases. I use these in almost all my projects over the past couple of years.
Remote low-voltage softswitch.
Also designed into this preamp are the breakout boards for the 3 operational features like; (1) Input selector, (2) volume control, and (3) headphone jack. Putting them on breakout PCBs allow for different mounting/placement options. The Micromatch (TE Connectivity) connectors and cables are used to connect them to the main preamp board.

Here are a few images of my build in process.
Final layout of the Back Panel. (4MM thick 3D printed)
Fully wired up preamp.
Fully finished and closed up preamp with smoked glass top.
The dynamic duo.
Temporary living room testing setup with vintage, HP-100 4-way speakers. The combo sounds so awesome, and the dynamics are really something you've got to hear.
If interested in the PCB board for this preamp and/or the low-voltage softstart board PM me for details.
Enjoy,
Rick
There's a little back story about my 100s. I bought these from a guy in Jersey several yrs ago when we lived in Troy, NY. As it turned out, I had to replace both tweeters in them. I forget which ones. He gave me a rebate on the price. At the time, I didn't have the gear I have now, and I hooked them up and listened, but I really wasn't moved by them. Fast forward 15 yrs. Since that time, we moved again, and they sat in my basement for 10yrs. I know! Anyway, a couple weeks ago I brought them up to our living room(where I really didn't have a system), with the intention of selling them. Well, after I hooked them up to the little Pioneer Elite amp - shown in the last pic - I fired up roon and selected a few tracks to play. And the source was only a little Tone Board 1! My jaw literally dropped, when the music started. I was utterly blown away. I could hear ever frigg'n nuance of the sound. The dynamics and character of the music was so alive. I would use the overused word of, very, very musical. When I hooked up the new preamp playing through the Modulus-86, the sound was equally as impressive. The only variable that stayed the same were the speakers. Needless to say, I commented to my wife, "You know, honey, I think I'm going to keep these speakers now - they sound so good." Moral of the story, don't let speakers languish in the basement for 10yrs! You just might have some hidden gems unaware.Nice work.
If the HPM 100s are like my 900s then they do sound fantastic.
The two of them has turned into a labor of love.WOW WOW WOW!!
Fantastic job on your preamp Rick! A lot of planning, trimming and drilling went into the chassis. You and jhofland created a potent little red preamp.
The Dynamic Duo look great.
Enjoy your new toys!
Best,
Vunce
OTOH, the preamp board went through 2 versions (my fault), and ended up being more costly, as I had a few board made - both bare, and SMD populated PCBs. The casework and mechanics took way longer than expected to get everything completed to my standards. I think I went through a whole roll of filament in the process! And, as any DIY'er knows, I encountered, miscalculations, wrong assumptions, and needed work arounds to get it all just right. It took me a couple of hours, just to decide on the diameter of the volume control! Whether it was going to be, 30,35, or 40mm. I chose 40.
Rick
Admirable work, OP. The usage of idc connectors is a genius idea and something i too wanna try after seeing this.
Not only is it convenient it also opens the path for future upgrades because if you wanna try a better volume pot you can just make a pcb for that pot and swap out the old one- no need to tear down the whole machine or desolder anything. Ive been doing that with my old preamp but never thought to bring those connectors into the mix. (Been using molex but the wire stripping ect is a pain)
Also, can i also ask you what volume pot that is in the picture and if you find it lacking in any way? The cheapest pots always suffer from channel imbalance and i wonder if you found one that avoids the issue
The little Micromatch (MM Datasheet) are very versatile - especially on small PCBs. And, ribbon cable can be easily affixed to the connectors simply by using pliers. And in my experience, they seem to be very robust. The little volume control pot is an ALPS (RK09L12D0A1T). It's a 10k Audio pot and is very smooth in operation. I've never experienced any channel imbalance using these pots in various projects.
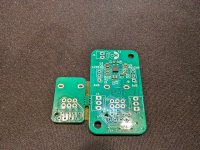
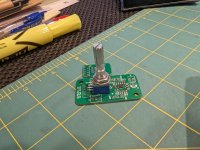
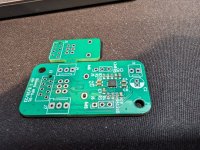
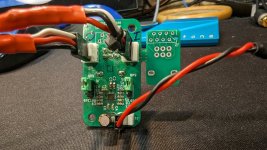
Speaking of volume pots.... Below is a little headphone amp that you can connect to any line level project. It uses the same pot as the preamp. It's both unique and versatile, because the amp was designed around the VC pot, and can be mounted directly on the front panel, or remotely using the little breakout board with Micromatch connectors and ribbon cable. See images below. I have a few of these, professionally fabbed up PCBs with all SMDs. All you need to add are the through-hole parts.(mostly KK connectors and 1 electrolytic cap) It uses the same excellent Analog Devices/Maxim (MAX97220) headphone amp part used in the preamp. PM me if interested in this board.
Rick
Speaking of volume pots.... Below is a little headphone amp that you can connect to any line level project. It uses the same pot as the preamp. It's both unique and versatile, because the amp was designed around the VC pot, and can be mounted directly on the front panel, or remotely using the little breakout board with Micromatch connectors and ribbon cable. See images below. I have a few of these, professionally fabbed up PCBs with all SMDs. All you need to add are the through-hole parts.(mostly KK connectors and 1 electrolytic cap) It uses the same excellent Analog Devices/Maxim (MAX97220) headphone amp part used in the preamp. PM me if interested in this board.


Rick
- Home
- Amplifiers
- Chip Amps
- Latest Custom Preamp
