josephpo said:
I'm planning to route the edges smooth and then use some sort of filler to smooth the rough edges. Finally a glossy piano black finish. My friend is planning to make his Ferrari Red. Did I mention we're building 2 pairs! Thats 8 X 15" Alphas in my garage!
I'm so jealous... While waiting for the baffle, maybe try 4 alpha's per channel ?

Oops, sorry I can't spell Jerome.
Tried the notch filter last night and it makes a huge difference! You do need to know what to listen for but you can't miss the resonance/cone break up/distortion. According to manufacturer this peak is +15 db at 8.5 kHz. Nasty! Shaun also suggested this tweak some time ago.
Would it make any sense doing the same with the Alpha at around 2kHz? This peak is +10 db.
Ok, so let's say I would like to do something silly like scaring the neighbour's dogs - how would you use 4 x Alpha's per side? I presume hooking up 2 drivers serial and then parallel the serial pairs. The impendance load will be the same as a single driver but what do you expect to gain? Probably need to up the large serial inductors and would be able to loose the baffle completely, at least for the woofers?
Hello Joseph,
The nasty peak need to be at least 25dB down to suppress it influence and the alpha resonance is. Needless !
Have fun.
Would it make any sense doing the same with the Alpha at around 2kHz? This peak is +10 db.
The nasty peak need to be at least 25dB down to suppress it influence and the alpha resonance is. Needless !
Have fun.
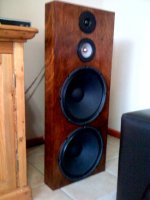
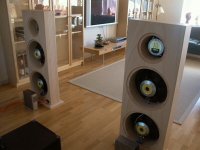
Just a quick update on progress so far. Attached photo of my J909's (Joseph 909
Ended up using Quaser Mk II type baffle - 7 layers mdf sandwitched together covered in walnut veneer. The Jamo bended baffle was just to difficult to get right for diy construction.
I'll have audio quality crossover finished by the end of the weekend and will post some feedback.
Ended up using Quaser Mk II type baffle - 7 layers mdf sandwitched together covered in walnut veneer. The Jamo bended baffle was just to difficult to get right for diy construction.
I'll have audio quality crossover finished by the end of the weekend and will post some feedback.
Attachments
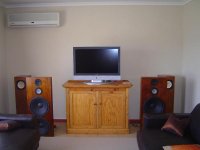
I had some fun listening to the J-Clones this weekend! I initially had the wiring to the mid mixed up and started with really horrible mid range sound. Going back to schematic fixed it and suddenly there was sound. These speakers were not the cheapest diy projects with 8 drivers which included expensive scan speak and seas drivers but I'm not disappointed. I'm sure the Jamo's will be better (Jamo did employ audio engineers on this as a 8 year project) and more refined but I'm sure that these will come fairly close. I'd like to spend a bit more time with them before really commenting, but certainly all the usuall comments apply made by open baffle converts. What did surprise me was how quit these speakers are, the bass is there when it should be not otherwise. I will certainly be burning my box speakers! Another surprise is that how efficient they are. Even with my EL34 valve amp I've never had the need to go past 34% on the volume control. There are also no distortion even playing very loud, so much so that it is difficult to realise just how loud you are playing.
On the downside, there is one specific note that is jumping out somewhere in the mid/high crossover frequency which I would like to tame a bit. I'll do some measurements in the next few weeks and try to find what is causing this.
The other fault (and I'm not sure this is a real fault) or just how good high end sound should be? I'm not sure the different drivers blend together properly. This I say because it is so easy to distinguish different sounds from multi instrument music. I certainly don't get this sense when listineing to normal pop music.
A last comment is on the tonality of the mid range sound, it's just a bit different my conventional speakers but you ears adjust to this within a few minutes, then the ob's sound better than box. Is this just part of the speaker colorations/character or a design flaw in the crossover?
Curved baffle - what went wrong?
Hi Joseph,
I was just wondering what went wrong with the curved baffle. You had a jig designed that sounded like it would work, but it obviously didn't. It would be helpful to know where things came unstuck for those of us also considering various baffle options.
Personally I'm also going for a flat baffle, but not even laminated in layers because I've had problems with gluing and clamping such panels. It always seems I mange to get voids in the resulting panel, which is not great.
Regards,
-Martin
Martin,
I think the biggest problem was that I (and more importantly wife) was running out of patience. The curved baffle could work it’s just that I underestimated the tension in ply wood and ended up with a curve that was not smooth. More cross bars would be required in the jig or some vertical bars to even out the pressure. Maybe a better option would be thin mdf layers and not ply.
At that stage I really felt like I needed to show some progress and decided to go with the simpler option. This was based on Bert’s Quasar MkII design. 7 layers 16 mm mdf (no more resonating ply) glued together resulted in a rather thick baffle of 112 mm (4 ½ inches) which was then veneered. The hardest part was routing the 56 holes. I created a full size template which is clamped over a single mdf panel with the circles pre-cut allowing for extra margin for the router guide.
Clamping the 7 layers wasn’t too difficult – it was however necessary to smooth the sides using a planer otherwise the veneer work would suffer. The veneer work was rather time consuming as I was literally sitting watching glue dry. To ensure even clamping pressure I could only glue 1/3 of the baffle at a time…
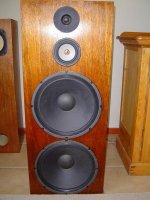
At the end I’m extremely happy, you can’t see it in the picture (I’ll upload some decent pics tonight) but the walnut finish is really rich and alive. The thin “box” look also makes it look like a conventional speaker.
There is one small problem with a 4 1/5 inch baffle. The cavity behind the mid driver caused some serious resonances. A quick fix to this was a couple of socks jammed into them, later replaced with some hollow fiber filling. I guess this cavity is deep enough to start acting as some sort of port. I’ll do some measurements with/without the stuffing to identify the exact frequency. Another maybe better option would to enlarge the hole a bit? I don’t really want to loose the open baffle sound by using too much filling. This has really fixed my concerns previously mentioned, the sound is now very well behaved and even the hardest metal sounds very smooth.
I think the biggest problem was that I (and more importantly wife) was running out of patience. The curved baffle could work it’s just that I underestimated the tension in ply wood and ended up with a curve that was not smooth. More cross bars would be required in the jig or some vertical bars to even out the pressure. Maybe a better option would be thin mdf layers and not ply.
At that stage I really felt like I needed to show some progress and decided to go with the simpler option. This was based on Bert’s Quasar MkII design. 7 layers 16 mm mdf (no more resonating ply) glued together resulted in a rather thick baffle of 112 mm (4 ½ inches) which was then veneered. The hardest part was routing the 56 holes. I created a full size template which is clamped over a single mdf panel with the circles pre-cut allowing for extra margin for the router guide.
Clamping the 7 layers wasn’t too difficult – it was however necessary to smooth the sides using a planer otherwise the veneer work would suffer. The veneer work was rather time consuming as I was literally sitting watching glue dry. To ensure even clamping pressure I could only glue 1/3 of the baffle at a time…
At the end I’m extremely happy, you can’t see it in the picture (I’ll upload some decent pics tonight) but the walnut finish is really rich and alive. The thin “box” look also makes it look like a conventional speaker.
There is one small problem with a 4 1/5 inch baffle. The cavity behind the mid driver caused some serious resonances. A quick fix to this was a couple of socks jammed into them, later replaced with some hollow fiber filling. I guess this cavity is deep enough to start acting as some sort of port. I’ll do some measurements with/without the stuffing to identify the exact frequency. Another maybe better option would to enlarge the hole a bit? I don’t really want to loose the open baffle sound by using too much filling. This has really fixed my concerns previously mentioned, the sound is now very well behaved and even the hardest metal sounds very smooth.
Hi Joseph,
If the cavity around the midrange is resonating I would try flaring the hole towards the rear. It's too late now but cutting holes of ever increasing diameter in the layers of the MDF would probably have been the simplest way to create a flare.
Regarding the curved baffle, how about the idea of gluing just two pieces of ply together in the desired curve, then when it dries, add extra layers one at a time?
I know what it's like wanting to see something happen - some sort of progress. Bare MDF in the lounge isn't a great look.
I finally have a couple of accelerometers (part MSP1001-ND) from Digikey so I hope to finalise my baffle shape/construction soon.
Cheers,
-Martin
I agree with DG. This must be the simplest solution.
You could use a Stanley Sureform or equivalent, like this (the flat file, but with the half round blade):
http://store.qualitydist.net/stsuto.html
It would mean removing the drivers because it would have to be done from the rear towards the front with the baffle face down, but it could be done free hand. I would not file closer than about 1/4" from the front surface, and I would mark a guide circle concentric with the existing circle but at the intended final diameter, as a visual aid.
I used to do this as a matter of course with my mids, which were usually mounted in 3/4" mdf.
Thanks for the advice!
Martin,
I have CNC cut mdf baffles in my garage and my friend has not started building his pair yet. Think I will give my jig another try! It certainly will help to only glue up a pair of baffles at a time but I do believe the jig must be reinforced with vertical bars to make sure you get a uniform curve.
Russell, David & Martin
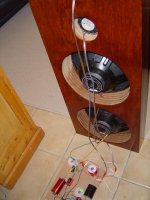
With regards to the mid cavity you are right; I will need to open it up. What an embarrassing flaw, in hindsight it is so obvious this cavity will cause resonances and impair open baffle sound. I haven’t encountered many thick baffles like this on the forums except for the Quasar. See attached picture.
You are right, it should be easy enough to enlarge even if it means a bit of elbow grease. I'll try to find the longest router bit available and the use a file to finish it off. The question is what diameter will move the resonant freq out of the mid's operating range. Will refer to Vance's book for the formula before I start cutting. It certainly would be sad if you just move the resonance around within the mid's operating band.
Martin,
I have CNC cut mdf baffles in my garage and my friend has not started building his pair yet. Think I will give my jig another try! It certainly will help to only glue up a pair of baffles at a time but I do believe the jig must be reinforced with vertical bars to make sure you get a uniform curve.
Russell, David & Martin
With regards to the mid cavity you are right; I will need to open it up. What an embarrassing flaw, in hindsight it is so obvious this cavity will cause resonances and impair open baffle sound. I haven’t encountered many thick baffles like this on the forums except for the Quasar. See attached picture.
You are right, it should be easy enough to enlarge even if it means a bit of elbow grease. I'll try to find the longest router bit available and the use a file to finish it off. The question is what diameter will move the resonant freq out of the mid's operating range. Will refer to Vance's book for the formula before I start cutting. It certainly would be sad if you just move the resonance around within the mid's operating band.
Attachments
I once talked to BD himself about this back cavity in the Quasar II. He said it did help in getting the frequency response of the fullrange driver right.
Looking at your pictures your back opening in the Jamo clone looks narrower than in the Quasar. Maybe you should open up the back step by step and control results in between.
Looking at your pictures your back opening in the Jamo clone looks narrower than in the Quasar. Maybe you should open up the back step by step and control results in between.
Ang said:could be useful to widen the rear cavities asymetrically - might have to do it by hand though
I was thinking the same thing - don't want to create a rear-firing horn, although to an extent it's impossible to avoid.
Maybe the real answer is to make the hole in the baffle much larger and employ a thin, set back sub-baffle for the mid and tweeter. This could also provide a degree of time alignment, especially if tilted back towards the top.
- Status
- This old topic is closed. If you want to reopen this topic, contact a moderator using the "Report Post" button.
- Home
- Loudspeakers
- Multi-Way
- Jamo R909 Passive Open Baffle Project