Hi all,
This is a bit odd, but some years ago I replaced the tray gear and the sled gear B on my VRDS CMK 4.0 equiped Copland CDA-288 MK. II with no problems.
I had taken the tray off and just inserted it again.
Now, on my other CDA-288, I replaced the sled gear B and reassembled, but now, I seem not to be able to turn the big black plastic gear the sits directly under the tray, to accept the tray correctly. It misalings with gear underneath which lifts the lower puck. And it also seems to be hard to push in the tray the last bit of it's way to fully closed.
Can anyone describe to me how to correctly adjust this and align all parts, so sled sits correctly?
Anything else I should know?
Kind regards,
Jacques
Last edited:
When I take a look at the big black plastic gear wheel directly unde rthe tray, there's a guide on top of it. I suppose this is to catch a tap that sits under the tray.
On the same gear wheel, there's also a small hole drilled close to the circumfery. What is this for? I notoced that spinning it slowly by hand, the hole is directly over the lower cog wheels on the underside of this big black plastic gear wheel, and on the inside of the inner circumpfery. Right there after, it raises the center lower spindle.
This is not happening when I install the tray.
What happens is, that I cannot "start" the movement of the tray, so have to start the movement by hand turning the big black plastic gear. And when it reaches close to shut, it meets resistance and have to be pushed a bit extra untill it stops. This feel unnatural, and most probably shouldn't be so.
Finally, I also notice a bit of wobling of the big black plastic gear, after I turn it's screw home (with a thin washer under it). That is also quite strange to me. It is not overcome by installing the nearly square metal cover on the left side of it.
So, my idea is to find out how to align the big black plastic gear, and eventually preload the spring loaded arm under it at around 11 o'clock, so that it lifts the lower spindle and can start moving the laser sled.
Any ideas?
Kind regards,
Jacques
Last edited:
I got around the rubberised tray falling apart, by gently wiping it with a papertowel cloth with isopropylalcohol. Took the remaining part off and the cd-tray is now nice and clean again.
Meanwhile I found an easy way to adjust the tray gear and the cd-tray:
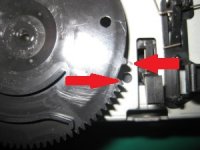
After having taken off the cd-tray, then the metal cover over the tray gear, replaced the gear, then inserting the tray gear (the big black one) so that the edge where it's missing a few teeth - first there is one tooth, then missing a few, then comes the teeth again, is pisitioned so, that the first tooth of the long row of teeth sits a few milimeters after the little hole in the chassis plate, which is left of the bent metal strip for the microswitch. see pic. On the pic the position is not correct it is the tooth that is pointed at, which should be aligned with the little speed marker line on the chassis plate.
Following the picture, the two red arrows should be aligned and point directly towards each other.
As you then slowly slide in the cd-tray, it passes the switch, clicks and then catches on the tray gear teeth. You know it's correctly positioned, when the cd-tray meets no resistance as it's fully puched in.
Another point: if one changes the other gear that may crumble and break, the laser sledge gear "B", be carefull when re-positionin the laser, so that it sits in the middle between the two micro switches that controld the movement stop forth and back.
Hope it make ssense.
Kind regards,
Jacques
Meanwhile I found an easy way to adjust the tray gear and the cd-tray:
After having taken off the cd-tray, then the metal cover over the tray gear, replaced the gear, then inserting the tray gear (the big black one) so that the edge where it's missing a few teeth - first there is one tooth, then missing a few, then comes the teeth again, is pisitioned so, that the first tooth of the long row of teeth sits a few milimeters after the little hole in the chassis plate, which is left of the bent metal strip for the microswitch. see pic. On the pic the position is not correct it is the tooth that is pointed at, which should be aligned with the little speed marker line on the chassis plate.
Following the picture, the two red arrows should be aligned and point directly towards each other.
As you then slowly slide in the cd-tray, it passes the switch, clicks and then catches on the tray gear teeth. You know it's correctly positioned, when the cd-tray meets no resistance as it's fully puched in.
Another point: if one changes the other gear that may crumble and break, the laser sledge gear "B", be carefull when re-positionin the laser, so that it sits in the middle between the two micro switches that controld the movement stop forth and back.
Hope it make ssense.
Kind regards,
Jacques
Attachments
You're welcome
Meanwhile, I am trying to build a CMK 3,2 from my VRDS-10 in to one of my Copland CDA-288's which normally in sporting a CMK-4,0 drive. A LOT of things have to be done to get more space. We'll see.
Kind regards,
Jacques
I guess it's not an easy job to find some room to install another drive than normally previewed for... letting apart the necessary electronic adaptation (sometimes required).
I've got a problem on a Wadia 16 (see that thread I Have Wadia 16 and Krell Schematics) which is not easy to solve (much more tricky than the problem with the Krell). I didn't choose the option to replace the drive yet (it works flawlessly) but the cause could be the commands control chip which is apparently paired with the drive... (by Teac). Don't know yet, I have to investigate... !
Enjoy your Sunday
")
Alright, so I got a new original flat cable. Now, the Tray gear broke - also old - so I installed a new oone.
As the tray is rubberised and it's slowly falling off and on to te cd's, I cleaned it all off with iospropanol alcohol. Works well.
Cheers.
Bonjour, Jacques!
Your thread here came at an opportune time for me. I've had a Wadia 850 (VRDS CMK4 drive) in my possession for a few years now. As with many others, I found 2 broken gears, the laser "sled" and the CD tray drive.
I have replaced those and am now running into this same obstacle where there is no motor movement with either eject or play commands. It makes sense that the flat ribbon cable between the mechanism and the control board may have failed. Unfortunately it is very difficult with this player to try and test the cable since it is concealed in order to connect the front display board.
I also am having difficulty getting the black tray gear properly aligned, but I'm going to shelf this until I get a replacement ribbon cable. Where did you get yours?
Thanks for all your input on this board!!
Isaac
Bonjour Isaac,
No worries, there are solutions to most things.
In your case, I would buy a fitting ribbon cable from fleabay. I did and it works well and is dead cheap. You have to note the following:
- amount of wires, say for example 16.
- spacing, say 1,25 pitch (mm), which is what Teac mostly used in those machines, possibly also Wadia.
- length (get a slightly longer one if need be).
- Type of connection: FCC A or FCC B. One is having open connectors on one side in one end and open connectors on the other side at the other end. The other type have the open connectors on the same side on both ends.
I believe I posted a thread on how to insert the tray elsewhere. Just follow that.
When you take the CMK 4,0 drive apart, you have to be very observant of the microswitches that they are not bent or placed wrongly. Look at it again, and DO clean then with a split cut cotton swap and a drop of isopropyl alcohol. Usually, over the years, they get a bit black with contamination and current, making them black and having bad connection. This leads to the next problem: if it cannot "see" a go or connection made from either of these, it won't play. So undertake that job first.
Always use a ground cable on your wrist, if handling lasers. And a new one often have a protection solder or similar that you have to remove, before it can operate. Just for protection against static electricity.
The flat ribbon cable nearly never fails, unless you have been a bit harm fisted when reinstalling, as one of the trays can come undone and move about, in which case it will not make a connection.
Clean all parts like snail, gears spindle axle and guide rail with a cotton swap with isopropyl alcohol and lube gears with synthetic relatively thin bearing grease (at auto part stores), and a drop of synthetic teflon oil on spray on to a cotton swap and then on to the guide rail for laser etc. to make it move freely. If you don't do this, old dirt and grease will hinter the laser and gears in working properly, and it may prevent it from playing and/or stop it or making jumping/skiping during play.
You have to take your Wadia 850 properly apart so you can work on it. It's not enough to jsut lift out the CMK 4,0 drive. I have tried to find some pictures where we can see where and how it's connected, but Wadia is rare and pictures are mostly from outside or promotion pictures with only top lid off, and does not show the consealed pcb's inside the extra casing. If you so, post a few pics here for future use by others
I think you have microswitch problems, not a broken ribbon cable, unless of course, you bent the end trays.
Let me hear what you find out.
See my new thread on VRDS drive improvement
Kind regards,
Redfox.
I have just finished a Krell KPS 28c with the same difficulties in correctly replacing the tray and I found a simple solution, you can see in the photo that there is a hole in the black sprocket, well there is the same in the metal of the chassis of the block( not the one that is visible between the two arrows on the photo), it is enough to match them and it goes the first time.
Be careful (for those who have operated the drawer by hand several times) to think about putting the spinner back in the low position.
What was most painful with this player is that it goes into safety and cuts the power supply at the slightest problem.

Be careful (for those who have operated the drawer by hand several times) to think about putting the spinner back in the low position.
What was most painful with this player is that it goes into safety and cuts the power supply at the slightest problem.
- Home
- Source & Line
- Digital Source
- how to insert CD tray correctly into Teac VRDS CMK4.0?