Getting back to the modified phase plug, I had done a rush job of cuting away that portion of the plug which interfered with the wire junctions of the tweeter. The tweeter will not sit perfectly centered on top of the plug, so some modification is necessary. Since I knew that I would not be using this plug on a permanent basis, and had lots to spare, I just did some rough cutting. Here is what it looks like while lying on it's side, with the tweeter on top.
And here is what the cut looks like, with the tweeter move aside. Note that the grooving goes all the way to the hole in the plug. That way the wire can be moved to the hole, and then down and through the now vented pole piece of the B20, and out the back of the driver.
My first try here is rather crude, and will most likely need a dremel tool to grind a small groove that the wire and junctions can fit within and also present a more professional appearance. I would think that just about any small tweeter will work this way, and some modification will be necessary with them all. And the smaller the tweeter, the more the modified phase plug can work in your favour.
One thing that we tend to forget is that the driver will be facing up, so maybe a couple of magnets will be more than enough to keep the phase plug assembly in place. I'm not certain at this point. But using epoxy to hold the plug in place could be problematic, because if some of the epoxy is forced out of the connection, it could stick to the voice coil and glue it in place as well. That would be a Real Bummer, don't you know?
Anyway, I think this proceedure has merit for taking a very good and inexpensive driver and make it much more versatile. I own a Woofer Tester, which I purchased a few years ago, and never learned to use. I was at the tail end of my last speaker building compunction, and soon moved on to other things and never got around to learning how to use it. Now that I am back in the groove, it's possible for me to take more B20s and run a "before" and "after" series of tests with the drivers in order to see if things are still up to "snuff" so to speak.
What I really would like to do is have some means to actually run a frequency response curve 'before' and 'after' as well just to see if all these improvements are working. Any ideas?
An externally hosted image should be here but it was not working when we last tested it.
And here is what the cut looks like, with the tweeter move aside. Note that the grooving goes all the way to the hole in the plug. That way the wire can be moved to the hole, and then down and through the now vented pole piece of the B20, and out the back of the driver.
My first try here is rather crude, and will most likely need a dremel tool to grind a small groove that the wire and junctions can fit within and also present a more professional appearance. I would think that just about any small tweeter will work this way, and some modification will be necessary with them all. And the smaller the tweeter, the more the modified phase plug can work in your favour.
One thing that we tend to forget is that the driver will be facing up, so maybe a couple of magnets will be more than enough to keep the phase plug assembly in place. I'm not certain at this point. But using epoxy to hold the plug in place could be problematic, because if some of the epoxy is forced out of the connection, it could stick to the voice coil and glue it in place as well. That would be a Real Bummer, don't you know?
Anyway, I think this proceedure has merit for taking a very good and inexpensive driver and make it much more versatile. I own a Woofer Tester, which I purchased a few years ago, and never learned to use. I was at the tail end of my last speaker building compunction, and soon moved on to other things and never got around to learning how to use it. Now that I am back in the groove, it's possible for me to take more B20s and run a "before" and "after" series of tests with the drivers in order to see if things are still up to "snuff" so to speak.
What I really would like to do is have some means to actually run a frequency response curve 'before' and 'after' as well just to see if all these improvements are working. Any ideas?
Ed LaFontaine said:Pretty slick...a thoughtful execution...I've got a pair of the same drivers in the cue. Thanks for sharing.
Any time Ed. That's what we are here for.
")
dlneubec said:Hi John,
Nice job! I would guess that the ND20-FB will be better in your application because of the smaller flange and also due to its rising frequency response, which should be helpful in getting a flatter 90º off axis FR.
FWIW, another very nice, inexpensive neo tweeter you might try is the Aura NT-1. If you haven't seen it, you can at Madisound. It has the same body as the FB, but a titanium dome and is consideraly lower in distortion and can cross lower for that reason. I'm comparing it to the NB in my current project, and to my ears, it is much cleaner and more detailed and only $3 more.
Aura NT1
Dan, with the MD20-FB I can also cut away the small flange and open up more for the PP to work better. Also, it has a fairly high sensitivity level, which makes it easier to match. If it is a bit too bright, it can always bee toned down a bit.
That Aura NT-1 is also another nifty item. I have seen it around but did not know whence it came. However, I notice that it has an 88db spl which is lower than the B20. It states that the B20 has an spl of 94db. Do you think that may make a difference?
Greybeard1 said:
Nice work... The only thing I would do differently than you're suggesting is use flush mounted flat head screws on the back of the plug to magnetically adhere the plug in place. You can get a hint of how it ooks by looking at some of the phase plug pictures on the planet 10 site. It's not my idea
It might be that the weight is too much for the plug to hold... but I'd certainly try it before expoxying something in place.
Unless youre' talking about expoxying the supertweeter to the plug... in which case, ignore everything I just said
GB
GB, I think you are right here. I will try to use a magnet first, since the driver is facing upward, and all the weight will be down on the magnet assembly. If it was standing up, I would not consider that. We'll have to see how it goes. If I have any problem I can always come back and blue it.
Another reason to just attach magnets is that if I am forced to clean out the voice coil, detaching the magnets is very easy. Detaching a glued PP will be more troublesome.
planet10 said:
I'm amazed you got thru with a hand drill -- what kind of bit? How hot did things get? I may try that now.
I got 1 1/4" dowel for my experiment. The little dayton fits perfectly on the end. A piece of 1 1/2" heat shrink will go over this to make it look seemless and add a bit of girth,
I don't think screws will be enuff to hold the plug if the driver is mounted normally, but facing up it will probably be sufficient. A tiny bit of ductseal or bluetack to keep the plug from walking might be helpful.
dave
Dave, it was really no trouble there. The secret is to use a sharp bit AND use oil as a coolant. In this case I used one of those coated bits I got at Harbor Freight. Every time I redrilled, I first applied sewing machine oil, of which I have more than a gallon
, and then applying just enough pressure to cut into the pole piece. I frequently removed the excess metal, which tended to stick to the bit due to all that oil present. It also made it easy to remove, since 95% of the shavings remained on the bit. Then a wipe-down of the top of the B20, each time, got the rest of the shavings. It just takes patience. As the hole got deeper I continued to fill it with oil. The more oil the better, as it keeps the bit cooler and it continues to cut well. And as an added bonus, all those tailings stick to the bit. It was the cleanup that took up most of the time. It is virtually impossible to get rid of ALL the tailings, no matter how hard you try. That is why you have to be willing to get in between the coil and magnet and gently pull up any tiny piece of metal that mysteriously shows up there. I find that adding the paper insert, taping it to the magnet, and putting grease where the bit will exit, helps greatly.
Using heat shrink is worth considering. How does it look once it is shrunk? Can you show us a picture of it complete? I'm always open to suggestions. I had planned to use eposy to attach it to the PP once I had painted it.
BTY, what is "bluetack"? Is that the blue painters masking tape I used earlier? I'm still learning all these new words and speaker acronyms.
MJL21193 said:
Misplacing the chuck key is my specialty too.
VERY nicely done! I'm impressed.
Keep an eye on squeeze out when you glue in the dowel. Suck to have the VC epoxied in place.

Tell you what, when I find it again, I am going to tie it to a heavy duty string and tie it to the drill press. Enough of this forgetting where I put it.
Yeah, Epoxying the voice coil to the magnet is a real "B"-itch.
Kensai said:Fantastic work, John. The smaller Dayton tweeter (of which I have a pair) would probably work a bit better for you (could probably be press fit directly into the dowel instead of having any exposed back side causing reflections), but that wouldn't exactly be a difficult change down the line. You'll be able to see how viable this is quickly enough, and I'm excited to see how it goes.
Kensai
Thanks Kensai
I have a lot of that 1 1/3" doweling, since I use it a good deal in my business. I'm always cutting off excess wooden curtain rodding that just goes into the trash. Most of it is fluted, but a fair amount is not. If you need to get some of it in the future you can always go to Lowes or Home Depot and go to the drapery section, where they sell wooden rodding. You can get natural or stained, and sometimes already painted black rodding. It fits perfectly in the B20 as standoff. That way, if you make a mistake, you just throw it away, and cut off another piece, with lots more to spare. pinkmouse said:Nice work John. For cleaning gaps, I use a piece of painter's masking tape folded in on itself to make a point with the sticky sides out. Gets out stuff you didn't even know was there.
What a marvelous idea! I did not consider it, but will in the future. Most people are deathly afraid to play around inside the Voice Coil, but it is not all that bad once you learn the proper proceedures. This idea makes my job easire when I drill the hole in the next driver. Let's hope it can pick up some of the shavings.
Somehow, I forgot to insert the last picture of the pole piece and the tweeter turned away from it. Here it is now.
Sorry about that. I can get pretty forgetful at times. Part-timers disease creaping up on me I guess.
An externally hosted image should be here but it was not working when we last tested it.
Sorry about that. I can get pretty forgetful at times. Part-timers disease creaping up on me I guess.
John L said
I use a rare-earth magnet on the side of the drill press and just stick the chuck key there - works fine. Some people use retractable key-chain thingies like this but it seems to me it would clatter around and be annoying.
John, this may have been answered earlier in the thread - if so, I apologize for missing it - but was there a reason you decided against just suspending the tweeter on wire fastened across the front of the B20? Don't get me wrong, I'm admiring your workmanship, but just wondering why you chose what looks like a difficult option.
Regards.
Aengus
Tell you what, when I find it again, I am going to tie it to a heavy duty string and tie it to the drill press. Enough of this forgetting where I put it.
I use a rare-earth magnet on the side of the drill press and just stick the chuck key there - works fine. Some people use retractable key-chain thingies like this but it seems to me it would clatter around and be annoying.
John, this may have been answered earlier in the thread - if so, I apologize for missing it - but was there a reason you decided against just suspending the tweeter on wire fastened across the front of the B20? Don't get me wrong, I'm admiring your workmanship, but just wondering why you chose what looks like a difficult option.
Regards.
Aengus
John L said:
Tell you what, when I find it again, I am going to tie it to a heavy duty string and tie it to the drill press. Enough of this forgetting where I put it.
Yes, the string trick works or a magnet on the side of the pulley cover. You managed to get it done anyway.
Proves my philosophy: drill presses are for sissies (or machinists - same thing), real men do it hand-held.
Aengus said:John L said
I use a rare-earth magnet on the side of the drill press and just stick the chuck key there - works fine. Some people use retractable key-chain thingies like this but it seems to me it would clatter around and be annoying.
John, this may have been answered earlier in the thread - if so, I apologize for missing it - but was there a reason you decided against just suspending the tweeter on wire fastened across the front of the B20? Don't get me wrong, I'm admiring your workmanship, but just wondering why you chose what looks like a difficult option.
Regards.
Aengus
First, on the keychain, I have been using one of those on my belt for going on 33 years. I first used one when I was right out of graduate school and managed one of the first Cracker Barrel Old Country Stores in Tennessee, back in 1975. I would not know what to do without one. I'd lose my keys on a continual basis.
And Second, I considered doing it the way you mentioned, but that would be too easy. It is part of human nature to make things hard, don't you know.
Plus, I want it to look more professional, and do something that others have not done already. And already Dave is furiously preparing to make this very mod to his B20s, so we are on to a new trend here with what will obviously become a cult classic. Wouldn't it be neat to have something that manages to beat the stuffing out of the others? And it is relatively simple to do. All you need is a little desire to be creative, a sharp bit, drill, machine oil, and some patience. What more can you ask?
All you need is ... some patience. What more can you ask?
Well, speaking purely for myself, it's the patience I lack. I'd ask for some, but I'd probably have to wait in line.

Regards.
Aengus
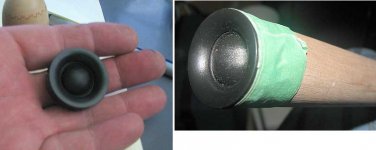
UPS brought my Parts Express order tonight, and one of the things in that order were my two ND20FB-4 tweeters. I took the dowel and cut another 1 1/2" strip from it, and repositioned the openings for the new tweeter, and here is what I came up with.
Then I took out my belt sander and carefully sanded down the outer flange where the screw holes were, and this is the raw look.
That should help improve the sound a bit, I think.
The diameter of the tweeter is exactly the same as that of the PP too. That should streamline things. I'll work on it some more tomorrow.
An externally hosted image should be here but it was not working when we last tested it.
Then I took out my belt sander and carefully sanded down the outer flange where the screw holes were, and this is the raw look.
An externally hosted image should be here but it was not working when we last tested it.
That should help improve the sound a bit, I think.
The diameter of the tweeter is exactly the same as that of the PP too. That should streamline things. I'll work on it some more tomorrow.
John L said:It states that the B20 has an spl of 94db.
90 seems to be what people are measuring.
http://melhuish.org/audio/parameters.html#pioneer
and attached are what i measured for the Kensai's B20
dave
Attachments

John L said:Using heat shrink is worth considering. How does it look once it is shrunk? Can you show us a picture of it complete? I'm always open to suggestions. I had planned to use eposy to attach it to the PP once I had painted it.
BTY, what is "bluetack"? Is that the blue painters masking tape I used earlier? I'm still learning all these new words and speaker acronyms.
I haven't got past the point in the picture. Tweeter just taped to the 36" piece of dowel (BTW how long did you cut your dowel?
Bluetak is a putty like substance used for putting posters on the wall without harming the poster or the wall.
dave
Attachments
planet10 said:
I haven't got past the point in the picture. Tweeter just taped to the 36" piece of dowel (BTW how long did you cut your dowel?
Bluetak is a putty like substance used for putting posters on the wall without harming the poster or the wall.
dave
Dave, the dowel is exactly 1 1/2" long. That puts the front of the tweeter about even with the top of the wheezer cone. Should I make it longer?
And I just thought of something else that should also stick very well, and will spread more evenely.
An externally hosted image should be here but it was not working when we last tested it.
John,
If you had measurement capability, I would suggest you determine the best length from testing various heights of the phase plug/tweeter. You will likelly get a better phase match between the woofer and tweeter if the tweeter is recessed deeper, closer to the VC of the woofer.
However, I'm not sure at what point or if the magnetic field of the woofer motor could effect the tweeter or how the woofer response will be altered by your phase plug/tweeter.
Dan
dlneubec said:John,
If you had measurement capability, I would suggest you determine the best length from testing various heights of the phase plug/tweeter. You will likelly get a better phase match between the woofer and tweeter if the tweeter is recessed deeper, closer to the VC of the woofer.
However, I'm not sure at what point or if the magnetic field of the woofer motor could effect the tweeter or how the woofer response will be altered by your phase plug/tweeter.
Dan
I don't,....yet. I am going to set up my woofer tester, and try to come up with what I need to test drivers, including a good crossover system. I just don't know what to get, or which items to choose.
I'm even thining seriously of obtaining a copy of Soundeasy.
planet10 said:
90 seems to be what people are measuring.
http://melhuish.org/audio/parameters.html#pioneer
and attached are what i measured for the Kensai's B20
dave
Dave, what program are you using to obtain this graph?
Here is what the tweeter/B20 combination will look like. I did not tape up the bottom of the PP for obvious reasons. when I finally run the wiring and finish up the assembly, I will spray paint the entire PP black.
This should make a very custom and seamless look when finished. I'll go out this afternoon and pick up a 4 x 8 sheet of MDF and start cutting it up in order to make another set of blanks for the future diffraction lenses. Things are slowly starting to come together,....finally.
An externally hosted image should be here but it was not working when we last tested it.
This should make a very custom and seamless look when finished. I'll go out this afternoon and pick up a 4 x 8 sheet of MDF and start cutting it up in order to make another set of blanks for the future diffraction lenses. Things are slowly starting to come together,....finally.
John L said:the dowel is exactly 1 1/2" long. That puts the front of the tweeter about even with the top of the wheezer cone. Should I make it longer?
That was my initial target. For a front firing driver that is close to the ideal height for the phase plug. As dlneubec points out, ideal from a phase match point might be elsewhere, even maybe tweeter glued right to the polepiece. There are theorectical tradoffs between all potential placement... some measures would be helpful.
In your case with the deflector.reflector, my inital reponse would be that the tip of the deflector should be as close as feasible to the apex of the dome.
dave
John L said:
Dave, what program are you using to obtain this graph?
Output from Fuzzmeasure copy & pasted into Adobe Illustrator.
http://www,fuzzmeasure.com/
i am using version 1.3.5 for impedance because 2.0 really concentrated on FR measures and the impedance T/S was a logistic step backwards from a producton POV, i haven't been able to try out 3.0 because it requires Leopard and i'm going to need a new Mac to run Leopard (planned to get an 8 x 2.8 GHz intel tower
) .Fuzzmeasure output really puts everything else to shame as far as quality output for presentation purposes. I can't tell you how many LAUD/Praxis/SoundEasy/ARTA graphes i've had to trace and then grapft onto a Fuzzmeasure grid fro presentation purposes.
dave
- Status
- This old topic is closed. If you want to reopen this topic, contact a moderator using the "Report Post" button.
- Home
- Loudspeakers
- Full Range
- Hexagon Pioneer B20FU20 Enclosure