Chris, thanks for the guiding hand. I'll working on it some this weekend. I got the parts to build the esp power transistor tester, but I will also add the .22 ohm resistors to my jig, because that is the value used for the emitter on my Adcom 535.
And second, to build your matching jig for the small signal transistors. I am not touching my Adcom again until I have good, accurate jigs and have my matches for my power transistors and the drivers.
For now, I'm sure this IT-18 needs some investigative work and cleaning to get it working right. I'll check those things you listed and update this thread if I get it figured out.
Hi sonidos,
No problem. Just enjoy as you do the work.
I am not aware of how the esp matching jig works. I built one for mosfets and one for BJTs of my own design. It's just a heat sink with transistor sockets with exposed resistors to read voltages across. I used terminal strips on the top of the structure. All you do is aply the supply voltage, + or -, then adjust the bias with another supply. All the resistors are precision types and hand selected. Now I have four transistors running at the same temperature and I can calculate the beta on each. I typically set the current to my expected bias current and allow it to settle down before measuring.
The IT-18 is a pretty simple device, so it shouldn't take too long. Note that a weak battery will throw the inside calibration out. Use a new, alkaline "D" cell.
-Chris
Chris, great. The esp layout is probably overkill since my Adcom runs class AB and his setup can run up to a few amps. I'll set up a jig so I can do as you suggest. I've got a decent size heatsink in my spare parts bin. At idle, the emitter resistor has a voltage drop of just 5 mV, so about 23 mA current...so I guess nothing fancy is needed. Should I omit the emitter resistors in my test jig or better to have them in the jig?
Back on topic, I measured the current through the emitter of one of the KSA992's and it was 3.8 mA. So not even close to 1 mA.
Back on topic, I measured the current through the emitter of one of the KSA992's and it was 3.8 mA. So not even close to 1 mA.
Last edited:
Hi sonidos,
Time to begin looking at resistor values and connections. It's entirely possible that an error was made in the 1970s and the meter wasn't much used as a result. Now, this same issue rears it's ugly head again.
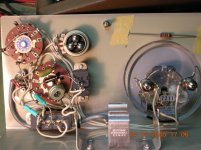
The major difference is that you now know where the problem manifests itself. That means you can look over the schematic and figure out what might cause such a thing. I have included a picture of what my meter looks like inside. No, I didn't build this one, in fact I find the use of a single colour for wiring a bit confusing. Having had to trace many items in order to find a fault, I generally do use multiple different colours of wire.
I hope the photo helps you find a problem.
Your testing jig can include emitter resistors I guess, but that would make it less sensitive to variations in each transistor. Remember that the goal is to highlight the differences between transistors. Once you actually design an amplifier circuit, you would use good design practices (like emitter resistors) that would minimize the variable effects of transistor characteristics. I measured the currents by looking at the voltage drops across resistors in each collector circuit. Each base circuit also had a resistor in series to determine the base current. After that, it's straight math.
Hi Fred,
I am not sure about the documentation being wrong or unclear for this. Heathkit has probably produced more construction manuals than almost anyone else. Since I didn't have to opportunity to build this one (I did build an IT-121 a few years ago), I have built a number of kits from various sources over the years. If the documentation for this model has an error, it's a rare event for Heathkit. There are other kits out there where the documentation is a complete joke. It is interesting that we see three (?) instruments with the the same building error.
If you don't mind me asking, approximately how much did each of your two meters cost you?
I also have two of these testers, in case one breaks. I have calibrated both of these at the same time and confirmed their readings were about the same. My second meter was purchased about a year or two ago off Eeekbay. It's in much better cosmetic condition than my original one is in and represents one of the few things that came through Eeekbay that actually functions properly. I use mine so much that I have worn out the signal transistor socket, the clips and the lead coming out of the meter. Wearing out other irreplaceable parts is a very real concern for me - hence the backup meter.
-Chris
Time to begin looking at resistor values and connections. It's entirely possible that an error was made in the 1970s and the meter wasn't much used as a result. Now, this same issue rears it's ugly head again.
The major difference is that you now know where the problem manifests itself. That means you can look over the schematic and figure out what might cause such a thing. I have included a picture of what my meter looks like inside. No, I didn't build this one, in fact I find the use of a single colour for wiring a bit confusing. Having had to trace many items in order to find a fault, I generally do use multiple different colours of wire.
I hope the photo helps you find a problem.
Your testing jig can include emitter resistors I guess, but that would make it less sensitive to variations in each transistor. Remember that the goal is to highlight the differences between transistors. Once you actually design an amplifier circuit, you would use good design practices (like emitter resistors) that would minimize the variable effects of transistor characteristics. I measured the currents by looking at the voltage drops across resistors in each collector circuit. Each base circuit also had a resistor in series to determine the base current. After that, it's straight math.
Hi Fred,
I am not sure about the documentation being wrong or unclear for this. Heathkit has probably produced more construction manuals than almost anyone else. Since I didn't have to opportunity to build this one (I did build an IT-121 a few years ago), I have built a number of kits from various sources over the years. If the documentation for this model has an error, it's a rare event for Heathkit. There are other kits out there where the documentation is a complete joke. It is interesting that we see three (?) instruments with the the same building error.
If you don't mind me asking, approximately how much did each of your two meters cost you?
I also have two of these testers, in case one breaks. I have calibrated both of these at the same time and confirmed their readings were about the same. My second meter was purchased about a year or two ago off Eeekbay. It's in much better cosmetic condition than my original one is in and represents one of the few things that came through Eeekbay that actually functions properly. I use mine so much that I have worn out the signal transistor socket, the clips and the lead coming out of the meter. Wearing out other irreplaceable parts is a very real concern for me - hence the backup meter.
-Chris
Attachments
Super!
Anatech,
A picture is worth a 1000 words. Mine is wired backwards too! We're almost batting a 1000 here. BTW, I paid $40 for mine. Yes, I've got plain vanilla white wire running throughout the unit, so I'll see if anything needs to be rewired. I won't be excessive on changes, of course.
A little off topic again, but some things take a while to sink in with me. Yes, I figured out that for my test jig that I don't want emitter resistors, but I do need one for collector, and one for base. I'll figure out the right values. Metal films can be had for small change. I think I've gotten it straight enough that I won't be smoking any power or driver transistors.
Hi sonidos,
Right on! I'm really glad that helped you out. With any luck, others with problems can sort them out by looking at the picture.
Now, for my power transistor jig, I used matched 1.00 ohm resistors in the collectors and matched 1.00 K ohms in series with the bases. The base resistors connect to a heavy buss, I used #12 solid copper for that. The collectors are fed from the same type of wire, but they are split into two equal length runs to reduce voltage drops. Using a 1K resistor in the base circuits allows me to run the group up with almost identical base currents. A quick measurement down the line will confirm this.
I used metal oxide resistors for the collector circuits and metal film resistors for the base circuits. All were purchased in 20 lots and matched from there.
You paid a bit more for your IT-18 than I expected, but they are cheap compared to other things you can buy that don't work as well. Was your meter in excellent cosmetic condition? Most of these meters I see are almost perfect, like new.
-Chris
Chris - thanks for bringing the picture into sharper focus. I planned on paying close attention to voltage drop...I know I need to make all things as equal as possible to get accurate beta values. Takes me back to physics lab and the experiments we ran.
Yes, the IT-18 is in great condition. My one concern is that the seller had no idea if it worked or not. He probably 'scooped' it up among other things in an estate sale. At least it will have a good home now and I'll document all of this in case one of my kids or relatives has interest in it when I'm an old geezer.
Yes, the IT-18 is in great condition. My one concern is that the seller had no idea if it worked or not. He probably 'scooped' it up among other things in an estate sale. At least it will have a good home now and I'll document all of this in case one of my kids or relatives has interest in it when I'm an old geezer.
I am not sure about the documentation being wrong or unclear for this. Heathkit has probably produced more construction manuals than almost anyone else. Since I didn't have to opportunity to build this one (I did build an IT-121 a few years ago), I have built a number of kits from various sources over the years. If the documentation for this model has an error, it's a rare event for Heathkit. There are other kits out there where the documentation is a complete joke. It is interesting that we see three (?) instruments with the the same building error.
If you don't mind me asking, approximately how much did each of your two meters cost you?
Hi Chris,
I paid about $35 for each of the meters. Both auctions claimed the meters worked correctly. I did not believe them (and was proved right).
As a professional technical writer, I would say that if users are consistently making the same error, even if they are doing so out of sloppiness or lack of attention, then the documentation is not doing its job. Tech writers need to account for human nature as best we can. Obviously you can't guarantee success for every single person. However, given the failure rate for the correct installation of this part, if this were software based instructions, I'd be calling for a re-write of that section (or my bosses who get the Support Call Center bills would be!).
In this case, I think Heath should have emphasized the need to install the part right way up, and stressed that assemblers look at the picture for the correct orientation.
It's just a small thing, and overall I agree that Heathkit instructions were remarkably good and clear, especially for their time. Otherwise, how else could a hormone-addled 13-year-old have successfully built an integrated amp that played for years!
TO-3p socket?
(note: this is slightly off topic so my apologies to all following this thread)
Chris - on your test jig, you mention using transistor sockets. That's perfect if I am testing TO-3 types. But what about TO-3P types like my Adcom has? They are on about 5mm centers and would alligator clips be good enough? That concerns me as I would want a good solid connection to the jig and after searching the net and DigiKey, I don't have a good answer.
Hi Fred,
You know, I can't disagree with you on that at all. Human nature being what it is and all. What I think is that technical people often take a number of things for granted when trying to communicate to non-technical people, or others who are not far along in their studies. I know I can look at some instructions and have a clear idea of the intent, yet other people may look at the same document and be completely baffled. Works the same in reverse for me as well.
I am often accused of "speaking down" to people. In fact, I'm not 100% sure I know what that means. I do know that this occurs when I am trying to be clear in what I'm trying to say simply because I know from experience that you can't assume anything about what another person knows. Darned if you do, and ... you know.
Your experience as a technical writer gives you insight into this that I probably don't have. I'm just tickled pink if I get a message successfully across without being accused of being conceited or "talking down" to someone. I did take a technical writing course as part of my studies, but I'm not sure how well I execute what I was taught!
Hi sonidos,
The TO-3P types are clamped down, then I use a plastic type socket on leads that mates with flat contacts. I have to admit that right now, this procedure is not part of my jig. I just temporarily solder the other ends to the existing jig. I did have some plastic insulator material from a Carver Lightstar similar to the ones cut out for TO-220 or TO-3 transistors, but it's a flat sheet. Now for the part that I'm not that proud of. The transistor bodies are "clamped" by using flat bar stock stacked up. It's not very pretty, but it does work for the short term. I was going to use those clamps available at woodworking stores that simply apply pressure by cam action. You screw them down and use a lever to engage them. Then I saw the price per (X 4 at least) and grew faint. So I'm considering some way to clamp all the parts down without using a screw, bolt or other fastener. It has to be adjustable for part thickness (shims will work fine here) and allow one or more levers to actuate the clamp. I'm sure I could use solenoids to achieve this (less expensive than those clamps). talk about Rube Goldberg!
The sockets were re-purposed from old computer monitors. This is an old habit from my childhood and teenage years when components were far too expensive to buy. I'm now collecting horizontal outputs for use in a high voltage regulated power supply, target 500 VDC or so. I may be further ahead to use HV Mosfets, but the cash thing is an issue. See? I'm just like every other experimenter out there.
Getting back to the sockets you are looking for. Molex may have a product that will work, or Amp. I'll try to have a peek some time. I always look at scrap parts first before wasting a lot of time to find something I can't afford in the first place. Not only that, but if I can afford it, those items are almost certainly not a stock item. My luck there is only matched by my track record of "working" items bought from Eeeekbay. You're not alone there.
-Chris
Chris -
Keep on talking down!
Ok, I'll keep looking too for that perfect solution to get a good connection on my TO-3Ps. I went ahead and drilled and tapped a heatsink to mount them with screws. I'm not into big production here...I just need to get my amp running at full potential.
I'm adjusting my gray cells now to look at re-purposing things too. I keep justifying that certain things cost a few cents or just under a dollar, but boy it adds up! It's a habit I need to gain quickly.
Folks - I'll let you know about how my IT-18 works after turning that switch around.
Hi sonidos,
I'd rather someone explain things completely as well. I tend to pick up things I missed, even if I know the subject.
Once you have tapped the holes, give the holes a slight countersink. Then sand the entire mounting surface flat, use 600 grit wet/dry paper as your final finish. I also like to use 800 grit, then the paper back. Shiny like a mirror, or close. Surface roughness determines how well the heat is transferred - to a limit (and I am beyond the limit). For me, the very shiny surface alerts me to any material on the mounting surface. It's easier to see.
Hi Pete,
You may be onto something there. I'm surprised at how many people are reporting this.
I wonder how many of these testers Heathkit sold? There doesn't seem to be any shortage of them - for which I am grateful! Everyone should have a decent transistor tester on their bench.
-Chris
Not everyone appreciates it, I suspect that pride may be part of the issue.Keep on talking down!
I'd rather someone explain things completely as well. I tend to pick up things I missed, even if I know the subject.
That'll work just fine. On Semi has some app notes on mounting semiconductors in PDF format. Download and read them, I think there are three all told. Your biggest mistake will probably be over-tightening the mounting hardware. Almost everyone does this. Bar clamping provides a more evenly spread pressure, which is why I was going that route (plus it's easier). They also have clips that perform the same function as a bar while controlling the clamp pressure.I went ahead and drilled and tapped a heatsink to mount them with screws.
Once you have tapped the holes, give the holes a slight countersink. Then sand the entire mounting surface flat, use 600 grit wet/dry paper as your final finish. I also like to use 800 grit, then the paper back. Shiny like a mirror, or close. Surface roughness determines how well the heat is transferred - to a limit (and I am beyond the limit). For me, the very shiny surface alerts me to any material on the mounting surface. It's easier to see.
Perfect! Recycle and reuse. Poirot would be proud! That's DIY at it's core.I'm adjusting my gray cells now to look at re-purposing things too.
Hi Pete,
You may be onto something there. I'm surprised at how many people are reporting this.
I wonder how many of these testers Heathkit sold? There doesn't seem to be any shortage of them - for which I am grateful! Everyone should have a decent transistor tester on their bench.
-Chris
Chris - got the app notes from OnSemi. It all makes sense. I picked up woodworking when I was 24. A trick I picked up was to get a thick piece of tempered glass to use as a sharpening surface because of its flatness. Keeps the blades nice and flat, as well as planing surfaces. I'll give that a try on this heatsink because it was surplus stuff and it is definitely on the dull rough side and needs a good polishing.
Guys,
Thanks for the tips! I turned the switch around, got everything wired right and the values are falling into the right range. I tested some small signal transistors, drivers, and power transistors. Looks good! I still need to check that everything is working fine internally, but at least I'm on the field now.
One thing that this unit told me is that a couple of power transistors I tested are probably fakes. I bought them from another source (MCM) and the silk screen is different from the ones I purchased from an authorized distributor.
Here's a toast to good tools!
Hi sonidos,
-Chris
That's great! I wish more people would take the time to learn about the basic things we all need to do. I don't think there is any excuse to do a job improperly if you work in an industry. Hobbyists have more time to research these things in my experience, but this basic stuff should be taught in whatever post secondary education programs that are taught on the subject. I first was instructed by an older technician (who had less theory than I did, but had a great deal more common sense at the time. It always pays to listen to the older guys!). Later on I discovered the original app note in a Motorola manual. I had long been aware that the best continuing education can be had by reading application notes and data sheets. This is still true.got the app notes from OnSemi. It all makes sense.
You can get large, certified flat stone surfaces from many woodworking supply stores these days. Even though I don't do much woodworking any more, I plan to pick one up as soon as my basement is straightened up and organized. These things have many uses. Really good tip though, I could have used that knowledge earlier in time!A trick I picked up was to get a thick piece of tempered glass to use as a sharpening surface because of its flatness.
And now I'm really happy! Thank you for letting us know. This has been a real pleasure for me.Looks good! I still need to check that everything is working fine internally, but at least I'm on the field now.
Hear hear!!Here's a toast to good tools!
-Chris
I'm coming in a bit late on this topic, but I have an IT-18 as well...but no manual. Mine was no longer in use in my department, but I could not find the manual.
This thread is very useful...it has been years since I checked transistor Beta, but I can never pass up a piece of test equipment.
Does anyone have a copy available for posting? I'd be willing to pay for photo copies and postage as well.
Thanks,
Dave
This thread is very useful...it has been years since I checked transistor Beta, but I can never pass up a piece of test equipment.
Does anyone have a copy available for posting? I'd be willing to pay for photo copies and postage as well.
Thanks,
Dave
- Status
- This old topic is closed. If you want to reopen this topic, contact a moderator using the "Report Post" button.
- Home
- Design & Build
- Equipment & Tools
- Heathkit IT-18 transistor tester troubles