rdf said:Thanks for the link Sherman!
No problem. Euphonia seems to have about the best price going on the James TXs. I just checked their site today though and they now seem to be backordered until Feb 7 or so. I'm glad I didn't wait any longer to order mine!
One benefit, to me anyway, of the James units is that they are smaller than the Hammonds. I am trying to do this on a 12" square aluminum sheet and the extra inch available now opens things up a bit and makes the layout look better I think.
I was thinking of replacing the Hammonds with James, then using the 1628s to bench the next amp. A bit of overkill, but what the hey, and it's an opportunity to hear the difference between OPTs. I have the opposite problem, space is fine but the Hammond PS TX doesn't colour match.
rdf said:I was thinking of replacing the Hammonds with James, then using the 1628s to bench the next amp. A bit of overkill, but what the hey, and it's an opportunity to hear the difference between OPTs. I have the opposite problem, space is fine but the Hammond PS TX doesn't colour match.
Well the James OPTs showed up today. That was quick. I have to say they look really nice.
I would really like to match the colors also. It seems that the choices are-
1- Paint all the trafos a color of my choice
2- Get someone to paint the Hammonds to match the James
3- Paint the James black to match the Hammonds
4- Just live with the color difference
I think #2 would look best but I can't imagine what it would cost.
Now I'm putting all the dimensions into TurboCad to try and make a life-size drilling template. That way it would be easy to flip so I can make the monoblocs mirror images.
It'd be a shame to paint anything as nice looking as the James.
I'd be curious what you think of the fit and finish of the Hammond iron when it arrives. Maybe I got a sample of the late Friday afternoon before the long weekend production run. Repainting was easy enough. Remove the shells, strip with Scothbrite, a spray can of hammer finish black and 20 minutes in the oven at 200 (the shells, not the coil of course.) Turned out all right, though not as nice as those shots of the James.
I'd be curious what you think of the fit and finish of the Hammond iron when it arrives. Maybe I got a sample of the late Friday afternoon before the long weekend production run. Repainting was easy enough. Remove the shells, strip with Scothbrite, a spray can of hammer finish black and 20 minutes in the oven at 200 (the shells, not the coil of course.) Turned out all right, though not as nice as those shots of the James.
Sherman said:It seems that the choices are-
5- mount the Hammonds under the chassis?
dave
planet10 said:
5- mount the Hammonds under the chassis?
dave
Hadn't thought of that one! Unfortunately I'm planning on a chassis only 3" or so high so they wouldn't fit.
I have also thought of option 6- cover the Hammonds with an aluminum cover that would match the top plate rather than trying to match the James trafos.
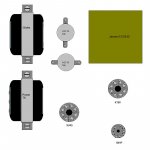
I'll decide when the Hammonds arrive and I place everything on the top plate to get a visual idea. Attached is my current layout idea. The top plate is 12" x 12". All connectors will be on the "back", the side closest to the choke and OPT. I plan on making them mirror images of each other.
Attachments
rdf said:It'd be a shame to paint anything as nice looking as the James.
I'd be curious what you think of the fit and finish of the Hammond iron when it arrives...
Repainting was easy enough..., a spray can of hammer finish...
I have to say that the finish of the James transformers is awfully nice. I don't think I could bring myself to paint over them. As for the Hammonds- I'll post my impressions here when they arrive. I have my fingers crossed!
I have to go to the home store this morning so I'll check the paint section to see if anything there is even a close match.
Sherman said:the side closest to the choke and OPT. [/B]
Shouldn't the choke & trafo be 90 degrees to one another?
dave
planet10 said:
Shouldn't the choke & trafo be 90 degrees to one another?
dave
Yeah, technically they should and I might do it that way. I've been trying to come up with a layout that makes sense and fits the size I have in mind. I took some ideas from Derek Walton's layout. ( http://indigo.ie/~walton/300bdrawings.html ) He says he tried the choke both ways and found no difference at all.
I think though that I may put the choke in back even though it is smaller and may look a little unbalanced. It makes the wiring much more direct and allows the AC and DC to be kept completely separate and not cross as they do in Derek's layout.
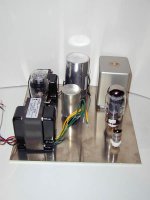
Here is a shot of the potential layout with the actual pieces.
Attachments
rdf said:I'd be curious what you think of the fit and finish of the Hammond iron when it arrives. Maybe I got a sample of the late Friday afternoon before the long weekend production run...
The Hammond iron arrived this morning! Both Euphonia and Angela are fast shippers.
Based on your description and on what I received it appears that Hammond builds all their stuff on the Friday afternoon before a long weekend.
The Hammonds will definitely be repainted. I checked the standard spray paints at Home Depot this morning and didn't find a really good match for the James color. I'll keep looking.
Sorry to hear that. Mine had no dents or dings either, a small consolation. How's the fixing hardware? The bolts holding mine together were trimmed to length with side cutters. It's too bad. The ~ 20 year old 273X next to me, lifted from some old broadcast gear, humiliates the new stuff.
rdf said:... How's the fixing hardware? The bolts holding mine together were trimmed to length with side cutters...
The bolts on yours were actually trimmed to length?
At this point I'm just hoping they work properly! I'm heading downstairs now to put them on a meter to check the output of each secondary. If that checks out I'm off to search for paint.
Hacked to length is more accurate. If any of the guys working for me did that they'ld be doing it over. Fortunately it's easy to find threaded rod in the proper guage and you can make the tranny look any way you like. I went with brass acorn nuts on both ends for the oh-so-popular 1920's Goth look. 
rdf said:... it's easy to find threaded rod in the proper guage and you can make the tranny look any way you like. I went with brass acorn nuts on both ends for the oh-so-popular 1920's Goth look.
That's a good idea. Acorn nuts on both sides would look really nice.
I have a question regarding painting the Hammonds. Can I paint the laminations or only the bell ends? I was thinking I would use masking tape over the openings where the wires come out and just paint the entire transformer. I found that Rustoleum Special Appliance Epoxy spray paint in "Stainless Steel" is a very close match for the James color, probably as good as I'll get without having a color custom mixed.
BTW I measured the voltage from the Hammonds. I get 802 volts on the HV, 5.72 on the 5V heater leads and 7.28 on the 6.3 volt heater leads. The HV is supposed to be 700 volts (350-0-350). I don't think I blame Hammond for the over voltage though as my AC is consistently at 124V rather than 115!
Sherman said:124V rather than 115!
124/115 x 700 = 755
I believe those will sag a bit under load.
An extra RC stage in the power supply never hurts
dave
planet10 said:
124/115 x 700 = 755
I believe those will sag a bit under load.
An extra RC stage in the power supply never hurts
dave
Dave,
That's true, the measurements were no-load so I would expect some sag but if it isn't enough the the extra RC filter would be a good idea. And I do have additional ASC caps on the shelf. Heck, this over-voltage might be a good thing!
Sherman said:Can I paint the laminations or only the bell ends? I was thinking I would use masking tape over the openings where the wires come out and just paint the entire transformer.
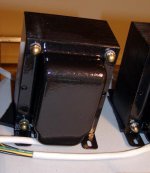
That's what I did, remove the end bells, paint and bake them separately, mask and spray the laminations. The PS tranny gets hot enough in normal use you'll smell paint curing for a couple of weeks anyway, the laminations still get a baked finish. The result on a 1628se is shown below. The paint's a Rustoleum Hammered Metal. Generic hardware store stuff, as were the nuts and plastic washers.
BTW, I agree with Dave about the excess HV voltage. It allowed an extra stage of RC and the result is surprisingly quiet for such a simple circuit. Now the excess filament voltage, that I'm not happy about but for now am content to drop it with a couple of .21 ohm, 100 uH iron core hash coils from the junk box. A little free filament filtering, looked at from the sunny side.
Attachments
rdf said:
That's what I did, remove the end bells, paint and bake them separately, mask and spray the laminations... The result on a 1628se is shown below. The paint's a Rustoleum Hammered Metal. Generic hardware store stuff, as were the nuts and plastic washers...
Great, I think I'll paint them this weekend! Time to run out for some acorn nuts and threaded rod. I found a spray paint (also from Rustoleum) called Special Appliance Epoxy in a color called Stainless Steel that is a pretty close match for the color of the James.
I'll have to experiment a little with a load on the PS to see what the filament voltage really is. If necessary I'll follow your lead and put in a couple coils to get it down to the right range.
- Status
- This old topic is closed. If you want to reopen this topic, contact a moderator using the "Report Post" button.
- Home
- Amplifiers
- Tubes / Valves
- Hammond vs. James?


