Hello again. I've now got about 200 hours on my 207's and would like to damp the baskets. I've been looking at the extreme basket mod thread so I've got some idea what to do but was wondering if some felt or Blue-tack or both on the inside of the legs might be good as well. Also some of you have put felt pucks on the back of the magnets. Is that the way to go for the 207s?
Thanks.
Thanks.
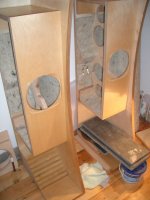
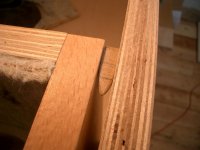
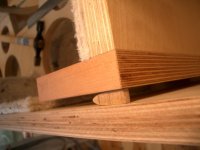
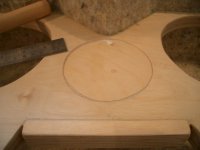
Port gap
Hi Durst,
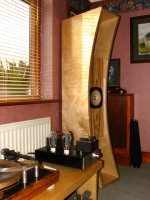
This is my first post so, first-off, a sincere thank you to Scott, Ron, Dave and Bud for giving me so much more musical enjoyment and insight from my music collection. The Curvy Chang is truly enjoyable and elegant design.
Durst, this is a very small error, I had a similar problem in my glue-up, in the end I decided to leave things be. You may be able to measure a difference but listening to test tones side by side in the room the bass sounds the same, listening to music in mono they sound identical.
In your case I would just try Ed’s idea of a post just in the corner were the gap is small then remove it after glue up (length of strong cord tied round it?) don’t make the port area smaller to even the gap you’re undersize not oversize.
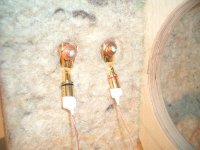
I also use cat5, 4 strands 2 per conductor for cables and internal wiring (my speakers have 206’s so a bit of extra series resistance can only help) the bass is fast and deep and natural, If you put the binding posts below the wedge you can connect a full un- bundled cat5 at the binding post end, then experiment to find your preference for conductor number at the driver, just reach in and clip of the extra later.
Good luck, with your build, be prepared to be surprised and delighted!
Steve.
Hi Durst,
This is my first post so, first-off, a sincere thank you to Scott, Ron, Dave and Bud for giving me so much more musical enjoyment and insight from my music collection. The Curvy Chang is truly enjoyable and elegant design.
Durst, this is a very small error, I had a similar problem in my glue-up, in the end I decided to leave things be. You may be able to measure a difference but listening to test tones side by side in the room the bass sounds the same, listening to music in mono they sound identical.
In your case I would just try Ed’s idea of a post just in the corner were the gap is small then remove it after glue up (length of strong cord tied round it?) don’t make the port area smaller to even the gap you’re undersize not oversize.
I also use cat5, 4 strands 2 per conductor for cables and internal wiring (my speakers have 206’s so a bit of extra series resistance can only help) the bass is fast and deep and natural, If you put the binding posts below the wedge you can connect a full un- bundled cat5 at the binding post end, then experiment to find your preference for conductor number at the driver, just reach in and clip of the extra later.
Good luck, with your build, be prepared to be surprised and delighted!
Steve.
Attachments
Spresto9, Thanks for your post, It is quite reasurring to hear that I have not screwed the whole thing up. I have taken Ed's advice and made up a shim exactly 9.7 mm (measured with micrometer)so heres hoping. like your idea of for the cat5 also.
Thanks very much.
Your Curvys look awesome!
Thanks very much.
Your Curvys look awesome!
Originally posted by spresto9
The Curvy Chang is truly enjoyable and elegant design.
Steve - to which I would add, yours is a most attractive build. Very nice indeed.
How about a few more pictures?
Regards.
Aengus
") Glad you're enjoying them.
Glad you're enjoying them.Hi Aengus and Scott,
Thanks for your kind words, I'll try to post some more pics and a few notes on the "Full Range Photo Gallery".
Scott, having settled on a set of values for my BSC network I now want to replace the cheap components with quality parts, regarding the inductor would you suggest an air-core coil or a FERON-core coil i.e. high series resistance or low?
Thanks again for your great design.
Steve.
Just to point out, the entire point of this design is that it doesn't require any compensation for step loss, because it doesn't possess any. So I wouldn't recommend any components at all. Not with the design driver at any rate, which is the FE207E.
The 206 which you have used, is a different matter. Step loss still isn't an issue; however the driver itself inherently peaks up quite strongly above 1KHz, so a shelving filter will be advantageous in this respect, as you have found. Personally, I'd go for a low resistance inductor.
The 206 which you have used, is a different matter. Step loss still isn't an issue; however the driver itself inherently peaks up quite strongly above 1KHz, so a shelving filter will be advantageous in this respect, as you have found. Personally, I'd go for a low resistance inductor.
Hi,
It's nice to see more Curvy Changs being built, I've had a pair for
about a year and a half now. Every so often I get the urge to build something else or maybe add some subs, but then put the records on and realise I dont need to. For me they are the perfect speaker, and are forgiving of imperfect posisioning. The focusing of the sound also helps reduce unwanted romm effect such as reflections. During a recent redecorating adventure (of wich I suffer many!!) I had chance to set them up in the recommended positions, in a very very bare room (bare and ready for painting, no soft furnishings except a chair. It was an interesting experience and illustrated Ronc's descripion of how they work and focus the sound. As I walked round the room I could hear the sound change significantly. If you walk in a line parallel to the speakers 10 foot away you can hear the sound snap into focus (and go form almost mono sounding to sterio) as you move across the room. The sweet spot is quite large, but what is most noticable is the dullness of the sound when you pass outside the rectangle formed by the speakers separation and the distance you are from them (10' approx) (I'll draw up what I mean its easier to explain). This is not a bad thing as it means that reflections from walls' is less of an issue and IMO is what in part contributes to the beatuy of the design and its simplicity. (Mr Scattmoose and Ronc please take a bow.)
My only real complaint is that all these beutiful builds that are apearing (Thank you Ppresto9) are causing some conflict, as my CC's are finished in a beautiful grey undercoat, I keep getting asked by the missis as to why mine dont look like yours and when am I going to finish them! Thanks Chaps
Quick edit, I use 2 strands of CAT5 as per instructions above, driven by a 6W SE Triode valve monoblocks.
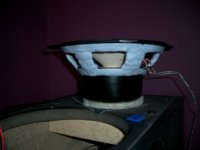
Dust said:Speaking of Blue tac, would that be good to use for the driver gasket? the supplied one does not fit.
Those are 207s? Everyone i've gotten comes wth quite nice gaskets (206 & 166 don't). You'd be best using neoprene weather stripping (Draught exclusion strip).
dave
- Status
- This old topic is closed. If you want to reopen this topic, contact a moderator using the "Report Post" button.
- Home
- Loudspeakers
- Full Range
- Greenhorn Curvy Chang Build