I agree with you Staggerlee, hide glue is one of the best alternatives. I have not used it for a few years, and only once, but it is quite easy to mix, but needs a little bit of that special touch. In my case then, I did not own a veneer saw, and my joint was not perfect. When the hide glue cooled, the joint opened in two places, and no amount of reheating and pushing would get them back together. At that point I gave up and set things down. I should have keep trying.
I still have the little canning jar and jury made coat hanger that I use to heat the hide glue in boiling water on the stove, but got rid of the already made glue, because it started to sprout on me.
Anyway, I still have the flakes for making more in the future, and will try it again. The iron on glue is really akin to the hide glue, because applying heat will soften up the adhesive, and allow for the veneer to be removed, or repaired, which is a neat thing to do, if you have a problem with the veneer.
I'll wait and see how easy the iron on adhesive works first before trying hide glue again.
Incidentially, Mike Burton in his wonderful book Veneering:A foundation Course, goes into hide glue extensively. He loves the stuff and is the reason why I origionally tried it out. This is the best veneering book I have ever seen, plus his sense of humour is great too. I understand that last year he came out with a revised edition, which is probably better than my late 90s edition.
I still have the little canning jar and jury made coat hanger that I use to heat the hide glue in boiling water on the stove, but got rid of the already made glue, because it started to sprout on me.

Anyway, I still have the flakes for making more in the future, and will try it again. The iron on glue is really akin to the hide glue, because applying heat will soften up the adhesive, and allow for the veneer to be removed, or repaired, which is a neat thing to do, if you have a problem with the veneer.
I'll wait and see how easy the iron on adhesive works first before trying hide glue again.
Incidentially, Mike Burton in his wonderful book Veneering:A foundation Course, goes into hide glue extensively. He loves the stuff and is the reason why I origionally tried it out. This is the best veneering book I have ever seen, plus his sense of humour is great too. I understand that last year he came out with a revised edition, which is probably better than my late 90s edition.
Here is what the reconstituted teac looks like on a speaker enclosure. The enclosure is a .25cf size, and will have the buyout two way system that I picked up from Parts Express, and is shown on the second picture.
Also, I made a mistake on it, in that I oversanded one of the front corners, and the substrate is showing through. I may just recover it again since I have more than enough to do this, and it is not all that time consuming.
Anyway, this will give you a good idea as to what the teak looks like.
http://community.webshots.com/inlin....webshots.com/photo/2660045090037686397KSAFnL
http://community.webshots.com/inlin....webshots.com/photo/2982964270037686397DBaKFC
Why can't I get my pics to show up? I've tried this about every which way possible. Is there some sort of restriction here, or process that has to be followed? Colour me confused.
Also, I made a mistake on it, in that I oversanded one of the front corners, and the substrate is showing through. I may just recover it again since I have more than enough to do this, and it is not all that time consuming.
Anyway, this will give you a good idea as to what the teak looks like.
http://community.webshots.com/inlin....webshots.com/photo/2660045090037686397KSAFnL
http://community.webshots.com/inlin....webshots.com/photo/2982964270037686397DBaKFC
An externally hosted image should be here but it was not working when we last tested it.
An externally hosted image should be here but it was not working when we last tested it.
Why can't I get my pics to show up? I've tried this about every which way possible. Is there some sort of restriction here, or process that has to be followed? Colour me confused.
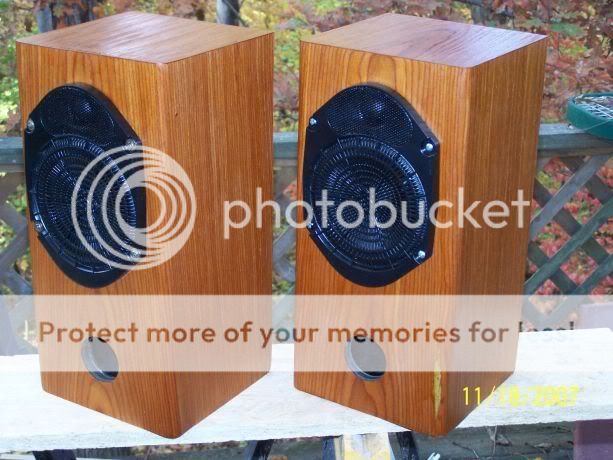
Here are the Buyout speakers finished, using the Reconstituted Teak. If you look at the bottom right corner of one of the speakers, you can clearly see where I accidentially sanded through the veneer. Once I noted my mistake, I just couldn't believe I had done it, so I had to sand some more. Stupid me.
I had just bought an air sander, one of those Dual Action Air Sanders, and it was far more powerful than I thought. I have an electric Porter Cable sander of the same type and it is nothing compared to the air system. So if you are using a compressor, you must be very careful when sanding around corners.
Each cabinet cost me less than $10 in materials. The speaker combination, including crossover, was $4.25, and the terminal plate for the back was less than $.50. The total cost of MDF and veneer, shellac and denatured alcohol came up to less than $5.00. I would have recovered the imperfect cabinet, but I have other projects to to, and on my computer desk it will not matter. Also, under normal scrutiny, the imperfection does not show up nearly anything as in the picture. Anyway, I wanted to show you all what can happen when you are using a new tool that is more powerful than you imagined.
 [
[

I had just bought an air sander, one of those Dual Action Air Sanders, and it was far more powerful than I thought. I have an electric Porter Cable sander of the same type and it is nothing compared to the air system. So if you are using a compressor, you must be very careful when sanding around corners.
Each cabinet cost me less than $10 in materials. The speaker combination, including crossover, was $4.25, and the terminal plate for the back was less than $.50. The total cost of MDF and veneer, shellac and denatured alcohol came up to less than $5.00. I would have recovered the imperfect cabinet, but I have other projects to to, and on my computer desk it will not matter. Also, under normal scrutiny, the imperfection does not show up nearly anything as in the picture. Anyway, I wanted to show you all what can happen when you are using a new tool that is more powerful than you imagined.


- Status
- This old topic is closed. If you want to reopen this topic, contact a moderator using the "Report Post" button.