I am on a mission to get my speakers complete..
it maybe be a few weeks yet till they are finished..
I will take pictures when the cabinets arrive and a few steps when
installing everything... i'm not sure about you,, but I am more than excited to get them finished. !!
what do you think of the sound>>>? I find myself listening to all kinds of things...
STAY TUNED ,, DONT CHANGE THE CHANNEL.. WE WILL RETURN RIGHT AFTER
THE CABINETS ARRIVE.......
If you want something different then how about a folded horn speaker with a tweeter ?
You can scale this plan to meet your needs.
I have built two and been pleased with them.
You can scale this plan to meet your needs.
I have built two and been pleased with them.
An externally hosted image should be here but it was not working when we last tested it.
An externally hosted image should be here but it was not working when we last tested it.
Alright - after playing with WinISD for awhile, using parameters for the 416 8B (the 8A is not available - lack of published data),
The 'A' series is actually an 803B series, so has a ~20 Hz Fs, 18 ft^3 Vas, 0.25 Qts and a ~12.56 ft^3 optimum cab net Vb tuned to ~32 Hz, which is what the Onken 360 is IIRC. Don't have the info anymore or recall actual dims [though probably my default 30" W], a couple of pairs of ~18 ft^3/Fb = Fs tower/column alignments were built [aka MLTL nowadays] with 805, 1005 multi-cells perched on top. Driven with matching impedance SETs the owners were 'happy campers'.
GM
Not that I recall except of course 'juggling' specs a bit to account for the different VC construction.
No, the reason being that '416A' was nothing more than a name change to it as Altec had added an 803 multi-cell horn to the line-up, which was a natural naming progression, so the A800 series woofer had to go. The original 803 is quite a bit different due to need of its times, with a much higher Fs, Qts, lower Vas for optimum performance in the A800 series VOTT, which it too had a name change to the A7 series with the advent of the 811 horn.
GM
Update: Z-19's installed!
Thanks for the info GM - I modeled the enclosure with the 803B and the results actually look better. There is a gradual drop from 100Hz down to 50 - of about 3db before it really starts to decline, but there is generally a much better bass response than with the 416 8b parameters or the TS params I found online. With the vents each trimmed to 8", the sim is putting me at about 30Hz - not quite the ideal according to the driver Fs, but with my box volume, the curve is flatter at 30Hz tuning than at 25, so I'm happy. And man, do these thing really sing!
In any case, a bit of an update on the crossovers. They are both finished and installed, and they sound amazing! This is the first change that I've made in my audio system that has made me sit up and feel as though I've been smacked in the face! The crossovers are really as good as the hype - fantastic! They just mop the floor with the Eminence units. Now I just need to get the levels set properly! The extra extension on the top end is very real - and quite welcome! Thanks for all of the help and suggestions. I'll post a couple more photos of the boxes themselves in a few days when I can get some time.
Here are a few more photos of my layout, and the back for an idea on the wire routing.
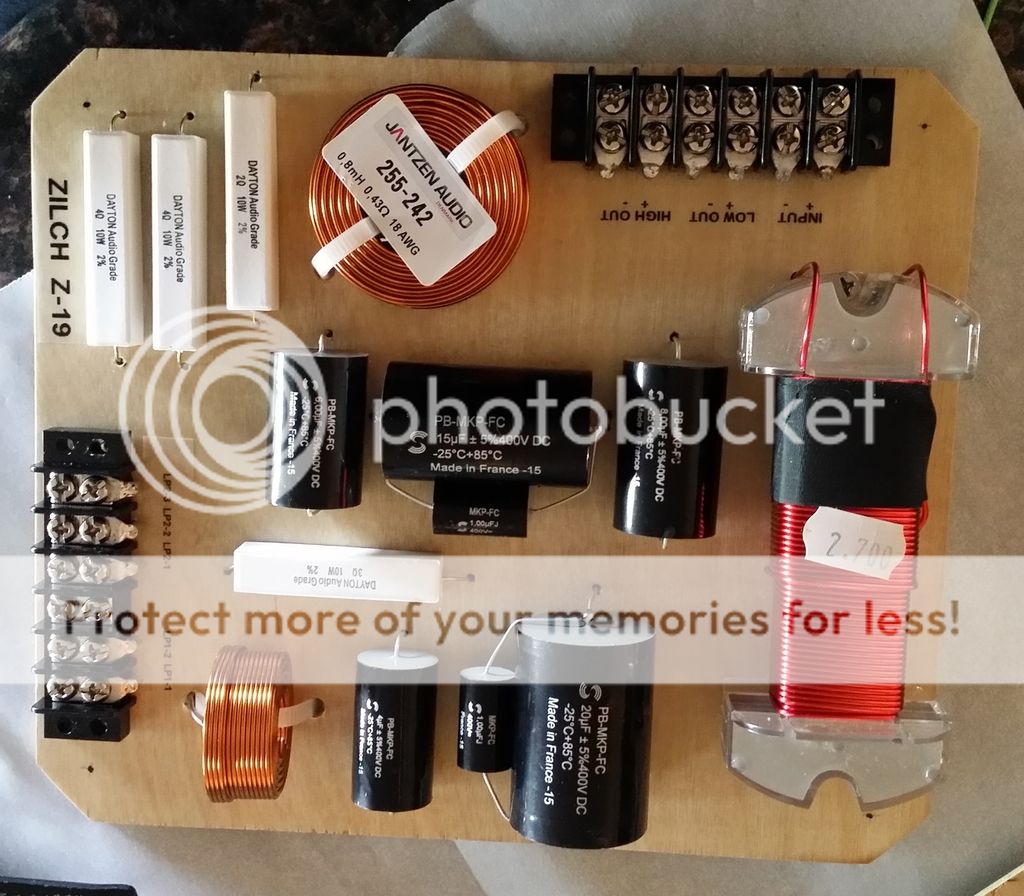
front
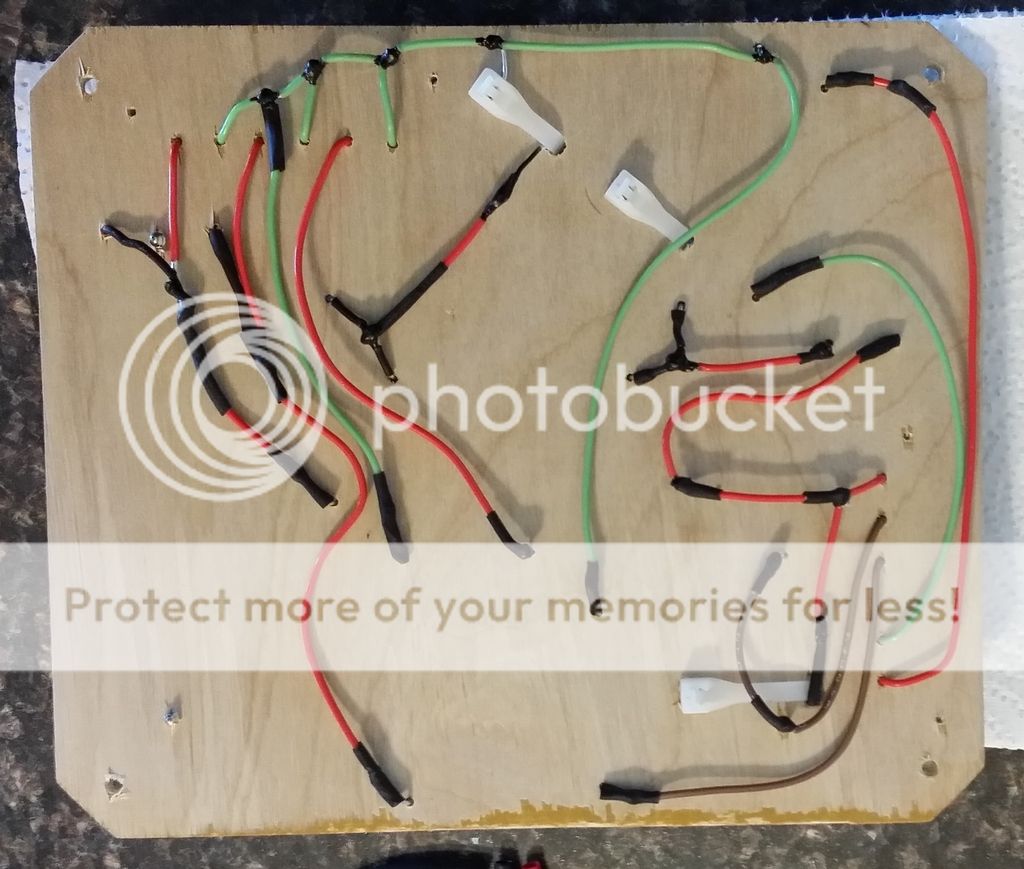
rear showing wire routing
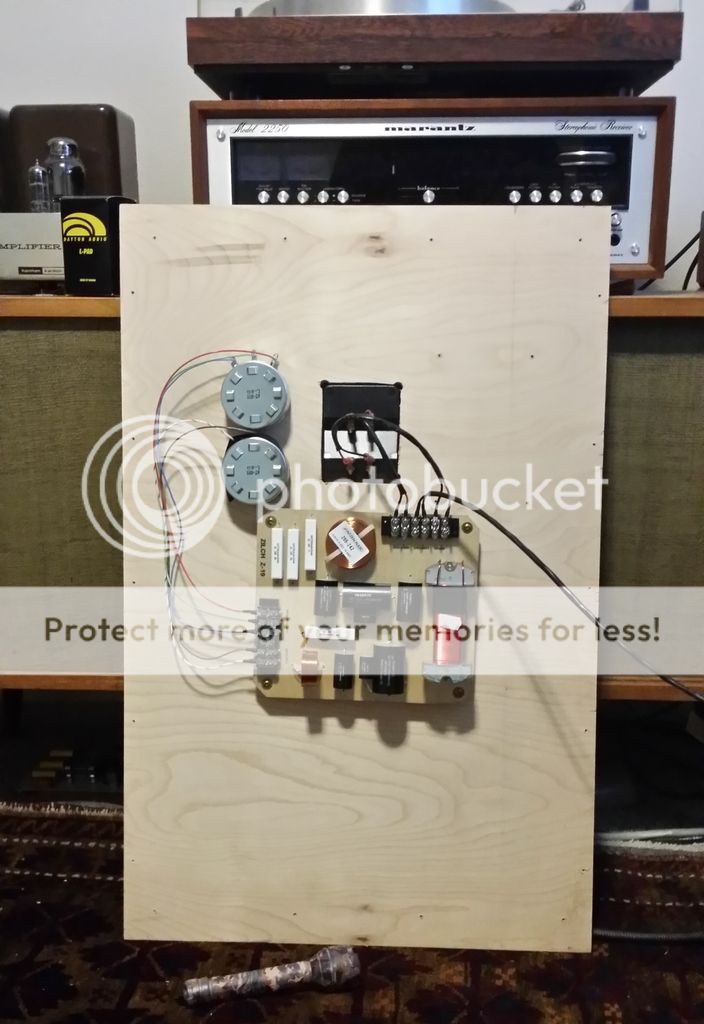
installed on the back panel of the speaker.
(Does anyone know how to get images to stop squashing down like this?)
Fun project. I took my time - figure I have about 20 hours into it. I was thinking of doing this as an external, but I'd want a more exotic species of ply and I think I'd use turrets if I did that. The board is mounted on some 1/2" nylon spacers from home dumpster.
Thanks for the info GM - I modeled the enclosure with the 803B and the results actually look better. There is a gradual drop from 100Hz down to 50 - of about 3db before it really starts to decline, but there is generally a much better bass response than with the 416 8b parameters or the TS params I found online. With the vents each trimmed to 8", the sim is putting me at about 30Hz - not quite the ideal according to the driver Fs, but with my box volume, the curve is flatter at 30Hz tuning than at 25, so I'm happy. And man, do these thing really sing!
In any case, a bit of an update on the crossovers. They are both finished and installed, and they sound amazing! This is the first change that I've made in my audio system that has made me sit up and feel as though I've been smacked in the face! The crossovers are really as good as the hype - fantastic! They just mop the floor with the Eminence units. Now I just need to get the levels set properly! The extra extension on the top end is very real - and quite welcome! Thanks for all of the help and suggestions. I'll post a couple more photos of the boxes themselves in a few days when I can get some time.
Here are a few more photos of my layout, and the back for an idea on the wire routing.
front
rear showing wire routing
installed on the back panel of the speaker.
(Does anyone know how to get images to stop squashing down like this?)
Fun project. I took my time - figure I have about 20 hours into it. I was thinking of doing this as an external, but I'd want a more exotic species of ply and I think I'd use turrets if I did that. The board is mounted on some 1/2" nylon spacers from home dumpster.
Last edited:
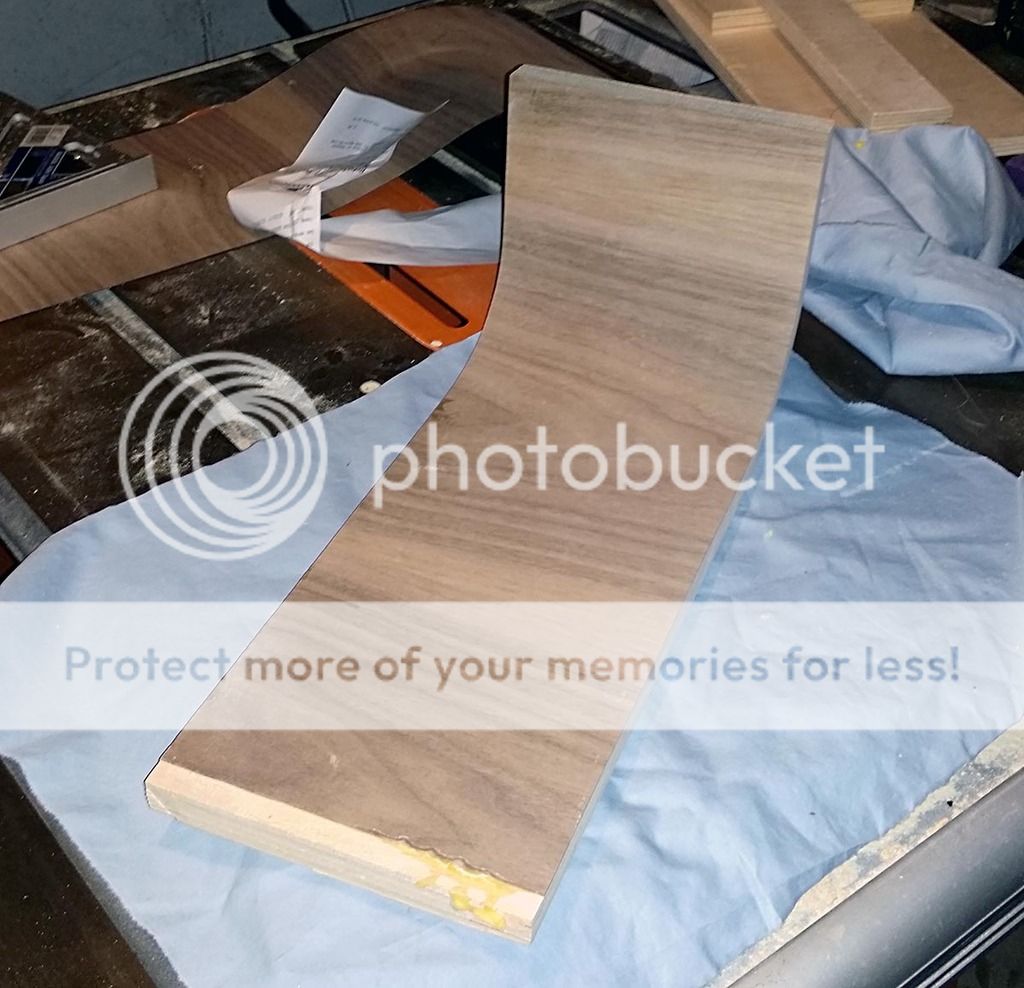
Update - veneering
I've got approximately 100 hours listening time on these speakers, and they sound really amazing. The top end is still lacking a bit - I keep looking for a pair of used BMS 4552's, but nothing so far... but overall, just thrilled with the sound!
During the Summer, I get to make my own hours. So I've been catching up on some projects that I've been meaning to take care of. I had been wanting to use the red gum veneer that I picked up, but I am saving that for something else down the road. I had been watching a gorgeous sheet of book matched walnut with a bit of sapwood in it, made an offer, and the seller accepted - so I got a really great sheet of 10 mil paper-backed walnut veneer shipped for about 70 bucks.
I was on the fence as to what adhesive to use for this project. I keep wanting to buy a vacuum press, but I never figure I'll get enough use out of it. So, not wanting to spend a couple hundred bucks on that, it was 1) contact cement, 2) PVA iron-on, or 3) cauls and clamps. Option 3 was out, because there would be no way to get clamps and cauls behind each panel with the speakers assembled already. I had waffled back and forth on the remaining two options until I tried a test piece using the PVA iron-on method. It was pretty quick, inexpensive, and required no additional tools. I get excellent results on my test piece, it stuck very well with no corner lifting or bubbles, and so that is what I opted for. I followed the procedure outlined here -> Veneering with Paper Backed Veneer Stock
I was a bit worried about scaling up my test piece to the rather large size of these cabinets, but it went smoothly (if slowly). The first cabinet side I did did end up with some bubles and loose edges. I used a foam roller and applied a nice thick coat of the original Titebond to each mating face. So I re-ironed the face again, this time using as much pressure as I could, and that did it. Pressure seems to be one of the keys with this method. Hopefully you can see how well it turned out. I still need to do a very light sanding with 400. I think I'm just going to do a wipe on matte or low gloss poly and 000 steel wool between coats. The baffle front will be either charcoal grey or black. I need to disassemble and get started with the veneer on the other cabinet before I get to the paint.
So far so good!

I may have found a local source for poplar bending ply as well, so the curved horn cradle may get started this Summer as well!
I've got approximately 100 hours listening time on these speakers, and they sound really amazing. The top end is still lacking a bit - I keep looking for a pair of used BMS 4552's, but nothing so far... but overall, just thrilled with the sound!
During the Summer, I get to make my own hours. So I've been catching up on some projects that I've been meaning to take care of. I had been wanting to use the red gum veneer that I picked up, but I am saving that for something else down the road. I had been watching a gorgeous sheet of book matched walnut with a bit of sapwood in it, made an offer, and the seller accepted - so I got a really great sheet of 10 mil paper-backed walnut veneer shipped for about 70 bucks.
I was on the fence as to what adhesive to use for this project. I keep wanting to buy a vacuum press, but I never figure I'll get enough use out of it. So, not wanting to spend a couple hundred bucks on that, it was 1) contact cement, 2) PVA iron-on, or 3) cauls and clamps. Option 3 was out, because there would be no way to get clamps and cauls behind each panel with the speakers assembled already. I had waffled back and forth on the remaining two options until I tried a test piece using the PVA iron-on method. It was pretty quick, inexpensive, and required no additional tools. I get excellent results on my test piece, it stuck very well with no corner lifting or bubbles, and so that is what I opted for. I followed the procedure outlined here -> Veneering with Paper Backed Veneer Stock
I was a bit worried about scaling up my test piece to the rather large size of these cabinets, but it went smoothly (if slowly). The first cabinet side I did did end up with some bubles and loose edges. I used a foam roller and applied a nice thick coat of the original Titebond to each mating face. So I re-ironed the face again, this time using as much pressure as I could, and that did it. Pressure seems to be one of the keys with this method. Hopefully you can see how well it turned out. I still need to do a very light sanding with 400. I think I'm just going to do a wipe on matte or low gloss poly and 000 steel wool between coats. The baffle front will be either charcoal grey or black. I need to disassemble and get started with the veneer on the other cabinet before I get to the paint.
So far so good!
I may have found a local source for poplar bending ply as well, so the curved horn cradle may get started this Summer as well!
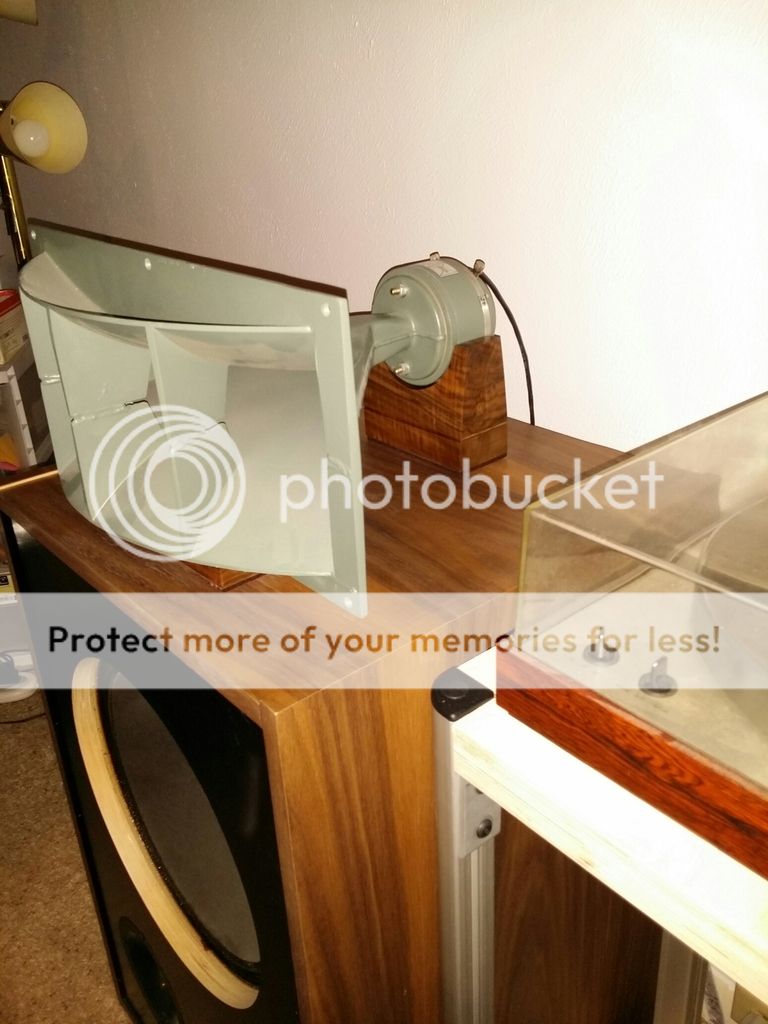
Wow - just realized I never finished off this thread. I was working on veneering these as we were busy looking for a house, then moving into the house, then working on the house. Long story short: They are finished, they look amazing, they sound really good, and I'm *finally* getting around to building the bent ply horn cradle. My phone is playing up right now, but I'll try to find the old photos of the finish process and post them in sequence. For now, here's a teaser of the cradle.
I can't find the photos I took of the finishing process on the speakers. I think they may be in my work camera, but not sure. Bummer.
I used semi-gloss oil-based spar urathane over the veneer - no stain. I used 4 coats altogether with 300 grit sanding between coats. The finish came out great - I really like spar urathane - it's a nice hard finish. I'll have to get a couple pics of the cabinets this week sometime. I still want to spray one more coat after a final sanding to 400 - that'll really complete the finish nicely.
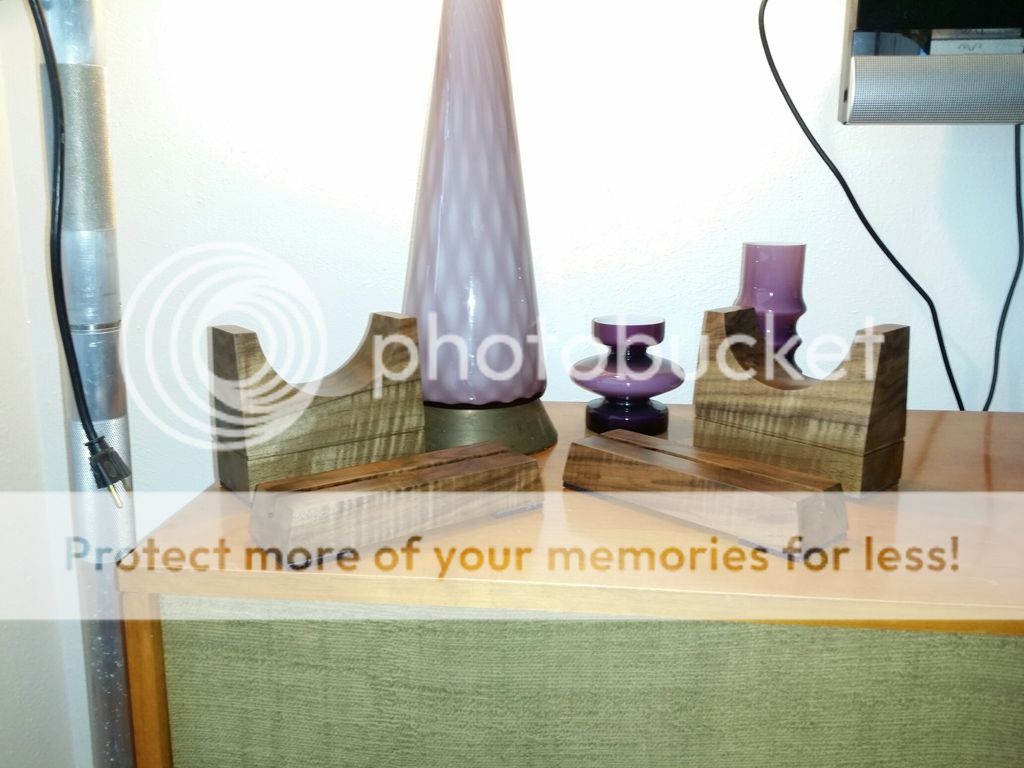
I was unhappy with the look of the bending ply after the lamination. The cradle itself came out bent perfectly, and seemed strong enough. But, it only had 8 plies, the plies were quite thick, and it really didn't look all that great when viewed next to the cool rack I just built here. So I came up with a different option that I think looks really great. I used the nicest material that I've ever used - was actually a bit intimidated by it. It's Bastogne walnut, and it's a hybrid between claro and black walnut. The slab I bought was approximately 8" x 32" x 2.5" thick, and had some very nice figure, some lighter areas and some darker. I would have preferred to get a piece with some nice sapwood as well, but this piece is really nice too.
So I came up with a design that I was happy with that cradled the compression driver body and had a separate 'cleat' for the front bottom rim of the horn to slot into. There really was a lot of milling in this project, but I really think it came out great. This is the most beautiful material to work with. I sanded to 600 and it was like glass even before finish went on. I used 4 coats of semi-gloss spar urathane and could not be happier with how they came out!
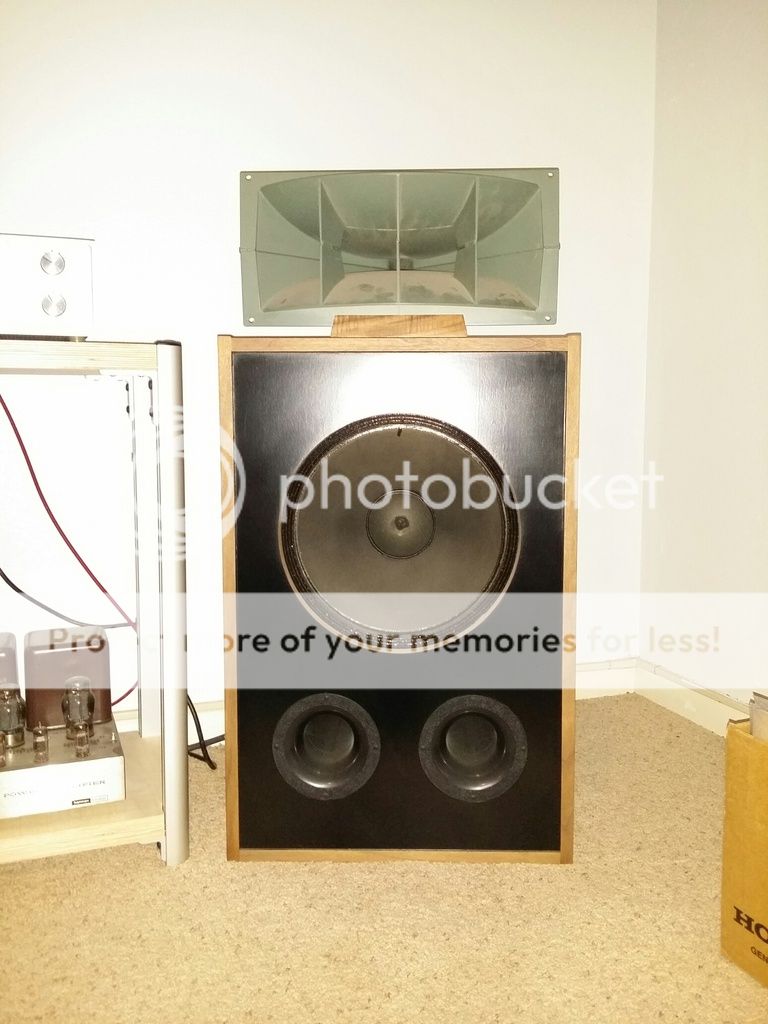
Next steps will be a slight riser I think - maybe 6" or so, and a pair of grilles using some kind of vintage-y speaker grille fabric. Anyone know any good online retailers of vintage look speaker grille fabric?
I used semi-gloss oil-based spar urathane over the veneer - no stain. I used 4 coats altogether with 300 grit sanding between coats. The finish came out great - I really like spar urathane - it's a nice hard finish. I'll have to get a couple pics of the cabinets this week sometime. I still want to spray one more coat after a final sanding to 400 - that'll really complete the finish nicely.
I was unhappy with the look of the bending ply after the lamination. The cradle itself came out bent perfectly, and seemed strong enough. But, it only had 8 plies, the plies were quite thick, and it really didn't look all that great when viewed next to the cool rack I just built here. So I came up with a different option that I think looks really great. I used the nicest material that I've ever used - was actually a bit intimidated by it. It's Bastogne walnut, and it's a hybrid between claro and black walnut. The slab I bought was approximately 8" x 32" x 2.5" thick, and had some very nice figure, some lighter areas and some darker. I would have preferred to get a piece with some nice sapwood as well, but this piece is really nice too.
An externally hosted image should be here but it was not working when we last tested it.
So I came up with a design that I was happy with that cradled the compression driver body and had a separate 'cleat' for the front bottom rim of the horn to slot into. There really was a lot of milling in this project, but I really think it came out great. This is the most beautiful material to work with. I sanded to 600 and it was like glass even before finish went on. I used 4 coats of semi-gloss spar urathane and could not be happier with how they came out!
Next steps will be a slight riser I think - maybe 6" or so, and a pair of grilles using some kind of vintage-y speaker grille fabric. Anyone know any good online retailers of vintage look speaker grille fabric?
An externally hosted image should be here but it was not working when we last tested it.
Last edited:
- Status
- This old topic is closed. If you want to reopen this topic, contact a moderator using the "Report Post" button.
- Home
- Loudspeakers
- Multi-Way
- Going a different direction - more advice sought