Hello Peter,
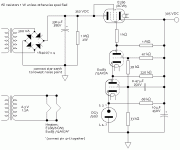
The PSU is in dire need of a redraw, I did the best I could late this afternoon to clean it up a bit after I finally received the scans.
Keep in mind this is a dual mono design, so for the PSU as well you'll need everything twice even the cases; one for the psu, one for the preamp proper.
As mentioned before the supply for the 12BH7As' heaters was never drawn but something along the lines of a LM317 regulated
supply should do nicely, I used a humble 7812 using its casing for heatsinking (bolted to the case) and left it floating at the tube.
The whole project is part of a phono preamp that I'll post later on.
In the PSU all resistors are Cornings and in the circuit proper Holcos were used except for some Vishays as gridleaks.
Coupling caps are currently MIT RTFXs but better caps may be available now.
If budget is tight I recommend the ICEL caps which are excellent and can be had from RS omponents.
For best results I made a series attenuator with a little twist, instead of swithing a decreasing number of series I added them up and switch the compound value individually.
If need be I'll get into detail later on.
Well, I don't want to blow my own horn here but in the words of countless people who've actually listened to it (well in my system that is) : very transparent, dynamic, it just doesn't get in the way of the music.
If you have any questions be my guest,")
they really are not too straightforward.
The PSU is in dire need of a redraw, I did the best I could late this afternoon to clean it up a bit after I finally received the scans.
Keep in mind this is a dual mono design, so for the PSU as well you'll need everything twice even the cases; one for the psu, one for the preamp proper.
As mentioned before the supply for the 12BH7As' heaters was never drawn but something along the lines of a LM317 regulated
supply should do nicely, I used a humble 7812 using its casing for heatsinking (bolted to the case) and left it floating at the tube.
The whole project is part of a phono preamp that I'll post later on.
In the PSU all resistors are Cornings and in the circuit proper Holcos were used except for some Vishays as gridleaks.
Coupling caps are currently MIT RTFXs but better caps may be available now.
If budget is tight I recommend the ICEL caps which are excellent and can be had from RS omponents.
For best results I made a series attenuator with a little twist, instead of swithing a decreasing number of series I added them up and switch the compound value individually.
If need be I'll get into detail later on.
First question: how does it sound?
Well, I don't want to blow my own horn here but in the words of countless people who've actually listened to it (well in my system that is) : very transparent, dynamic, it just doesn't get in the way of the music.
If you have any questions be my guest,
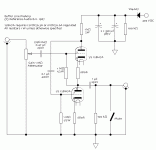
PREAMP.
Hi,
I flagged it as optional because even though the grid is of course biased negatively, most gear preceding it is capacitively coupled at the output.
If you're unsure about this, than put it in.
As stated in a previous post this was part (and still is) of a phono preamp and since the output of that one couples capacitively into the volume control and buffer I felt I'd be better off ommitting that cap.
I knew you'd ask about that.
What it does is preventing the PSU caps in the preamp chassis to discharge into the PSU chassis proper.
Basically this prevents arcing when connecting the two chassis together.
In view of the fact that videoconnectors multiple poles are used to connect both units over an umbillical cord, see it as a safety measure.
Doing away with it can cause serious damage to the connectors and arc-overs are definitely real with this kind of voltages and caps.
Cheers,
Hi,
the input cap is marked as 'optional' but surely the input grid is biased above ground
I flagged it as optional because even though the grid is of course biased negatively, most gear preceding it is capacitively coupled at the output.
If you're unsure about this, than put it in.
As stated in a previous post this was part (and still is) of a phono preamp and since the output of that one couples capacitively into the volume control and buffer I felt I'd be better off ommitting that cap.
What is the purpose of the 1N4007?
I knew you'd ask about that.
What it does is preventing the PSU caps in the preamp chassis to discharge into the PSU chassis proper.
Basically this prevents arcing when connecting the two chassis together.
In view of the fact that videoconnectors multiple poles are used to connect both units over an umbillical cord, see it as a safety measure.
Doing away with it can cause serious damage to the connectors and arc-overs are definitely real with this kind of voltages and caps.
Cheers,
The "role" of a capacitor...
Even if the preceding stage is capacitively coupled at the output ...when the pot is at the zero position the grid of the upper tube will be at ground potencial...so the capacitor is a must not a optional...
Cheers
I flagged it as optional because even though the grid is of course biased negatively, most gear preceding it is capacitively coupled at the output
Even if the preceding stage is capacitively coupled at the output ...when the pot is at the zero position the grid of the upper tube will be at ground potencial...so the capacitor is a must not a optional...
Cheers
He,he...
Hi,
Well, there is not a volpot but an attenuator designed in such a way that this grid is never at ground potential, i.e. if you want infinite attenuation you trigger the mute switch which is at the output.
The reason I did this is to:
a) circumvent using a series of two caps and
b) since this circuit already presents an insertion loss it's quite unlikely anyone would be listening at such infinitissimally small volume levels.
Cheers,
Hi,
Even if the preceding stage is capacitively coupled at the output ...when the pot is at the zero position the grid of the upper tube will be at ground potencial...so the capacitor is a must not a optional...
Well, there is not a volpot but an attenuator designed in such a way that this grid is never at ground potential, i.e. if you want infinite attenuation you trigger the mute switch which is at the output.
The reason I did this is to:
a) circumvent using a series of two caps and
b) since this circuit already presents an insertion loss it's quite unlikely anyone would be listening at such infinitissimally small volume levels.
Cheers,
It finally happened...
Frank,
Thanks for the circuits of this so much talked line amp.
attenuator shematic missing?
where are the inductors??
I'll make plans for building it in the near future, in the meanwhile I'll start gathering parts.
It seems that your drawing abilities need to be improved!!! It makes better amps,
Frank,
Thanks for the circuits of this so much talked line amp.
attenuator shematic missing?
where are the inductors??
I'll make plans for building it in the near future, in the meanwhile I'll start gathering parts.
It seems that your drawing abilities need to be improved!!! It makes better amps,
RE:REREAMP.
Hi,
Thank for your interest, Tony.
Yes, I'm aware of that but is very simple: it uses one 23 switch Elma per channel, pos. 24 is a stop.
It's a 1 Meg series switch, lower values will work fine too.
The only way it differs from the DACT or Goldpoint series attenuators is that every step is composed of the addition of :
R1 = R1
R2 = R1 + R2 etc. taken from a ladder not a shunt.
I considered this less of a compromise than having such a large number of Rs and contacts lumped together.
Since people may want to calculate their own step attenuations I didn't present my circuit.
Mine is basically coarse for the first and last steps and on average uses 2 dB steps and just a few Vishay resistors at those positions I most often use.
No need for inductors, the PSU is regulated on a per channel basis.
You could but I doubt you'd hear, measure any benefit.
I know, it not even my hand but the one of one of my technicians back in 1987, I made an attempt at improving it and i can only assure you that the original PSU scan would have been completely useless if I hadn't.
If it presents a major stumbling block I'll work on it further.
In the mean time I can only try to find excuses not to.
Cheers and thanks,
REAMP.Hi,
Thank for your interest, Tony.
attenuator shematic missing?
Yes, I'm aware of that but is very simple: it uses one 23 switch Elma per channel, pos. 24 is a stop.
It's a 1 Meg series switch, lower values will work fine too.
The only way it differs from the DACT or Goldpoint series attenuators is that every step is composed of the addition of :
R1 = R1
R2 = R1 + R2 etc. taken from a ladder not a shunt.
I considered this less of a compromise than having such a large number of Rs and contacts lumped together.
Since people may want to calculate their own step attenuations I didn't present my circuit.
Mine is basically coarse for the first and last steps and on average uses 2 dB steps and just a few Vishay resistors at those positions I most often use.
where are the inductors??
No need for inductors, the PSU is regulated on a per channel basis.
You could but I doubt you'd hear, measure any benefit.
It seems that your drawing abilities need to be improved
I know, it not even my hand but the one of one of my technicians back in 1987, I made an attempt at improving it and i can only assure you that the original PSU scan would have been completely useless if I hadn't.
If it presents a major stumbling block I'll work on it further.
In the mean time I can only try to find excuses not to.
Cheers and thanks,
Frank,
it looks real good, the important things are there, like the tube pinout for us tube retards.
The component list had a 15V trafo that doesn't appear anywhere in the schematic.
Could all the filter electrolytics be 450 V?
Is this you current ultimate pre-amp?
Oh yeah...any suggestions on how to run the gnds?
RERE.
Hi,
Yes, and the drawing mentions that.
You can do whatever you you fancy there, as long as you feed the 12BH7A with a well regulated heater you'd be fine.
I outlined the arrangement for that filament supply before in some previous post, a 7812 or LM 317 reg should be O.K.
Sure.I used Nichicons but better caps are available nowadays.
Sticking to the topology, it can be improved which is why I left a number of choices open ended.
Bottom line, CDP, volume control, low Zo with plenty of current and voltage swing.
All that with as little signal degradation as possible.
Money being no object, yes...there are always some details one could improve.
I just wanted to provided a solid basis and my preamp is pushed already...
Details on request,
RE.Hi,
The component list had a 15V trafo that doesn't appear anywhere in the schematic.
Yes, and the drawing mentions that.
You can do whatever you you fancy there, as long as you feed the 12BH7A with a well regulated heater you'd be fine.
I outlined the arrangement for that filament supply before in some previous post, a 7812 or LM 317 reg should be O.K.
Could all the filter electrolytics be 450 V?
Sure.I used Nichicons but better caps are available nowadays.
Is this you current ultimate pre-amp?
Sticking to the topology, it can be improved which is why I left a number of choices open ended.
Bottom line, CDP, volume control, low Zo with plenty of current and voltage swing.
All that with as little signal degradation as possible.
Money being no object, yes...there are always some details one could improve.
I just wanted to provided a solid basis and my preamp is pushed already...
Details on request,
POSTSCRIPT.
Hi,
How did I miss this?
Mucho important indeed, dunno how I missed this part of your post.
I hate to say it but you'll need a scope for this...if not, the best points for starearthing where around the center of the cases....in my layout.
That seemed to satisfy my limited sense of logic ....but be aware that it won't always be that easy.
The key being, earth at the point where you find the least activity.
Cheers,
Hi,
Oh yeah...any suggestions on how to run the gnds?
How did I miss this?
Mucho important indeed, dunno how I missed this part of your post.
I hate to say it but you'll need a scope for this...if not, the best points for starearthing where around the center of the cases....in my layout.
That seemed to satisfy my limited sense of logic ....but be aware that it won't always be that easy.
The key being, earth at the point where you find the least activity.
Cheers,
Re: It finally happened...
Frank, just kidding....
My sense of humor some times (most times?) is not really good.
apassgear said:
It seems that your drawing abilities need to be improved!!!
Frank, just kidding....
My sense of humor some times (most times?) is not really good.
Re: WOOOOW!!!
Thanx... it is one of the things i do -- make drawings (maybe someone will notice and i'll get some paying work) -- these just contribute to my "beautifing the web" campaign.
Any glitches?
dave
Nice schematics
Thank you soooo much for this lovely job ... I'm very impressed.
Thanx... it is one of the things i do -- make drawings (maybe someone will notice and i'll get some paying work) -- these just contribute to my "beautifing the web" campaign.
Any glitches?
dave
Frank: "Well, I don't want to blow my own horn here but in the words of countless people who've actually listened to it (well in my system that is) : very transparent, dynamic, it just doesn't get in the way of the music."
======================
Sorry with the question, Frank. But, what does it mean with not getting in the way of the music?
======================
Sorry with the question, Frank. But, what does it mean with not getting in the way of the music?
- Home
- Amplifiers
- Tubes / Valves
- Frank's Ultimate Tube Preamp