Fantastic, I should learn to not try multitasking at my age. Working on two amps and these speakers at the same time.
I'm warming up the glue gun now.
Your support is second to none !!!
Thanks
You are most welcome. Glad to help get another convert to making speakers out of foam core.
")
How did your hot glue session go?
You will find that the second cornu goes twice as fast.
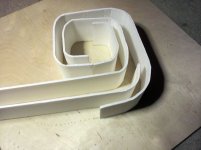
I think I did good. Waited till this morning and had both done in a couple hours. For the curves near the throat I scored the board and rolled it around the metal leg of a card table. As I worked outward only in-place scoring was necessary. I used clear thin packaging tape on the joints that were a little ugly.
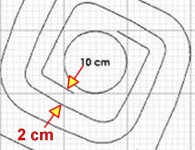
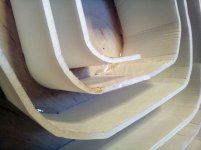
I tried to always allow for a thin bead of hot glue on the outside of each piece as I worked so there is a continuous seal. There is a piece of tape on one throat to keep the 2 cm opening consistent but will probably be replaced with cotton thread at a couple spots.
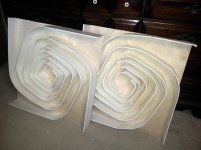
The whole process was enjoyable and as stated often, the tricks of the trade come easy and fast. I was very surprised just how sturdy the build is. Word is both Kliscpsh and B&W have been watching this thread.
My Gorilla Glue has turned into a Gorilla Puck, so I'll have off to the hardware store.
I tried to always allow for a thin bead of hot glue on the outside of each piece as I worked so there is a continuous seal. There is a piece of tape on one throat to keep the 2 cm opening consistent but will probably be replaced with cotton thread at a couple spots.
The whole process was enjoyable and as stated often, the tricks of the trade come easy and fast. I was very surprised just how sturdy the build is. Word is both Kliscpsh and B&W have been watching this thread.
My Gorilla Glue has turned into a Gorilla Puck, so I'll have off to the hardware store.
Attachments
Great progress Bob! I am very interested to see how yours sound since you are doing the Vifa but with a deeper 3.5 inch channel depth. How did you hear that both Klipsch and B&W are watching this thread? Maybe they will realize that good sounding speakers don't need to weigh 200 lbs. and cost as much as a small car.
and cost as much as a small car.......Word is both Kliscpsh and B&W have been watching this thread.
It's on the internet so it must be true.
And if they aren't ... they should be.I used clear thin packaging tape on the joints that were a little ugly.
I'm finding that plain boring printer paper and thinned-down PVA glue (white, wood, etc...) are making fantastically strong patches.
EDIT: Looking more closely at your photos I will strongly suggest that you remove the packing tape from the top edge of the foamcore - you will not get any glue to adhere to the packing tape and you will then have a leak in the horn.
Also I have been squishing glue into the scored bits (once in place) to help reinforce the curves, this makes it very solid.
I tried to always allow for a thin bead of hot glue on the outside of each piece as I worked so there is a continuous seal.
Yes, that seems to be important. You can seal the edges after the fact if you use the hot glue gun like a caulking gun. Drag the hot tip through the glue to help shape and seal.
Hopefully I will get my second one finished today - it's been a bit crazy around here lately.
Last edited:
I'm finding that plain boring printer paper and thinned-down PVA glue (white, wood, etc...) are making fantastically strong patches.
I'll give that a try. I'm going to do more shaping before I close them up.
...suggest that you remove the packing tape from the top edge of the foamcore - you will not get any glue to adhere to the packing tape and you will then have a leak in the horn.
I saw that too, think the thread loop will work.
Also I have been squishing glue into the scored bits (once in place) to help reinforce the curves, this makes it very solid.
My concern was the possibility of some slivers of the paper backing on the scores coming loose and/or flapping around. Good suggestion.
Another thought (for a subsequent build) is rounding off the leading edges at the head of each throat. That may have been mentioned earlier but I don't remember seeing it. I'm considering using some of the small gauge Radio Shack magnet wire for the leads. I've made experimental 7' speaker cables from a single strand with surprisingly good results. I read it was very popular in Britain a few years ago.
So I've got my plywood panels, 2'x2' like Bobs, and my foam strips (only 3") and I'm planning to buy the vifa TC9 drivers for this trial run. But I have a few quick questions.
First, is there a consensus on the best way to approach gluing at this point? If I don't want to buy a glue gun for this one project, is it wise to use caulk as someone suggested previously?
I get that there is a correlation between throat SA and driver SD, but I want to confirm that the combined SA of both throats should equal the SD of the driver.
My strips seem to be a little uneven. How precise does the cutting need to be for this project? I'm worried of my front panel appearing "wobbly." Should I go buy a drywall T square to assist the precision of my cuts and try again?
Bob,
Yes, please remove the clear tape, not sure why you need it. It will also buzz and make noise if left there. Upon looking carefully at your photos, it looks like you achieved the bends by indenting the foam core paper and not scoring it with a razor. It kind of buckles and does not bend smoothly when you do not pierce the paper when scoring it. Too late now but no big deal - just a clarification for other folks who have not started yet. With the cut scoring, you can literally get a perfect bend that will transition to tangent smoothly at the point where the horn mouth goes from curved to straight. 6L6 is being extra cautious by adding glue to the cut score lines to make it strong but probably not necessary. I also did not find it necessary to patch with paper and pva either - just a bead of hot glue on the butt joint is fine. Once both faces are glued on the structure will be very strong, I would almost bet you could stand on it and it will support your weight. I did not use plywood and my all foam ones could support between 70 and 80 pounds of clamping weight from dumbells and books.
Yes, please remove the clear tape, not sure why you need it. It will also buzz and make noise if left there. Upon looking carefully at your photos, it looks like you achieved the bends by indenting the foam core paper and not scoring it with a razor. It kind of buckles and does not bend smoothly when you do not pierce the paper when scoring it. Too late now but no big deal - just a clarification for other folks who have not started yet. With the cut scoring, you can literally get a perfect bend that will transition to tangent smoothly at the point where the horn mouth goes from curved to straight. 6L6 is being extra cautious by adding glue to the cut score lines to make it strong but probably not necessary. I also did not find it necessary to patch with paper and pva either - just a bead of hot glue on the butt joint is fine. Once both faces are glued on the structure will be very strong, I would almost bet you could stand on it and it will support your weight. I did not use plywood and my all foam ones could support between 70 and 80 pounds of clamping weight from dumbells and books.
So I've got my plywood panels, 2'x2' like Bobs, and my foam strips (only 3") and I'm planning to buy the vifa TC9 drivers for this trial run. But I have a few quick questions.
First, is there a consensus on the best way to approach gluing at this point? If I don't want to buy a glue gun for this one project, is it wise to use caulk as someone suggested previously?
I get that there is a correlation between throat SA and driver SD, but I want to confirm that the combined SA of both throats should equal the SD of the driver.
My strips seem to be a little uneven. How precise does the cutting need to be for this project? I'm worried of my front panel appearing "wobbly." Should I go buy a drywall T square to assist the precision of my cuts and try again?
The hot melt glue gun is CRITICAL for this project as it is the tack or clamp that holds curves in place while longer drying pva or caulking or whatever you use to dry. You can get a glue gun at Walmart, etc for $4. The glue costs more than the gun $6/bag of 100 sticks. I use the mini size.
You need quite evenly sized strips (+/- 2 mm deviation max) or you will have hard time with sealing face on in last step. Use a ruler to mark out lines carefully, a metal straight edge and a good razor to cut it. I lay it on carpet to cut and stroke the razor multiple times to go through paper, if you do it in one push, it will be jagged.
Yes, combined area of throats needs to equal driver Sd. Measure throat width accounting for thickness of foam. You can be a little off and that's ok.
If you are using the Planet10 drawing scaled to 24 inches, I think you need 3.5 inch deep channels. If you want to use your 3 inchers which you cut already, you need to modify the plan to compensate and make bigger throat area.
Last edited:
Hey xrk, I'm just a kid (trapped in an aged body) and you know how excited we kids get about something new. My approach had been "proof of concept" till I got half way through the build. I soon realized this could be quite involved and precise if one chose to slow down and shoot for perfection.
I'm already thinking of how to build a roller like they use for curving metal. A few wooden dowels in a simple rig should be pretty easy. If these sound as good as reported it will be well worth the extra effort when using more expensive drivers. So far I've invested ~ $36 including the Vifas. Next time I'll up my game.
My approach had been "proof of concept" till I got half way through the build. I soon realized this could be quite involved and precise if one chose to slow down and shoot for perfection.I'm already thinking of how to build a roller like they use for curving metal. A few wooden dowels in a simple rig should be pretty easy. If these sound as good as reported it will be well worth the extra effort when using more expensive drivers. So far I've invested ~ $36 including the Vifas. Next time I'll up my game.
I'd be interested in seeing that jig or someone doing a square version of the enclosure. I don't think I have the patience to glue those curves.
It's so easy it will make your head spin. Seriously, it goes fast and smooth. The entire point of this whole exercise is the face that these complex compound curves can be made with minimum hassle.
Honestly, making a square version would be much slower. If you try this technique you will understand why I say that.
I'll just echo what has been said so many times in the thread. It looks a lot more intimidating than it actually is. Great care should be taken at all the throats, but it gets easier as you work toward the edges. Like everyone else, by the time you finish the second build you know enough to consider making a third to replace the first. 
It's so easy it will make your head spin. Seriously, it goes fast and smooth. The entire point of this whole exercise is the face that these complex compound curves can be made with minimum hassle.
Honestly, making a square version would be much slower. If you try this technique you will understand why I say that.
Agreed. The curves are way easy, which is part of the reason I modified the plan on my 14 incher to be circular curves with no squares. You don't need a jig or rollers. The scoring of the foam core on the inside and roll it past a curved object like a table leg works. On my first one I just bent it by hand and it wad fine. It literally takes 15 minutes per channel and done i 1 hour per speaker.
I'll just echo what has been said so many times in the thread. It looks a lot more intimidating than it actually is. Great care should be taken at all the throats, but it gets easier as you work toward the edges. Like everyone else, by the time you finish the second build you know enough to consider making a third to replace the first.
That's why the first should be done on a 20 inch all foam back. Costs nothing and if good, works great.
I did cut exactly as you described, and still I found they deviated slightly. Perhaps most are within acceptable limits, but maybe I will start over and cut 3.5" strips this time. I'm glad I specified about the gluing. Thanks for the help!The hot melt glue gun is CRITICAL for this project as it is the tack or clamp that holds curves in place while longer drying pva or caulking or whatever you use to dry. You can get a glue gun at Walmart, etc for $4. The glue costs more than the gun $6/bag of 100 sticks. I use the mini size.
You need quite evenly sized strips (+/- 2 mm deviation max) or you will have hard time with sealing face on in last step. Use a ruler to mark out lines carefully, a metal straight edge and a good razor to cut it. I lay it on carpet to cut and stroke the razor multiple times to go through paper, if you do it in one push, it will be jagged.
Yes, combined area of throats needs to equal driver Sd. Measure throat width accounting for thickness of foam. You can be a little off and that's ok.
If you are using the Planet10 drawing scaled to 24 inches, I think you need 3.5 inch deep channels. If you want to use your 3 inchers which you cut already, you need to modify the plan to compensate and make bigger throat area.
- Home
- Loudspeakers
- Full Range
- Foam Core Board Speaker Enclosures?