do t+s specs affect sound quality much in the cornu? or will it sound similar enough between drivers due to the fairly small size of the drivers in question?
im more wondering if i could simulate the cornu in hornresp as a basis for designing future horns that arent spiralled, and wanting to just pick the first driver i get access to the specs of.
also, could someone please put up the t+s specs of the tangband driver people are using? it will help me greatly in my research/design of future horns")
thanks
im more wondering if i could simulate the cornu in hornresp as a basis for designing future horns that arent spiralled, and wanting to just pick the first driver i get access to the specs of.
also, could someone please put up the t+s specs of the tangband driver people are using? it will help me greatly in my research/design of future horns
thanks
do t+s specs affect sound quality much in the cornu?
They affect the bass alignment.
dave
Progress!
(Click into the photos if the ratios look wrong, sometimes the forum squishes the photos...)
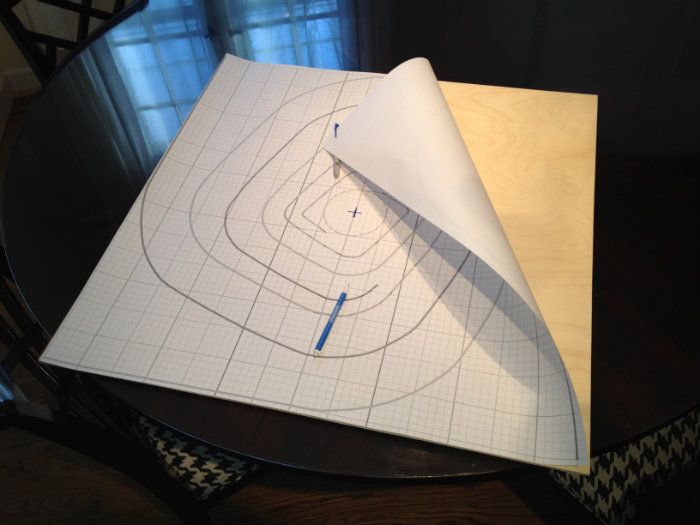
This is the .pdf that Dave Planet-10 provided for us, seen on the birch board. The dimensions are 30"x30" (76.2cm x 76.2cm for those of you that think in Metric.)
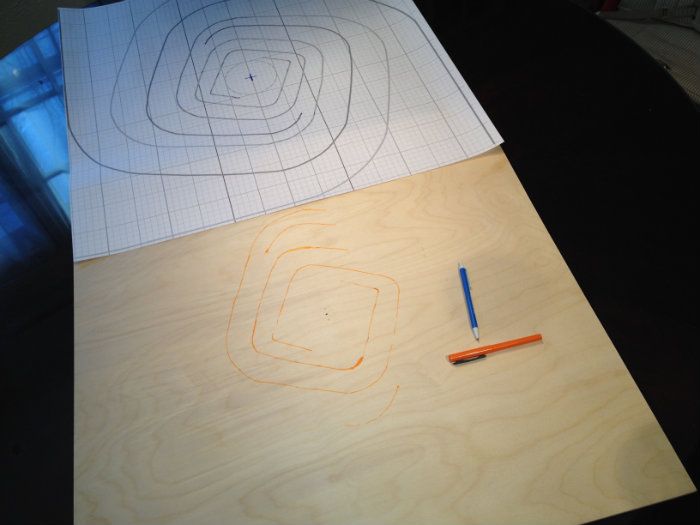
Starting the transfer. At first I was just denting the wood through the paper with a ballpoint pen and tracing those dents with the orange marker.
But after a bit I realized it was much easier to press the pen harder through the paper and make a mark. That was much faster. (And it's a disposable ballpoint, so who cares if the pen is damaged, which it dosen't seem to be...)
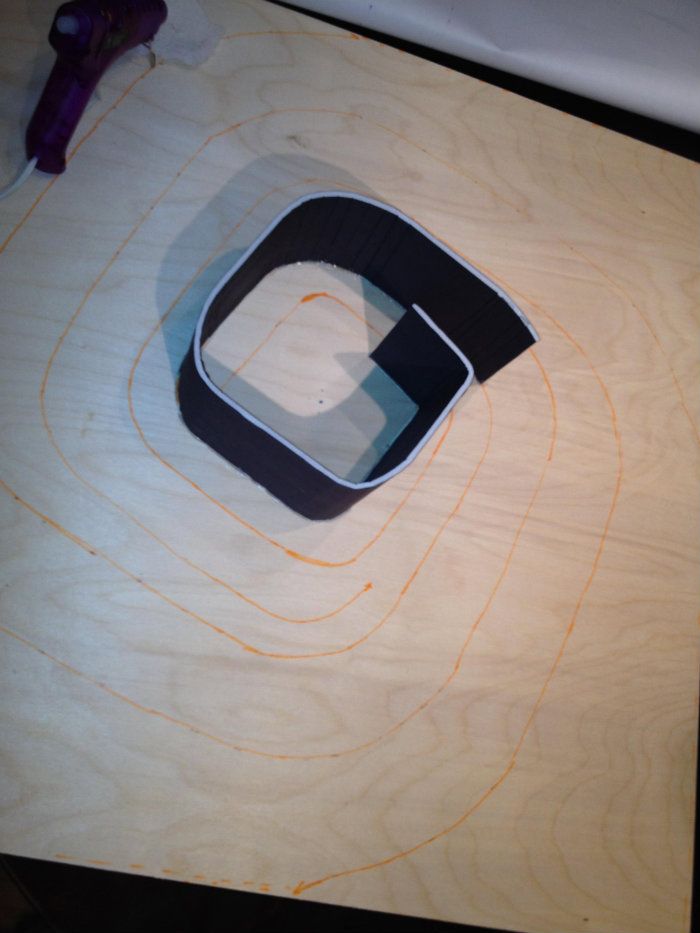
And the tunnel begins! Some of my foamcore has black paper, so it seemed logical to do one half of the spiral in black, one in white, to better illustrate.
Cutting the inside of the curve seems strange when you read it, but it makes perfect sense once you are using this material. I mentioned earlier that the backing paper is rather flimsy - it is, but the foam is sturdy.
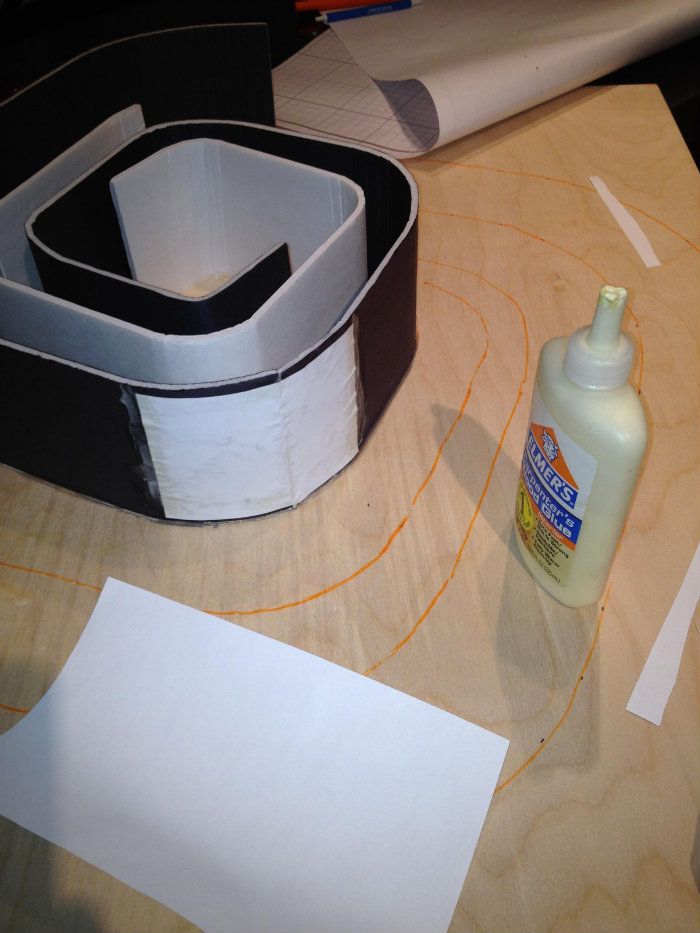
Here you see a reinforcing scab where the foamcore ended and the new piece begins. Nothing more than copy paper and glue. I don't know if it's necessary, but it can't hurt. The rough edges are smoothed down.
And that's all I completed today.
(Click into the photos if the ratios look wrong, sometimes the forum squishes the photos...)
This is the .pdf that Dave Planet-10 provided for us, seen on the birch board. The dimensions are 30"x30" (76.2cm x 76.2cm for those of you that think in Metric.)
Starting the transfer. At first I was just denting the wood through the paper with a ballpoint pen and tracing those dents with the orange marker.
But after a bit I realized it was much easier to press the pen harder through the paper and make a mark. That was much faster. (And it's a disposable ballpoint, so who cares if the pen is damaged, which it dosen't seem to be...)
And the tunnel begins! Some of my foamcore has black paper, so it seemed logical to do one half of the spiral in black, one in white, to better illustrate.
Cutting the inside of the curve seems strange when you read it, but it makes perfect sense once you are using this material. I mentioned earlier that the backing paper is rather flimsy - it is, but the foam is sturdy.
Here you see a reinforcing scab where the foamcore ended and the new piece begins. Nothing more than copy paper and glue. I don't know if it's necessary, but it can't hurt. The rough edges are smoothed down.
And that's all I completed today.
Last edited:
Days away from first sound...
The post is typically quicker at Xmas (3-4 business days) but US Customs is in between the hand off from Canada Post to USPS.
dave
As I am sitting here pondering the build, I think I am going to get some 5-min epoxy. The hot glue will still be used, but to tack things in place so the epoxy can cure...
Also, as far as I can tell, using hot glue on the top will be practically impossible - there is no way I can run the many feet of glue bead before it cools. Epoxy would be appropriate to set on the foamcore top edge and then gently place the top plate on.
My only other question now, before they are closed up, is how much stuffing to put towards the origin of the horn? Once they are closed it will be really hard to stuff them.
Cal, Dave? Any insight?
-Jim
Also, as far as I can tell, using hot glue on the top will be practically impossible - there is no way I can run the many feet of glue bead before it cools. Epoxy would be appropriate to set on the foamcore top edge and then gently place the top plate on.
My only other question now, before they are closed up, is how much stuffing to put towards the origin of the horn? Once they are closed it will be really hard to stuff them.
Cal, Dave? Any insight?
planet 10 said:Drivers for those left today Jim...
-Jim
Jim,
I lightly stuff the first straight section from the throat, I did it by adding it through the throat from the speaker opening after the fact. I densely stuffed the speaker cavity. Cal may have needed more as he had more bass than he wanted.
The 5 min epoxy is a good idea. I mentioned that in my post where I used nothing but hot melt on the top made possible by segmenting it so that it can be done piecemeal - not recommended.
Good luck.
Xrk971
There's a jpeg pattern of the spirals?
See post 230 - thanks to Planet10.
There's a jpeg pattern of the spirals?
Actually he misspoke. I created a CAD drawing tracing over the tiny jpg, and made a vector pdf, so that it is easily scalable with no loss of resolution.
dave

I'm going to do the Vifas first, then the 70cm version w/ CHR70-3 (or maybe the TB W4-1337SD).
Is anyone building the smaller 20 inch version, or all you all going for the full size 70 cm or larger? Just wanted to have some comparisons from others for my build with tc9fd's.
![20121205_151327[1].jpg](/community/data/attachments/287/287979-06020e6a95ea97bdeaec4999ee1ce439.jpg)
Seems to me you can get a good idea with a test run lying flat on a table before you seal the face. Stuff, set the face on top, weight or clamp enough to stop leakage and play. The table top should emulate wall mounting well enough for this. I'm also thinking about ways for a removable portion for the center-back to allow stuffing adjustment and driver access.
. . . .
My only other question now, before they are closed up, is how much stuffing to put towards the origin of the horn? Once they are closed it will be really hard to stuff them.
Cal, Dave? Any insight?
. . . .
-Jim
You can remove 'practically'. Impossible is correct.Also, as far as I can tell, using hot glue on the top will be practically impossible
Messy and difficult to get the entire surface ready before it begins to set. PVA glue is your friend in the case. Lay your bead, tape the board in place and set it face down for clamping. There is more than one reason for doing it that way.Epoxy would be appropriate to set on the foamcore top edge and then gently place the top plate on.
My only other question now, before they are closed up, is how much stuffing to put towards the origin of the horn? Once they are closed it will be really hard to stuff them.
When I am finished the 'finishing' I will be using rockwool, about 3" thick. I am going to cut a piece that will friction fit the driver chamber with a 'well' for the magnet. I may have to do this in two pieces. I am also going to fit a piece in the throat of the two horn openings approx 3-4" long and full horn depth [4.5"] This will not be so stuffed as to act aperiodic but enough to bring down the midrange coming out the horn. I will do this first and update later but that is days away.
I am going to get my trim wood today and get that cut and fitted. If there's time I will add the oil to the baffles and trim wood.
Saw this at officeworks today. Pvc instead of paper.
I wonder how that would work?
Thanks to Cal for turning me on to this thread.
What's the concensus on EL70 drivers for this project?
I have seen some not-so-favourable mention in recent posts regarding the prospect of using EL70s, but xrk initially thought they might be a good candidate.
Has anyone tried it?
What's the concensus on EL70 drivers for this project?
I have seen some not-so-favourable mention in recent posts regarding the prospect of using EL70s, but xrk initially thought they might be a good candidate.
Has anyone tried it?
And it's here:I created a CAD drawing tracing over the tiny jpg, and made a vector pdf, so that it is easily scalable with no loss of resolution.
http://www.diyaudio.com/forums/full...-board-speaker-enclosures-23.html#post3266494
- Home
- Loudspeakers
- Full Range
- Foam Core Board Speaker Enclosures?