If you're new at applying wood veneer, here is a link to lots of tips and info.
Tips and Info: Applying Wood Veneer Sheets | Oakwood Veneer Company
Hope it helps!
Not new, but tired of cauls and clamps on big speakers with the King of Glues, PPR.
Got a line on a heated platen or a way to buy some surplus and make one?
Guy from Puerto Rico, for a 5"x32" just use regular wood glue and clamp a double layer of MDF over the veneer as a platen. Short clamps or even thumb clamps every 6" down each of the four sides will do it. I'm jealous, my panels are usually 18"x24" or more.
Here is some reading for ya
Iron On Veneer / PVA Glue Method or Contact cement solvent based
An alternative to using a tack contact cement when traditional press methods aren’t available is this method using white, yellow PVA glue or contact cement and a standard household iron. This process will help you achieve a better glue bond and allows for the use of 10 mil paperbacked or raw veneer which can save you money. Follow these steps for best results.
Surface Preparation
The surface or substrate you are veneering must be clean and flat. MDF, particle board or cabinet grade plywood are all satisfactory substrates. If applying veneer over a hardwood substrate, be sure all finish is removed and repair any gouges or scratches that might telegraph through the new veneer. It is not advisable to veneer over old veneer as the heat and moisture generated in this process may actually cause the old veneer to delaminate.
Glue Application
You can use either white glue, yellow woodworking glue or solvent contact cement. It is recommended when you use yellow woodworking glue to thin it with 10% water to allow easier spreading as it can be very thick. With a brush or roller coat the back of the veneer and the substrate with glue. If you are rolling the glue a foam roller applicator works well but not for the contact cement. You may have to find a roller from a paint supply store which is designed for contact cement use. In almost all cases you should apply two coats of glue to the substrate because some of the first coat will soak into the surface. Be very careful not to get any glue on the face of the veneer as this will surely be a problem during the finishing process. Once applied, allow the glue to dry to the touch. The contact cement will probably dry quicker but as a general rule, wait 20 to 30 minutes. An important thing to remember is to apply even, thin coats of glue. Generally speaking, you want to end up with approximately 6 to 8 mils ( 1 mil = 1/1000” ) of glue thickness.
Ironing Veneer to Substrate
Make sure your glue on the veneer and cabinet or other surface is dye not tacky but 100% dry. The glue must be 100% dry on both surfaces for this method of applying veneer with a iron on method to work. Place the veneer on the substrate and position the grain direction accordingly. Unlike WET contact cement which bonds on contact, the veneer can be allowed to make contact with the substrate while positioning the veneer. If you use contact cement solvent based, let the contact dry 100% the same as white or yellow glue. This method will work with all three glues if the glues are dry 100%. Use a lightweight cotton material between the veneer and the face of the iron. An old bed sheet or cotton t-shirt work well for this purpose. With your iron set on a high heat setting, begin to iron the veneer from the center out using a slow and deliberate pace. The cloth should prevent the hot iron from scorching the face of the veneer. Keep moderate downward pressure on the iron as you move it across the surface. Make sure you have covered every square inch of surface and examine the veneer for any loose spots that may not be bonded. If there are any areas that appear as though they aren’t bonded to the substrate, just go back over them with the iron. Allow this assembly to cool for 2 hours before trimming the veneer to finished size. Allow 24 hours for glue to fully cure before doing any finishing.
Finishing Veneer:
Veneer can be finished just like any hardwood. The first step is proper sanding starting with a medium grit paper followed by a fine grit paper. This can be done with an electric sander if you are confident enough or by hand if you are not. Remove all sanding residue with a brush or tack cloth. From this point you can either stain the wood or finish with a clear
Thanks
I gathered this off the web several years ago and edited a little")
This info I use to provide with every speaker kit I sold for customers.
Here is a sample of during and after using the IRON on Contact method.

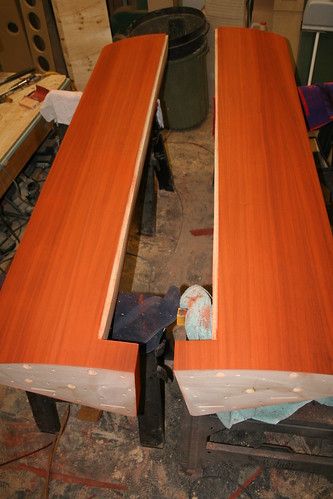

This was a large stacked array using Accuton Mids and G1 ribbons sitting on top of 4 TC 12 in a open baffle under each stacked array.These arrays were filled with sand then bolted all as one piece to the top of the sub cabinet.Veneer matched with grain on bother side and on all pieces.This kind of work is only possible with the Iron on method as you have to match the grain as you lay each piece..
Also you want some deals on veneer I have purchase from the seller on Ebay for years as a fact just ordered some SAPELE POMMELE Veneer for a custom center I am doing.
veneer, wood items in rosebud veneer store on eBay!
LVicy(!~~60_12.JPG)
I gathered this off the web several years ago and edited a little
This info I use to provide with every speaker kit I sold for customers.
Here is a sample of during and after using the IRON on Contact method.
This was a large stacked array using Accuton Mids and G1 ribbons sitting on top of 4 TC 12 in a open baffle under each stacked array.These arrays were filled with sand then bolted all as one piece to the top of the sub cabinet.Veneer matched with grain on bother side and on all pieces.This kind of work is only possible with the Iron on method as you have to match the grain as you lay each piece..
Also you want some deals on veneer I have purchase from the seller on Ebay for years as a fact just ordered some SAPELE POMMELE Veneer for a custom center I am doing.
veneer, wood items in rosebud veneer store on eBay!
- Status
- This old topic is closed. If you want to reopen this topic, contact a moderator using the "Report Post" button.