I tried drilling, chipping it out, even going in from the other side, nope, not happening - it just got more embedded in the aluminum, and my hole got less useful. ... I do not have a drill press, CNC or anything like that.
Can you take it to a workshop with a drill press or similar equipment that will allow removing the drill bit from the hole?
If you cannot remove the drill bit, tapping new holes a few millimeters next to the old ones would probably work, and you wouldn't have to buy a new heatsink.
It is usefull onlly for wood!Artsy, pretty good solution for you.")
artsy.
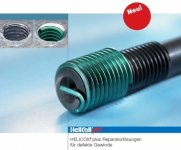
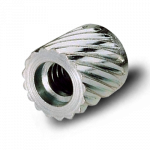
The solution to save your heat sink is to find a local machine shop that can burn the drill out with an EDM machine. It will cost some but shouldn't be that expensive for a single small drill bit. If after the drill is out the hole is a mess you then drill that hole larger and install what is called a Heli-coil in the hole to bring it back to the original tap size. The machine shop who can burn out the drill bit can install the heli-coil for you. It should be much less than having to purchase a new heat sink. The Heli-coil is a similar idea to what LC showed but it is made for repairing threads in metal, what LC showed is for putting a thread insert into wood or plastic, I've used thousands of those, they are not for your repair. You won't be able to remove that tap with a drill, the tap is harder than a drill and you just will walk of the center and make a bigger mess. Find a local machine shop who can fix this for you. The Heli-coil is a stainless steel insert that will last forever. It takes a special tool to install the insert and they come in a kit from McMaster Carr if you just have someone burn out the broken drill but requires drilling and taping the hole to a special size for the insert. This is how a cylinder head on a car is repaired when someone pulls the threads out of an aluminum head when installing the spark plug wrong or having one seize. A very common repair on threaded holes in aluminum.
The solution to save your heat sink is to find a local machine shop that can burn the drill out with an EDM machine. It will cost some but shouldn't be that expensive for a single small drill bit. If after the drill is out the hole is a mess you then drill that hole larger and install what is called a Heli-coil in the hole to bring it back to the original tap size. The machine shop who can burn out the drill bit can install the heli-coil for you. It should be much less than having to purchase a new heat sink. The Heli-coil is a similar idea to what LC showed but it is made for repairing threads in metal, what LC showed is for putting a thread insert into wood or plastic, I've used thousands of those, they are not for your repair. You won't be able to remove that tap with a drill, the tap is harder than a drill and you just will walk of the center and make a bigger mess. Find a local machine shop who can fix this for you. The Heli-coil is a stainless steel insert that will last forever. It takes a special tool to install the insert and they come in a kit from McMaster Carr if you just have someone burn out the broken drill but requires drilling and taping the hole to a special size for the insert. This is how a cylinder head on a car is repaired when someone pulls the threads out of an aluminum head when installing the spark plug wrong or having one seize. A very common repair on threaded holes in aluminum.
Thanks everyone
The two options I see:
#1 Continue to work at removing the tap. As You can see from the photos, I will end up with a nasty big messy hole - too big for a longer screw. A wider screw is not a option, due to the hole in the driver. But I could drill this hole out clean with my drilling jig and fill in with something like what Lazy suggested, but something for aluminum. I have even considered aluminum rod, ever so slightly larger then the hole, then "compressed" in. I am not sure what this would do to the thermo properties of that area of the heatsink base.
#2 I can move the module over 3/4" away from the nasty hole and re-drill and re-tap the holes. I do not think this would affect the performance of the amp too much not being dead center on the heatsink. I would more then likely drill the holes all the way thru and use my plug tap and thread the holes all the way thru. I am too freaked out to order another bottom tap and have to worry about it breaking. Apparently I have not developed the "touch" for tapping threads for such small screws.
I have read about using acid and stuff like that. Again, it is a matter of accessibility. I live in a very rural area where everything must be ordered. The cost and hassle may exceed the cost of a new heatsink. There are some tool and die shops here that might be able to perform such work...
For now, I am going to play games with my daughter and digest these ideas...
Artsy,
Most tool and die shops use the EDM process and can save your work for you and fix that hole. If you put an aluminum plug in there you wouldn't be able to detect the difference in the heat dissipation, it would be nearly identical. Check with your local tool and die shop, this is a standard procedure.
Most tool and die shops use the EDM process and can save your work for you and fix that hole. If you put an aluminum plug in there you wouldn't be able to detect the difference in the heat dissipation, it would be nearly identical. Check with your local tool and die shop, this is a standard procedure.
Hi ArtsyAllen,
the very best option is what Kindhornman suggested, he is right on the money. If you cannot find a suitable place to get it fixed or if it is too expensive, you could always try to shatter the tap with a fine punch tool and hammer, get it out bit by bit, drill a larger hole when done and insert some epoxy putty (the one that hardens like steel. make sure you make the heatsink surface as flat as the heatsink (maybe put a piece of metal on the surface of the heatsink you will use and fill from the other side). Once cured, you call drill and tap into the putty. It wouldn't as good as aluminum so make sure you don't over tighten and/or remove the screw too many times. If not good enough, you can always drill it back.
But you should consider Kindhornman's option first
Do
I have been plugging away bit by bit assembling this amp - mainly the chassis work.
I have a lot of pictures to post of the build, but I hit a massive discouraging road block today...
I had all the holes drilled in the heatsinks, and was almost done tapping the threads. I was down to my last round with the bottom tap, and it broke! Surprising, given it was a new Hanson Carbon tap. I will admit that I am new to using this stuff, but this I did not expect... I tried drilling, chipping it out, even going in from the other side, nope, not happening - it just got more embedded in the aluminum, and my hole got less useful. At this point, I see no choice but to save this heat sink for another project, and order a new one - and just drill and tap the holes all the way thru, forget this "bottom" tapping business, I guess I am out of my league on that one. I am lucky I got this far, plugging away with a good hand drill and extensive jigging. I do not have a drill press, CNC or anything like that. The sad thing about it, is one heat sink is completely done, and this one was down to the last turn on all the holes. I was so close...
Please excuse my creative crash here, this would be my attempt at crying out for some help...
Do any of You all see a way to salvage the heatsink, or should I order a new one? I thought about flipping the holes top to bottom, but that would leave the "bad" hole and the one across from it as "voids" for the mosfets.
I am going to sleep this on off...
Regardless of the solution/method to remove the broken off tap, the hole will not be useable - at least for a 3mm screw! Once it's out and cleaned, you try (and this is a big if) filling it with some JB Weld. Let it set up for a couple of days, try re-drilling and tapping. I've never tried JBWeld in this type of application, but there's nothing to loose. It might work.
I had this very same thing happen to me too. I didn't even attempt to remove the tap. I filed it down clean with the HS surface. I was then able to re-configure the FO module to a slightly different position on the heat sink and all was well. But it sure made my OCB disorder flare up!
That's what happens when you strive for perfection. Hope you can find a good solution.
Rick
artsy.
The solution to save your heat sink is to find a local machine shop that can burn the drill out with an EDM machine. It will cost some but shouldn't be that expensive for a single small drill bit. If after the drill is out the hole is a mess you then drill that hole larger and install what is called a Heli-coil in the hole to bring it back to the original tap size. The machine shop who can burn out the drill bit can install the heli-coil for you. It should be much less than having to purchase a new heat sink. The Heli-coil is a similar idea to what LC showed but it is made for repairing threads in metal, what LC showed is for putting a thread insert into wood or plastic, I've used thousands of those, they are not for your repair. You won't be able to remove that tap with a drill, the tap is harder than a drill and you just will walk of the center and make a bigger mess. Find a local machine shop who can fix this for you. The Heli-coil is a stainless steel insert that will last forever. It takes a special tool to install the insert and they come in a kit from McMaster Carr if you just have someone burn out the broken drill but requires drilling and taping the hole to a special size for the insert. This is how a cylinder head on a car is repaired when someone pulls the threads out of an aluminum head when installing the spark plug wrong or having one seize. A very common repair on threaded holes in aluminum.
I agree with the helicoil solution, but M3 is a small hole. I think the outside threads on an M3 helicoil would be M5 size...
Meaning the hole (after removing the tap) can't be much over 4mm. Don't mess around, look for help would be my advise.
In air-cooled cylinder heads it's quite a common practice to helicoil all tapped holes because they will last longer and be stronger than the original tapped hole. I've done all exhaust studs on my own air-cooled heads.
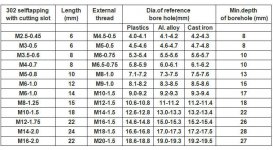
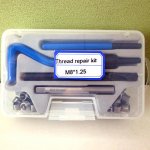
A DIY kit looks like this (for small numbers)
M3 is quite hard to get right though(*). Easy to break a tap. On my project I used a drill stand for a hand drill to guide the taps. Doing all of the moving/rotation by hand this gave way less sideways motion. A guide/template for drilling the holes is very welcome too. More work, but less of a chance of things going wrong.
(*) reason enough for me not to tap M3 unless absolutely necessary. It might even make sense to use helicoils as a standard solution for M3 holes in aluminum. That way you're drilling and tapping for a M5 size.
(the pitch is different though, the helicoil kits come with a tap as the pitch will be the same as the hole it's filling in).
Attachments
Last edited:
Wesayso,
I whole heatedly agree with your assessment about the Heli-coils. It's also nice to see I'm not the only one who also works on cars! Been there and done that on pulled head bolt threads in my Jaguar which I'm glad is long gone. It is an everyday solution for threads in aluminum that you want to last or something that comes apart more than once. I have an assortment after all these years but not for a small 3mm screw size. Only other good solution besides putting in an aluminum plug would be to heliarc weld the hole up and redrill it, but what a pain and it usually discolors the metal.
I whole heatedly agree with your assessment about the Heli-coils. It's also nice to see I'm not the only one who also works on cars! Been there and done that on pulled head bolt threads in my Jaguar which I'm glad is long gone. It is an everyday solution for threads in aluminum that you want to last or something that comes apart more than once. I have an assortment after all these years but not for a small 3mm screw size. Only other good solution besides putting in an aluminum plug would be to heliarc weld the hole up and redrill it, but what a pain and it usually discolors the metal.
That's the spirit, Kind you're the best!

It is usefull onlly for wood!
It's about general idea, realization upon available assets.

Half way there...
Thanks everyone for all your ideas, we are moving forward for sure...
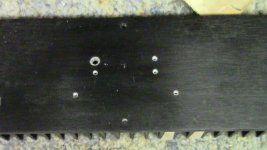
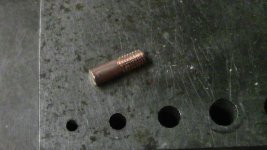
I got the tap out
I will post more pictures later when I am not hurrying to work. But I wanted to run this idea by You.
I found a solid copper plug with a tiny pin sized hole that is just slightly larger then the new hole, it would be a perfect plug. I know copper has slightly different properties with heat, as it does not dissipate heat as well as aluminum, but maybe in this case, it will work just as well.
Is this a good option, or should I stick with finding an aluminum plug or rod?
Thanks,
More photos to come...
Thanks everyone for all your ideas, we are moving forward for sure...
I got the tap out
I will post more pictures later when I am not hurrying to work. But I wanted to run this idea by You.
I found a solid copper plug with a tiny pin sized hole that is just slightly larger then the new hole, it would be a perfect plug. I know copper has slightly different properties with heat, as it does not dissipate heat as well as aluminum, but maybe in this case, it will work just as well.
Is this a good option, or should I stick with finding an aluminum plug or rod?
Thanks,
More photos to come...
Attachments
Thanks everyone for all your ideas, we are moving forward for sure...
I got the tap out
I will post more pictures later when I am not hurrying to work. But I wanted to run this idea by You.
I found a solid copper plug with a tiny pin sized hole that is just slightly larger then the new hole, it would be a perfect plug. I know copper has slightly different properties with heat, as it does not dissipate heat as well as aluminum, but maybe in this case, it will work just as well.
Is this a good option, or should I stick with finding an aluminum plug or rod?
Thanks,
More photos to come...
Allen,
Good to see you're back on track.
If you look at high end heat sinks for CPUs, you'll find that they often come with a copper base and aluminum fins. AFAIK something to with copper being better at transferring the heat from the chip to itself, and aluminum having better properties (also cheaper) at dissipating.
So you should be good with a copper plug.
Let the experts chime in!
- Home
- Vendor's Bazaar
- First One - mosFET amplifier module