Hi Fran,
big THANK YOU for guiding....but i think i had a cold solder joint that oxidated
over the time in the cupboard at cap E5 (at the mod pdf). After resoldering
the hole thing swings again.
After one year of shiga-absence i have to read a lot to find out whats next
to do with this player...
Greetings Ulf
There's a link a few pages back and you can download the manual.
I have 2 shigas - one has all the mods done to it, the second has very little done other than being bolted down to a heavy metal plate. The only thing I haven't played with is the power supply - I'm just using a 7808 on both builds. I picked up an awslr regulated PS recently so I'll be trying that out when it gets here.
Fran
The urge to tweak this thing is irresistible!
So right.....

Probably due to the fact that this contraption reveals every single bit you improve/alter.....almost scary...

Hi,
After doing some mods, my shigaclone has become overly critical of cd's. With most of them, it will spin right up, read TOC and play them, but with quite a few cd's it will not read the TOC. It spins, the laser will move a few millimeters, and then... nothing.
The mods: different cable to external PS, disconnected and moved PCB.
What I don't understand is why it is now being so picky. It would be easier to understand if it just didn't work.
I bought 4 cd's last week, and it refuses to play one of them (Grant Green, Live at club Mozambique. I listened to it at the shop and it is a great album). So far, there are at least 7 cd's I have that it will not play anymore.
Does anybody have any idea?
Last edited:
Mine will play all original cd's but if they are scratched or a bit dirty it has trouble ...resulting in a repetition or a mute mode.
After cleaning 99 percent of all those problems become solved!!
The black hi-space recordables he has trouble reading the TOC with, resulting in spinning too long and stopping once in a while.
However most of the time a second command will result in reading and playing them as well.
I have become a fuzzy person with cleaning my cd's more often now since I only play with my Shiga-based "PiTbull" Transport......
Try cleaning the unplayable cd with paying extra attention to the inner ring...let it become fully dry before a second attempt.
Last edited:
Mine plays scratched ok (unless badly scratched), but exhibits a different quirk: with a few CDs, it will get stuck playing the same "chunk" of the song in a loop until I fast forward a bit. It happens on some brand new CDs, so the problem is poor disc surface... And it will always get stuck at exactly the same spot. Any ideas?...
Hello Peter,There must be something wrong here as normally Shigaclone is never picky about CDs; it plays everything, even badly scratched or dirty.
One reason for pickiness could be lack of caps at the crystal oscillator.
The only mods so far have been an external ps (regulator inside the transport housing), removal of the caps from the PCB as per instructions on the pdf, and the removal of the PCB from the transport. The ribbon cable to the transport moves free, and the transport is solidly mounted.
Before, the transport itself was mounted to the outer shell of a wooden box using some cotton string. This meant it had some wiggle room, and sometimes the laser unit would ride against the cutout in the box. Then of course it would stop playing. All of this has been addressed in my new housing (made out of Oregon pine, Fichte, and Padouk).
The cd's it won't play are all clean and undamaged. The Grant Green album I mentioned was brand new: to listen to it at the shop they had to remove the cellophane wrapper.
I am completely baffled. Could it be that somehow the distance of the cd to the laser is right at the edge of where it will read discs? As the chips and laser must still be ok, it is the only answer I can come up with.
Mine will play all original cd's but if they are scratched or a bit dirty it has trouble ...resulting in a repetition or a mute mode.
After cleaning 99 percent of all those problems become solved!!
The black hi-space recordables he has trouble reading the TOC with, resulting in spinning too long and stopping once in a while.
However most of the time a second command will result in reading and playing them as well.
I have become a fuzzy person with cleaning my cd's more often now since I only play with my Shiga-based "PiTbull" Transport......
Try cleaning the unplayable cd with paying extra attention to the inner ring...let it become fully dry before a second attempt.
I had very similar problems until I realized that the platter height was probably incorrect. A minor adjustment (in this case maybe a half to one mm closer to the laser) solved all of these issues on my Shigaclone. If you've messed around with the platter at all it would be quite likely that it is not in quite the right place, and then it sometimes works and sometimes doesn't. Mine is pretty un-finicky about what it plays.
Last edited:
If you've demounted the bottom board then you most likely have had to put in some kind of bar to extend the stop switch for the laser sled travel. Its fairly likely that this needs a little adjustment - I've seen this on my own build in the past. I would bet that the switch is stopping the sled moving close enough to the platter.
Not reading the TOC is different to it reading scratched CDs.
Fran
Not reading the TOC is different to it reading scratched CDs.
Fran
Hello Kevin & Fran,
Thanks for your suggestions, I will look into them. The stop switch comes from a replacement mechanism. These replacements come with a small pcb containing the switch and the connections to the motor. Strangely enough, while the mechanism looks exactly the same and uses the same ribbon (same number of strands) as the original, when I connected it, it would not read the TOC on any cd, it would just spin up.
In the end I just desoldered this small PCB and mounted it to my old transport. I guess both the height of the platter and the switch could be to blame, but the switch is the most probable culprit (stupidly, I do not remember if I ended up using the old motor or the new one. Note to self: make notes.).
Has anybody else had problems with replacement mechanisms?
Jeroen
No, whats going there, is that there is a little blob of solder on that PCB for static protection. You have to wick that off for the new mechanism to work.
Also, the stop switch I mean is mounted on the bottom board and there is a part of the sled that hits off it to limit travel. Have a look at the bottom board again and gently push the sled towards the main motor. You should see where the sled hits this switch. I'll have a search around for a pic of the solder blob.
Fran
Aha! I'll have a look.No, whats going there, is that there is a little blob of solder on that PCB for static protection. You have to wick that off for the new mechanism to work.
Also, the stop switch I mean is mounted on the bottom board and there is a part of the sled that hits off it to limit travel. Have a look at the bottom board again and gently push the sled towards the main motor. You should see where the sled hits this switch. I'll have a search around for a pic of the solder blob.
Fran
The new mechanism comes with this stop. I desoldered the one on the bottom board, and used some spare wires with both connectors from the boom-box to make a small detachable wiring loom connecting the motors and the switch that are part of the replacement mechanism to the main board.
I guess the solder blob is somewhere on the laser sled? If I can just connect the whole replacement mechanism, I would not have to check for tolerances on the switch and platter height. I'll rummage through the parts collection and have a look.
Jeroen
Last edited:
I have the okapi mods PDF, but I can't load it here. shoot me a PM with your email address and I can send it. Beware that there are a good few other mods and changes since this pdf was made.
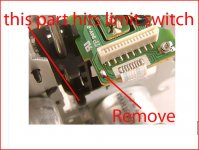
See this pic - thats the blob you need to remove on the replacement mechanisms.
See this pic - thats the blob you need to remove on the replacement mechanisms.
Attachments
Fran,
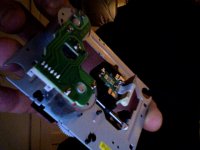
I thought a few pictures might be good. I had to take them with the webcam, and they are kind of dark, but they'' maybe clarify things.
First off, the mechanism with its own small pcb for motors and end-switch.
Second: is the solder blob to the right below the ribbon connector the blob you mean?
Jeroen
PS: the extra mechanism has as part no.: SF-P101N 16 Pin.
Attachments

- Home
- Source & Line
- Digital Source
- Finally, an affordable CD Transport: the Shigaclone story