Anyone have any links to fibreglass construction techniques, fibreglass orientated projects(doesn't have to loudspeakers) and such like. Really anything to do with fibreglass would be good.
I'm cooking something up but its really just a bunch of ideas in my head at the moment. Don't have a clue how to go about transferring them into reality.
I've got this idea of creating a skeleton frame covering it in cloth and slapping the fibreglass over that then sanding to the shape I want but that's just something I've pulled out the air and vaguely remember seeing years and years ago on the car audio side of things.
Thanks
Should be a whole ship load of boat building info out there.
Fiberglass hulls are build in molds though. You might want to think about doing it the same way. The biggest advantage is a uniform, thick "gel coat". This is sprayed inside the mold before the fiberglass goes in and provides the ultrasmooth ouside layer.
No more worries with the MDF movement.")
Fiberglass hulls are build in molds though. You might want to think about doing it the same way. The biggest advantage is a uniform, thick "gel coat". This is sprayed inside the mold before the fiberglass goes in and provides the ultrasmooth ouside layer.
No more worries with the MDF movement.
el`Ol said:I remember a documentation about a low cost Frank Gehry project in Germany where he said this was only possible because of a new production method for molds (I think it was styrofoam, but not sure). Maybe with gypsum instead of concrete...
Wouldn't you need a mold to create the styrofoam mold? Modelling clay or similar might be better since you could shape this by hand, templates and basic tools.
This is what I'm looking at building, its a rough and incomplete sketch so you'll have to use your imagination a little
An externally hosted image should be here but it was not working when we last tested it.
ShinOBIWAN said:
Wouldn't you need a mold to create the styrofoam mold?
Exactly that was the clou that they didn´t need a mold for the styrofoam, but made the molds from styrofoam blocks. I don´t remember how they did this, but I think it would make it much easier for you if you were able to produce the enclosure directly from the CAD data.
ShinOBIWAN said:How would you go about joining the two pieces? What would you use for the mold?
This article seems to be a wealth of knowledge on the subject. Very detailed.
Plaster is a pretty workable material - both for carving/shaping a rough piece, and for use on molds. Its messy, and takes some learning, but is a great medium. If you embed cloth or wire in it, it can have quite a bit of structural strength. I once built a large bed in the shape of a shell out of plaster..
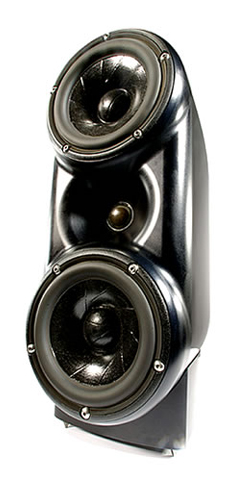
Looks very much like the "Ultimate Monitor"ShinOBIWAN said:
Wouldn't you need a mold to create the styrofoam mold? Modelling clay or similar might be better since you could shape this by hand, templates and basic tools.
This is what I'm looking at building, its a rough and incomplete sketch so you'll have to use your imagination a little
An externally hosted image should be here but it was not working when we last tested it.
Hello Shin,
You could make a mould out of expanda foam .Make a rough skeleton out of chicken wire spray expanda foam over and use
a rasp file to shape it ,use car body filler to smooth it out .
Then use a fibreglass chopper gun to make a female mould .
Either hand lay it or use a chopper gun to make the positive shape .
Boat builders and surf board makers would be able to help .
Cheers .
I second the idea of making a buck first, then a mold from the buck. I have made race-car body panels this exact way with good success. The advantage for you, as mentioned before, is the ability to use a thick gel coat at the surface layer. Your design looks like it is thicker in the middle of the part than at the baffle, this means you will have to use a two piece mold if you chose this method.
I have made free hand bucks using the wire and expanded foam method, it is very challenging to make a symmetric part this way.
The method which worked best for me follows:
If you have access to a large format printer, you can divide the solid model into evenly spaced slices and print of the cross sections. If you really need to save paper, you can print all of the cross sections concentrically on one piece of paper and trim off each cross section as you work your way down to the smallest one.
Standard builders insulation foam (the blue or pink stuff) can be easily cut with a hot-wire or sharp razor knife, and can be stacked ala trans-lam style enclosures to form the basic shape of the part. From here, there is the matter of filling in the steps between layers of foam with auto body filler or plaster and smoothing the shape to your finished part.
Now, here is a little trick I have used to make parts that were not weight sensitive and going on a race car. I have never used it on the scale which you are building and am not sure how well it would work.
You can make a "lost foam" mold by dissolving the foam out from underneath a finished fiberglass layer. With this method you make the buck as described above, then vacuum bag the fiberglass directly to the buck. When the fiberglass sets up, the foam inside can be easily dissolved using common solvents (acetone, lacquer thinner), leaving the shell behind.
I found a pdf that describes this method here: http://www.westsystem.com/ewmag/23/pdf/03-Lost_foam.pdf
The disadvantage with that method is that you will be making two mirror image parts and would have to make two separate bucks, rather than use the same mold for two parts. This makes having symmetric parts more challenging. However, making a mold takes a very long time, so you would not necessarily save time by making a mold. In fact, you would probably spend a lot more money and time making a buck and mold than any other method mentioned so far, but potentially have the best results, and the ability to make duplicates with just a little more effort.
Just some ideas to throw into the fray.
Regards,
David
gtforme00 said:
Standard builders insulation foam (the blue or pink stuff) can be easily cut with a hot-wire or sharp razor knife, and can be stacked ala trans-lam style enclosures to form the basic shape of the part. From here, there is the matter of filling in the steps between layers of foam with auto body filler or plaster and smoothing the shape to your finished part.
A good material for making the "buck" is the Styrofoam mentioned above. Blue seems to be denser. The buck would be a perfect replica of what the finished speaker would look like. So, it needs to be perfectly smooth. Unfortunately, auto body filler has the same solvent as this foam (styrene) therefore it will dissolve it.
Priming the the smoothed foam with a couple of coats of water based paint will protect it.
Maybe Mr. Colani gives you some hints for prototyping if you show him some freehand drawings and some nicely rendered graphics.
http://www.colani.de
http://www.colani.de
OK I've found some really nice photo's of a construction using what I think is plaster and filler on a plywood frame.
The pictures and descriptions were taken from http://www.mundohi-fi.com and I'd highly recommend looking at the whole project because its a real stunner.
Could some kind person please translate the text below each image please and I'll go back and edit in the english translation.
I plotted the plan and attached it to a piece of wood to cut it with a carpenter's saber saw.
The spines of the two snail shells after cutting
With a compass and the saw I proceeded with the cutting and gluing of the ribs which will form the skeleton of the snail shell.
First side of the snail shell finished
Pieces of stainless steel to be placed inside the shells for attaching the stands. Their curved shape fits the interior shape of the shells.
I fille the interior with polyester fiber cloth and hardened it with resin to ensure the best connection of the ribs with best accuracy.
Exterior of the snail after the interior is covered with polyester fiber
The ribs are aligned with a square to get them as perfect as possible
Here you can see the fiber before and after application of the resin and in the rear the stainless steel support
Adding resin to the side except where the hoop for the woofer goes.
I turned a custom wood "crown " where the woofer will fit and glued it to the front.
Testing how the two halves fit. The lower has fiber the upper without fiber.
Overall view of the mounting of the "snails"
Glueing the hoop where the woofer goes.
The pictures and descriptions were taken from http://www.mundohi-fi.com and I'd highly recommend looking at the whole project because its a real stunner.
Could some kind person please translate the text below each image please and I'll go back and edit in the english translation.
An externally hosted image should be here but it was not working when we last tested it.
Saqué el plano ploteado y lo pegué en una madera para cortarlo con una sierra de calar de carpintería.
I plotted the plan and attached it to a piece of wood to cut it with a carpenter's saber saw.
An externally hosted image should be here but it was not working when we last tested it.
Las 2 espinas dorsales de las 2 caracolas, una vez cortadas.
The spines of the two snail shells after cutting
An externally hosted image should be here but it was not working when we last tested it.
Con un compás y con la sierra de calar se procede al recorte y pegado de las costillas las, cuales formarán el esqueleto de la caracola.
With a compass and the saw I proceeded with the cutting and gluing of the ribs which will form the skeleton of the snail shell.
An externally hosted image should be here but it was not working when we last tested it.
Lateral terminado de la primera caracola.
First side of the snail shell finished
An externally hosted image should be here but it was not working when we last tested it.
Piezas de acero inoxidable, que van instalados dentro de las caracolas, para la fijacion del pié. Su forma curva se adapta a la forma interor de las caracolas.
Pieces of stainless steel to be placed inside the shells for attaching the stands. Their curved shape fits the interior shape of the shells.
An externally hosted image should be here but it was not working when we last tested it.
Llené el interior con tejido de fibra de Poliester, lo endurecí con resina, para así conseguir una mayor fijación de las costillas y mayor consistencia.
I fille the interior with polyester fiber cloth and hardened it with resin to ensure the best connection of the ribs with best accuracy.
An externally hosted image should be here but it was not working when we last tested it.
Parte exterior de la caracola, una vez recubierto el interior de fibra de poliester.
Exterior of the snail after the interior is covered with polyester fiber
An externally hosted image should be here but it was not working when we last tested it.
Con una escuadra se alinean las costillas una a una, para buscar que quede lo más perfecto posible
The ribs are aligned with a square to get them as perfect as possible
An externally hosted image should be here but it was not working when we last tested it.
Aquí se puede observar la fibra antes y despues de poner las resinas, y en la parte posterior el soporte de inoxidable
Here you can see the fiber before and after application of the resin and in the rear the stainless steel support
An externally hosted image should be here but it was not working when we last tested it.
Lateral enresinado menos la parte donde va la corona del altavoz de graves
Adding resin to the side except where the hoop for the woofer goes.
An externally hosted image should be here but it was not working when we last tested it.
Torneé una corona de madera a medida, que es donde va ubicado el altavoz de graves, y se lo pegué con fibra en el frontal.
I turned a custom wood "crown " where the woofer will fit and glued it to the front.
An externally hosted image should be here but it was not working when we last tested it.
Prueba para unir las dos partes. La inferior la podeis observar con fibra y la superior si fibra.
Testing how the two halves fit. The lower has fiber the upper without fiber.
An externally hosted image should be here but it was not working when we last tested it.
Vista general del montaje de las "caracolas"
Overall view of the mounting of the "snails"
An externally hosted image should be here but it was not working when we last tested it.
Pegado del aro donde va ubicado el altavoz de graves.
Glueing the hoop where the woofer goes.
An externally hosted image should be here but it was not working when we last tested it.
Tenía curiosidad por meter la cabeza dentro de la caracola, para escuchar que tal resonaba, y claro…lo hice.
I was tempted to put my head in the snail to listen to how it resonated, and of course... I did.
An externally hosted image should be here but it was not working when we last tested it.
Aquí ya podemos ver como el proyecto va cogiendo forma.
Here we can now see the project taking shape.
An externally hosted image should be here but it was not working when we last tested it.
Antes del pegado de las dos mitades, pulí minuciosamente con una pulidora de aire su interior, para su posterior pintado con resinas y lograr que quedara lo más fino posible una vez acabadas.
Before gluing the two sides, I meticulously polished their interiors with an air polisher. They were brushed with resin so that they would end up with the finest possible finish when they were finished.
An externally hosted image should be here but it was not working when we last tested it.
Se ha empezado a rellenar las costillas que forman la caracola con pasta de fibra de poliester, y a su pulido basto.
Beginning to fill the ribs that form the snail shell with a paste of polyester/fiber, and smoothed...????
An externally hosted image should be here but it was not working when we last tested it.
En los laterales se pueden observar las costillas de madera.
On the sides you can see the wood ribs
An externally hosted image should be here but it was not working when we last tested it.
Aquí poniendo pasta de fibra de poliester en el interior de la caracola, esto es una de las operaciones más difíciles
here, one of the most difficult operations, is putting the polyester/fiber paste in the interior of the snail shell.
An externally hosted image should be here but it was not working when we last tested it.
Aquí compruebo que el altavoz se ubique bien en su aro, para controlar correctamente las holguras y dilataciones. La pasta de color azul es la pasta del acabado. Se trata de las primeras pruebas del acabado final.
Here I'm testing the driver to make sure it fits well it's opening to control any shrinkage and expansion. The blue paste is the finishing paste (filler?) These are the first tests of the final finish.
An externally hosted image should be here but it was not working when we last tested it.
Esto es una prueba de cómo sería el ensamblaje final, para ver como iva quedando el proyecto. Ya se empieza a intuir el acabado final.
This is a test of the final assembly to see how things were going. Now the final finishing begins..
An externally hosted image should be here but it was not working when we last tested it.
Caracola ya terminada y rellena de pasta de poliester.
Snail shell finished and filled with the polyester paste.
An externally hosted image should be here but it was not working when we last tested it.
Se le ha dado una capa de imprimación para la localización de posibles poros en la superfície.
Now with a layer of (primer?, filler?) to find possible imperfections in the surface
An externally hosted image should be here but it was not working when we last tested it.
An externally hosted image should be here but it was not working when we last tested it.
An externally hosted image should be here but it was not working when we last tested it.
An externally hosted image should be here but it was not working when we last tested it.
Maybe you know that....
...11 pages,step by step.
http://www.mundohi-fi.com/portal/index.php?module=pagesetter&func=viewpub&tid=8&pid=8
...11 pages,step by step.
http://www.mundohi-fi.com/portal/index.php?module=pagesetter&func=viewpub&tid=8&pid=8
- Status
- This old topic is closed. If you want to reopen this topic, contact a moderator using the "Report Post" button.
- Home
- Loudspeakers
- Multi-Way
- Fibreglass loudspeaker construction