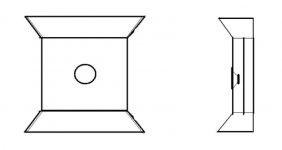
Last side uses slow drying glue like pva (white glue). On a very small Cornu like a 14 in you can segment the final side into 5 pieces and glue one at a time. Not worth it though - just use white glue and press down with weights like books. Wait 6 to 8 hrs.
WHAT MORE WAITING!!! I want it now

I did wonder about white PVA but wasn't sure if it'd be up to the job with the foam board. I've been using white bathroom sealent to seal up after hot glueing to close up any gaps and wonder how to deal with that on the back board but I guess a liberal amount of PVA will do that job. X I did send a pm asking about the drivers I'm going to use but not sure if you picked it up. I'm giving something a go and will see if it works and will post when I've completed the experiment
If you are concerned with the glue running off, here's what I did.
I took the glue and ran a bead on the edge of the horn foam and then laid small strips of paper to hold the glue in place with a kind of surface tension. I then laid a bead on the 'table' that the paper created before placing the back on and weighting it down.
I took the glue and ran a bead on the edge of the horn foam and then laid small strips of paper to hold the glue in place with a kind of surface tension. I then laid a bead on the 'table' that the paper created before placing the back on and weighting it down.
Attachments
If you are concerned with the glue running off, here's what I did.
I took the glue and ran a bead on the edge of the horn foam and then laid small strips of paper to hold the glue in place with a kind of surface tension. I then laid a bead on the 'table' that the paper created before placing the back on and weighting it down.
Brilliant idea, I can seal the edge of the paper to the wall boards then fit the back with a good amount of glue to the paper.
A quick question and apologies if it has been answered already but how do you hot glue the back board? The glue dries so quickly it seems impossible to cover one curve edge let alone all four are people using a different glue for the second side?
This was answered for I guess
I can seal the edge of the paper to the wall boards then fit the back with a good amount of glue to the paper.
That was the thought behind it when I found the my cuts were not laboratory perfect.
Guys, what a great thread!
Sorry in advance as I couldn't read it all and a question is itching:
Has anyone tried to expand the mouths of all or at at least 2 of the horns?
In mean something like this:
Welcome to the Cornu thread!
Not that I have seen posted on this thread. I have sketched it myself and wanted to try expanding out and forward as you show, and I would do all 4 sides to keep it symmetric. The thing is, the Cornu is a BLH that has almost **too much bass** (circa +10dB boost) that we already resort to making the profile thinner to reduce horn mouth size or use stuffing in horn mouth. The design has an expansion ratio of nearly 30x which is very large for any BLH. So adding extensions on the sides will surely require a front horn which can boost front radiated sound by +10dB to match. Some who built the "grande" 36 in scale said the bass was over powering and the mids and highs could not keep up.
Thank you Xrk, for the prompt reply.
My aim is lower extension. I imagine excess bass/midbass could be tamed with shorter horns...but I understand this could be tricky.
I always think a front horn is a good thing. The real challenge wood be to make the front horn part of the bass horn design. Imagine a "black-hole's"' gravity (the transducer) deforming the space around.
Cheers,
M.
Imagine a "black-hole's"' gravity (the transducer) deforming the space around.
Exactly what I have been thinking of too. Kind of like an super elliptical oblate spheroidal horn that fits perfectly inside the nest formed by the 4 expanding side horns which actually also make a turn to be front facing. Lots of neat round surfaces - maybe molded construction or 3d printed in sections and glued together.
I am merging this with the other thread
It's trial and error. With mine, I placed a cup shape of rockwool behind the driver in the chamber and then a small amount at the start of the throat. I found I had to adjust it a number of times before I was happy. Make sure you do the stuffing while listening to them in the location you are going to keep them as this is a sensitive speaker to wall loading and stuffing. The FF125 can be very bassy if there's not enough and quite dead sounding if you use too much.
It's trial and error. With mine, I placed a cup shape of rockwool behind the driver in the chamber and then a small amount at the start of the throat. I found I had to adjust it a number of times before I was happy. Make sure you do the stuffing while listening to them in the location you are going to keep them as this is a sensitive speaker to wall loading and stuffing. The FF125 can be very bassy if there's not enough and quite dead sounding if you use too much.
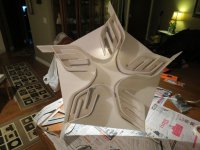
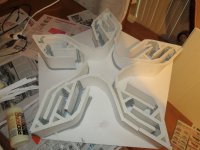
Well impatient me had to get going to hear sound so the first box is done with the exception of the back being fitted.
I wired it up and the sound was poor all bass and nothing else. Hmmm I'd better have a go at shoving some stuffing in so having picked up a bag (small sack ) of soft toy stuffing I packed it in the main driver cavity and down the openings of the four horns fading as I went. Retry the sound and WOW!!! An epiphany. The tings and dings have all come back yet the bass is still playing deep and low. With only one speaker, no fixed back and sat on the floor resting up against the TV stand the sound is fantastic and filling the room. Once this is finished up on the wall so all four horns sounding out and in stereo I can only predict this will sound amazing. All from a couple of throw away computer speakers some cheap lightweight craft materials and a few hours of fun.
Anyone with limited skills who want to have a play with speaker building must give this a go. You will be blown away with the sounds coming from such cheap and cheerful ingredients.
I wired it up and the sound was poor
all bass and nothing else. Hmmm I'd better have a go at shoving some stuffing in so having picked up a bag (small sack ) of soft toy stuffing I packed it in the main driver cavity and down the openings of the four horns fading as I went. Retry the sound and WOW!!! An epiphany. The tings and dings have all come back yet the bass is still playing deep and low. With only one speaker, no fixed back and sat on the floor resting up against the TV stand the sound is fantastic and filling the room. Once this is finished up on the wall so all four horns sounding out and in stereo I can only predict this will sound amazing. All from a couple of throw away computer speakers some cheap lightweight craft materials and a few hours of fun. Anyone with limited skills who want to have a play with speaker building must give this a go. You will be blown away with the sounds coming from such cheap and cheerful ingredients.
 Thank you Mr X though what course of future projects you have set me on I don't know. What I do know is if the wife gets hold of you there may be trouble
 Saying that I'm deliberately playing a little bit of George Michael (her favourite) and she is loving it through the one box.
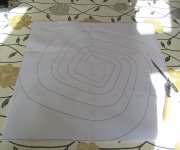
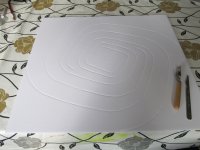
Progress on my Cornu's has been slow, but I've managed to transfer the spirals from the templates to the boards.
The tracing wheel did a surprisingly good job of transferring the pattern, I thought I might need to trace over the marks with a pen, but as you can see from the second photo the templates are perfectly legible.
Next step, start cutting the pieces for the channels and gluing them on. I've opted to go for a channel depth of 3" to make the speakers a little slimmer and increase the WAF slightly .
The tracing wheel did a surprisingly good job of transferring the pattern, I thought I might need to trace over the marks with a pen, but as you can see from the second photo the templates are perfectly legible.
Next step, start cutting the pieces for the channels and gluing them on
. I've opted to go for a channel depth of 3" to make the speakers a little slimmer and increase the WAF slightly .Attachments
- Home
- Loudspeakers
- Full Range
- Ever think of building a Cornu Spiral horn? Now you can!