Making something yourself has an appeal and value intrinsic to itself. This same concept applies to ESLs as well.
I also started with perf metal stators, but now am firmly in the segmented wire stator camp. The latest incarnation of my ESLs cost about $500 all in per pair. However, to get to this point to took several attempts. If I had to guess, I have built probably 10 different designs before settling on this one. For sure, some of the parts (like the electronics, transformers, etc) are re-used, and not all of the designs were made to look pretty. Some designs were done using parts I already had or from very inexpensive materials.
So, the last few years of building ESLs probably has cost at most a couple thousand dollars - but has provided countless hours of enjoyment along the way and a boatload of satisfaction in the end.
Kudoes SyBorg and anyone else that has attempted a full ESL project. Don't mean to denigrate the attempt in any way, but with the panels; mountings; step-up audio device (transformer/crossover?) and bias supply involved (all separate projects), it goes WAY beyond any electrodynamic speaker project. I got hooked on the 63's when I first heard them in the late 80's. Took me 20 years to get a pair (and keep them working).
Charles
Charles
My method of building ESL's cost less than $5 to $20 per panel depending on the size I choose to make them.
http://www.diyaudio.com/forums/planars-exotics/109789-esl-diaphragm-coating-7.html#post2142822
Here is one that I made out of some PCB and old Credit cards,
http://www.diyaudio.com/forums/planars-exotics/158115-material-esl-2.html#post2076459
Window screen is the cheapest stator material to date and works great as long as you use the proper methods for coating it.
http://www.diyaudio.com/forums/planars-exotics/158115-material-esl-2.html#post2075441
I agree with Bazukaz, the wire stator method is the best method for many reasons!!!
To avoid a lot of the construction issues associated with the wire method save yourself from a headache and use a rigid steel wire such as some copper clad TIG wire and properly coat them with some Acrylic Spray Paint, red primer and clear, with one color coat on the primer if needed.
Here is a larger set of bass panels that I have yet to finish,
http://www.diyaudio.com/forums/plan...ectrostatic-speakers-dummies.html#post2547781
It is available in various diameters from .025" to .0625" or so.
I used .0625 in my latest build and it yielded a .080" diameter stator rod after coating.
Next time I will use a thinner rod like .045" or even .032"
I have covered the coatings issue in great detail several times with tests and pictures here,
http://www.diyaudio.com/forums/plan...tric-coatings-fact-fiction-2.html#post2894427
It makes no difference as to what stator material you choose to use, If your coating fails it is NOT repairable, and you have to strip the whole thing down and start all over with a bare piece of metal and re-coat it again!
In some cases you may be able to just re-do the bad areas using the same process as body shop does when they are fixing a dent on your car.
Nevertheless all of the bad area must be stripped down to bare metal!!
You Can Not just simply recoat the bad area and expect it to work or last very long.
Here is a list of links to threads I compiled a while back that can help get you started,
http://www.diyaudio.com/forums/plan...vice-information-reassurance.html#post2205114
The biggest issue of failures I have seen from newbies is stator coating failure!!
I can't stress this enough!
Make sure that you apply the coating properly, use the right kind of coating and have a thick enough coating, in this case more is better.
Remember you are not painting them to make them look pretty, The paint coating is a vital function of its operation.
If this is the method you should choose to use.
What most every one forgets is that, "Hey I am only using a 2Kv or a 3kv bias so they should be good"....WRONG!!!!
There is as much as 7Kv to 15Kv peak AC or more coming out of the step-up transformer once you crank them up and put some juice to them!
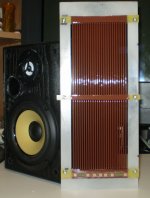
Below is a picture of the latest build that I mentioned.
It is a desktop version and is only about 10" tall but it is also electrically segmented as well.
You can find out more about this method here,
http://www.diyaudio.com/forums/plan...tor-esl-simulator-esl_seg_ui.html#post3184437
This is the beginning of the thread,
http://www.diyaudio.com/forums/plan...tor-esl-simulator-esl_seg_ui.html#post2908293
I have a complete thread on the plans and construction methods I used, but the ESLDIY site is under construction (Again!) and all of the pictures are now gone!
It will be a while before I post anymore work at ESLDIY since they keep changing it and making broken links every time I try to refer some one to those project pages.
However if you wish you can check it out as the threads and links I posted that are still there, just the excellent pictures I had are now gone, last time I checked,
ESL DIY
Cheers!!!
jer
http://www.diyaudio.com/forums/planars-exotics/109789-esl-diaphragm-coating-7.html#post2142822
Here is one that I made out of some PCB and old Credit cards,
http://www.diyaudio.com/forums/planars-exotics/158115-material-esl-2.html#post2076459
Window screen is the cheapest stator material to date and works great as long as you use the proper methods for coating it.
http://www.diyaudio.com/forums/planars-exotics/158115-material-esl-2.html#post2075441
I agree with Bazukaz, the wire stator method is the best method for many reasons!!!
To avoid a lot of the construction issues associated with the wire method save yourself from a headache and use a rigid steel wire such as some copper clad TIG wire and properly coat them with some Acrylic Spray Paint, red primer and clear, with one color coat on the primer if needed.
Here is a larger set of bass panels that I have yet to finish,
http://www.diyaudio.com/forums/plan...ectrostatic-speakers-dummies.html#post2547781
It is available in various diameters from .025" to .0625" or so.
I used .0625 in my latest build and it yielded a .080" diameter stator rod after coating.
Next time I will use a thinner rod like .045" or even .032"
I have covered the coatings issue in great detail several times with tests and pictures here,
http://www.diyaudio.com/forums/plan...tric-coatings-fact-fiction-2.html#post2894427
It makes no difference as to what stator material you choose to use, If your coating fails it is NOT repairable, and you have to strip the whole thing down and start all over with a bare piece of metal and re-coat it again!
In some cases you may be able to just re-do the bad areas using the same process as body shop does when they are fixing a dent on your car.
Nevertheless all of the bad area must be stripped down to bare metal!!
You Can Not just simply recoat the bad area and expect it to work or last very long.
Here is a list of links to threads I compiled a while back that can help get you started,
http://www.diyaudio.com/forums/plan...vice-information-reassurance.html#post2205114
The biggest issue of failures I have seen from newbies is stator coating failure!!
I can't stress this enough!
Make sure that you apply the coating properly, use the right kind of coating and have a thick enough coating, in this case more is better.
Remember you are not painting them to make them look pretty, The paint coating is a vital function of its operation.
If this is the method you should choose to use.
What most every one forgets is that, "Hey I am only using a 2Kv or a 3kv bias so they should be good"....WRONG!!!!
There is as much as 7Kv to 15Kv peak AC or more coming out of the step-up transformer once you crank them up and put some juice to them!
Below is a picture of the latest build that I mentioned.
It is a desktop version and is only about 10" tall but it is also electrically segmented as well.
You can find out more about this method here,
http://www.diyaudio.com/forums/plan...tor-esl-simulator-esl_seg_ui.html#post3184437
This is the beginning of the thread,
http://www.diyaudio.com/forums/plan...tor-esl-simulator-esl_seg_ui.html#post2908293
I have a complete thread on the plans and construction methods I used, but the ESLDIY site is under construction (Again!) and all of the pictures are now gone!
It will be a while before I post anymore work at ESLDIY since they keep changing it and making broken links every time I try to refer some one to those project pages.
However if you wish you can check it out as the threads and links I posted that are still there, just the excellent pictures I had are now gone, last time I checked,
ESL DIY
Cheers!!!
jer
Attachments
Last edited:
- Status
- This old topic is closed. If you want to reopen this topic, contact a moderator using the "Report Post" button.