Richard,
Rough is a very inclusive term. So, if it is a sand paper finish, down to about 600 grit then yes you do need to refinish it. If it is a hammertone paint finish, with fairly large blobs of paint then no you do not need to.
Really, any finish that you can drag a paint applicator over, without splattering or wicking out due to the grains of whatever cause the roughness, then you can succesfuly treat it.
Grayham,
I don't know. Are you going to drive the shafts in until only the tops are available? Might as well just try it out and use toothpaste to fill the holes when and if it doesn't work. It is an interesting question though.
Bud
Cilla,
I did coat the entire front side only with Gloss. However the amount and where I placed what amounts are different for DX4 and PM6A. The DX4 has what I consider a standard amount of gloss, what I would expect to apply to most drivers. The PM6A has quite a bit less Gloss on the main cone and about the same amount on the whizzer.
I have spoken to Lowther America about the PM6A they have, that is fully treated, and the results are mostly positive. The only concern being more upper midrange information than was expected. The slope is gentle, may be connected to phase more than frequency response and is something they are going to investigate in detail shortly.
The owner of the DX4's is still trying to come to terms with how explosively dynamic the sound is, how much clarity there is, how uncompressed the dynamic range is and how they can still catch him unaware and scare him with their intensity.
Lowther America also finds these characteristics, but the PM6A is aimed towards detail, which it has train loads of, and not dynamics, which it only has truck loads of.
I liked the PM6A so much that I now own a pairof 15 ohm drivers, to the disgust of my wife, and fully intend to build an open baffle speaker system using them and two Eminence Beta 8 drivers per side. One Beta 8 to run OB and the other to drive a transmission made of 4 inch poly drain pipe and fittings. Again to the disgust of my wife.... but she has put up with me for 40 years so, no worries
Bud
Bud,
Thank you for your response.
I'm surprised your wife is not too keen on the PM6A's, to me they look beautiful. Still, I suppose after 40 years you have each become fully EnABLed with each other.
The speaker design sounds very interesting. What length pipe do you intend to use?
I have an EX3 unit, which presents a dilemma: Everyone who owns EX3's aspires to EX4's. Lowthers exchange policy is a temptation, but that temptation will be closed off if I EnABL the EX3. On the other hand a treated EX3 would likely suit me just fine and save me a decent amount of dosh in the process.
I'd like to experiment with the electron dump. Magnet ltz wire is tricky to get hold of. What I've got tho' is multi stranded Ltz speaker cable. If I coated each strand with some type of varnish would this do?
Cilla
Cilla,
So, fold up a 150mm length of speaker wire, with both ends free of plastic sheathing, and stuff both ends into the ground side of each Lowther, turn on music and listen for a while. The real deal over here worked quite well with the untreated PM6A's. In fact, left me wondering if I actually wanted to mess with them at all.
Not saying that whatever the magic ratio is, of Litz surface area / dielectric surface area X dielectric constant, will be the same in your case, but you are only out 300mm of wire to try it out. This all presupposes that the Litz speaker wire has a plastic jacket around it.
If you must spend money, then PM me and I will tell you how much you must spend.
Bud
Cilla,
The plastic sewer pipe should be about nine feet long, just enough to fit the VAS requirements for the Beta 8 driver and supply about 35 Hz to add to the rest of the squawking. The baffle closely resembles a delta wing naval jet fighter, with the wings folded up into a moderately narrow V
Bud
The plastic sewer pipe should be about nine feet long, just enough to fit the VAS requirements for the Beta 8 driver and supply about 35 Hz to add to the rest of the squawking. The baffle closely resembles a delta wing naval jet fighter, with the wings folded up into a moderately narrow V
Bud
Hey Bud...
That's a good tweak I done on assorted systems over the years. This also works for those who biwire thier speakers and you can also use it to connect the two negative terminals on a biwired speaker. This also works with amplifiers mono and stereo. I have found that 10 or 12 gage wire works well but you can hear the affect with zip cord twisted together as a single wire. Regards Moray James.
That's a good tweak I done on assorted systems over the years. This also works for those who biwire thier speakers and you can also use it to connect the two negative terminals on a biwired speaker. This also works with amplifiers mono and stereo. I have found that 10 or 12 gage wire works well but you can hear the affect with zip cord twisted together as a single wire. Regards Moray James.
Lowther Trade In Policy
Hi PDan:
Unfortunately for you, you are in England. Here I would be happy to trade in your EX3's to EX4's and change out the cones for you so you could retain the EnABL'd cones. You may be able to do this yourself, as Lowther will ship you EX4's and expect you to return the EX3's in short order. The task is a PIA on the EX series drivers, and I can send you a short description of how to do this if you would like.
If you EnABL your EX3's and then decide you do not like the change, you can then trade them in on EX4's. Lowther does not care about the condition of the drivers that are being traded in.
Just a short note on the PM6A's that Bud has EnABL'd for me. Great definition and detail. The rise in the upper mids is typcial of un-broken in Lowthers. These have very few hours on them. As they continue to play they are breaking in and sounding better and better. Once they are settled in I will do some measurements on these and the same drivers without the EnABL. I will also write a full review of what I am hearing. If break in is close to complete I will do it this weekend. However next weekend is more likely.
They do a lot of things which were unexpected and delightful. It would be hard to go back to drivers without EnABL at this point.
Good to hear from you Moray,
Also good to hear that others have chanced upon loops of wire with dielectric, hooked to the ground/signal return of audio gear.
I have the idiot loops in or on all pieces of gear, and since I have so much surface area it doesn't take much plastic and I can tune the dynamic color from Brownian dull to Circus Band colorful, just by how much plastic is on the wire. I have another wrinkle too in that I can adjust how much color is retained above 4 k to how much overall color is maintained.
Anyway, thanks for sharing your knowledge.
Bud
LOWTHER
I nave posted below the patterns for the PM6A drivers. Primary changes are the addition of phase plug treatment rings, one from each sheet.
To apply the lower phase plug ring set use the whizzer inner conic section, lower ring set as a guide, placing the pattern directly across from the pattern on the conic section lower ring set.
The upper ring will require rapidiograph 060 pen tip and holder to make small enough dots. Forget blocks here. Then a six block in two rings set at the tip, with 2mm dia paint dot and roughly equivalent PVA dot.
Gloss coat one coat from the top ring to the tip, allow to dry thoroughly and then another coat from the lower ring set all the way to the tip. Try not to double brush stroke this second application as you cross the first coating. It is going to rewet immediately and you can disturb it by using multiple brush strokes here. The PVA dot goes on after the Gloss coats and gets a light cover coat after it has dried. Use full strength gloss coat on this phase plug.
What we are really trying to do is slow the phase plug down, so that it doesn't cause an out of phase high frequency signal, as it does in an untreated cone. The two coatings will make a marked difference in performance, one you can hear, at various stages, by putting your ear close to the whizzer cone. After the full coat and PVA treatment there is no longer an interference blare to transients.
Bud
Attachments
HEMP FC 4.5 C speaker
For those of you sitting on the fence post, or rail, about purchasing some of these new hemp drivers, go do it. This one, at least, is as close to sensational as you are likely to get in an unEnABL'd cone speaker.
Most definitely full range with extreme accuracy and VERY low distortion. Casts a very good sound field and, though there are only 2 hours on the units in my possession, hint's of extreme detail and depth of field.
I really love my Lowthers and it remains to be seen how these drivers respond to patterns and very selective application of gloss coat. If it is as positive a response as were the Lowthers.... well, the Fonken Boxes just found another driver candidate and Fostex is in some hurt....
I have put a link to the initial pictures of the FR 4.5 C and have attached a PDF of the conic section and pattern rings I intend to use. I have not used these pattern rings yet so they may change in some way.
http://picasaweb.google.com/hpurvine/HempFR45CSpeaker
Bud
Attachments
Hemp FR 4.5 C
Here is the real meat of the thing. This is an obscenely good speaker. Everything was looked after with true professionalism..... except one little detail.
For some reason Hemp and designers got to the place where they had everything done correctly. Then, someone, or no one, decided to put the finishing touch on and added a little vertical walled trim ring over the surround glued edge.
Now, everyone does this, some use a flat smooth piece, others use a molded piece. Whats the problem you ask? They all create a Raleigh wave at their frequencies of interest. In most speakers you would never know. In all speakers this foolish act inhibits stage width and adds a peculiar sound to the final event. Almost the same ear twisting torture as IM distortion, except there is only one frequency involved. Usually you can't hear this over the rest of the problems no one took care of. In this driver there are no other problems to cover it up with.
In this Hemp driver it is the only problem. Once treated to EnABL and it's explosive release of dynamics and color and stage width to die for, they still somehow sounded like "Pixie" speakers. Truly low distortion sweet extremely finely detailed sound, in a huge sound field, but every object was ....tiny.
I went ahead and coated the mounting frame, to see if this would disturb the situation enough that I could ignore it. Nope, just accentuated the Raleigh wave running around inside that damn piece of cardboard tube, edge glued to the surround perimeter.
I then looked very closely and finally noticed how much this piece stuck up above everything else. Curses!
However, EnABL is up to even this task. When you peruse the pics you will notice a very unusual looking pattern, half on the side wall of this ugly trim hoop and half on top. This does kill the Raleigh wave, it does also unleash the hounds of Hemp ..... Boy, if poor Limono thought he had a nuclear weapon on his hands, just wait till Richard gets these things back.
Now.
To treat this wonderful speaker you are going to have to come up with an 0.050 Rapidiograph tip, for the lower ring and the dome ring set's. The dome ring set would be infinitely easier to do with an 0.035 pin tip, but Planet ten tells me they are scarce nowadays. So, when you go to pattern the dome use a very quick stroke, to get the minimu8m possible dot size from the pen tip. Also, keep using your finger nail edges to carefully remove the excess paint build up around the tip end. This is Poly S paint of course, thinned to 50% solution so it will pass through the pen tip.
The upper and outer ring were done with an A4 calligraphy pen tip and that's all there is to this part.
The Gloss coat is another thing entirely. All surfaces need a single coating of 50% strength Gloss coat cut with pure water not alcohol, and absolutely no more. Had I been alert enough to place the outer ring on, before I put on the cone Gloss coat, I might very well not have applied any Gloss coating, anywhere. That is how good these things are.
So, if you are going to treat yours, and I really do recommend it, if for no other reason than that you can startle folks with how immense a sound field they throw up, from such tiny drivers. Plus, all of the designed in goodness shows up.
Try Mercury's SACD of the Rodrigo/Vivaldi concert, by the Romero's. You can EASILY pick out individual violins from what is often just a shrieking mess, and listen to them. You can follow the rest of the bowed instruments to their peak SPL, without pain or cringing.
Do I like them better than the Lowthers? No. The Lowthers, once EnABL'd have every bit as much drama, detail and beauty and they have something else, in greater quantity than these little wonders. They make music in your living/listening room, so do these, but the Lowthers make more of it available..... so far. I haven't yet gloss coated the outer pattern, so I don't have the final bits in place.
The treated cone pics are now available on the previously linked URL found in my last thread
I will provide another update ,but no further comparisons. Oh, attached is the revised pattern PDF, with the outer ring.
Bud
Attachments
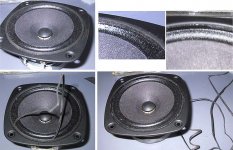
Re Hemp 4.5 trim ring
Hi Bud, after reading about that cardboard ring being a problem i found it easy to remove it.I inserted the tip of a knife GENTLY through it flush with the frame to split it. then I cut through most of the way from the top at that point. I found that it would lift off the surround. Once i had about 1/4 inch off the surround and could complete the cut through it was just a matter of gently twisting toward the outside edge of the frame. It let go quite easily without pulling much on the surround material it's glued to. The adhesive seems quite soft. Everything looks neat and clean with it gone.
Hi Bud, after reading about that cardboard ring being a problem i found it easy to remove it.I inserted the tip of a knife GENTLY through it flush with the frame to split it. then I cut through most of the way from the top at that point. I found that it would lift off the surround. Once i had about 1/4 inch off the surround and could complete the cut through it was just a matter of gently twisting toward the outside edge of the frame. It let go quite easily without pulling much on the surround material it's glued to. The adhesive seems quite soft. Everything looks neat and clean with it gone.
Re: Re Hemp 4.5 trim ring
After looking at mine & poking it a bit, i think i accomplished the same thing a bit differently.
The offending ring is a multi-layer cardboard ring. The plies of the cardboard are vertical. I used the tip of my exacto-knife to split off the inner-most ring, and peeled it off. Then the next. This has the effect of leaving the outer-rings in place to hold the surround in place as you peel off the layers. For the 3rd batch i pulled off a couple layers at once and the surround was pulled up a bit on its back egde. Further layers were then a bit less ambitious and i started where the surround had started to pull up a bit, to be able to avoid further lifting. I was very careful with the last bit, cutting it and pulled it off heading away from the centre of the cone. I then pressed down the edge of the surround and all seems fine. There is now a little bump that probably could be filled in -- and further secure the surround -- with a couple judicial application of puzzle-koat to fill things in.
dave
Jim G said:cardboard ring being a problem i found it easy to remove it.
After looking at mine & poking it a bit, i think i accomplished the same thing a bit differently.
The offending ring is a multi-layer cardboard ring. The plies of the cardboard are vertical. I used the tip of my exacto-knife to split off the inner-most ring, and peeled it off. Then the next. This has the effect of leaving the outer-rings in place to hold the surround in place as you peel off the layers. For the 3rd batch i pulled off a couple layers at once and the surround was pulled up a bit on its back egde. Further layers were then a bit less ambitious and i started where the surround had started to pull up a bit, to be able to avoid further lifting. I was very careful with the last bit, cutting it and pulled it off heading away from the centre of the cone. I then pressed down the edge of the surround and all seems fine. There is now a little bump that probably could be filled in -- and further secure the surround -- with a couple judicial application of puzzle-koat to fill things in.
dave
Attachments
- Status
- Not open for further replies.
- Home
- Loudspeakers
- Multi-Way
- EnABL Processes