Well, you could, but you would have to remember that the sub level was tied to the center channel level, but sure it would work, and it would ony take 3 PCBs.rabstg said:
While your having fun.....
Try designing it! I'd buy one!
Also couldn't you get away with 3 brds if you put the center on one channel and the sub on the other? Since MOST subs have level controls built in...
Russ White said:If you wanted them all to have the same volume, one other easy thing to do would be to take 3 PCBs and have them all share a common digital PS.
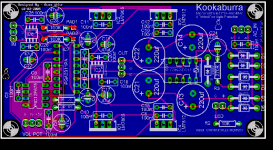
Notice the pot header has +5V, WIPER, and DGND pads.
So you would omit JG and R1 on the 2 "SLAVE" boards. You would then run a wire from the +5V pad on the "MASTER" PCB to the +5V pad on each "SLAVE" PCB. And you would likewise run a wire from DGND on the "MASTER" PCB to the DGND of each "SLAVE" PCB.
Then you would take the 3 wire cable from the "MASTER" PCB to a singal 5K linear pot. You would then run a single wire from the "WIPER" pad on the "MASTER" PCB to the "WIPER" pad on each of the "SLAVE" PCBS leavbing the other to pads empty. Then all 3 PCBs will use the same volume pot, and will have the same volume setting.
The easier way to do that would be that when you make your 3 wire connector for the POT header, you use two wires for each PIN(5V,wiper,GND), would would then put a second connector on one set, and the other set you would run to the POT. You could thus "daisy chain" the boards together, the important thing is that they all share a common PS, so omiting R1 and JG is important for the slave boards.
")
Cheers Russ, this is exactly what I meant.
On our stereo in the lounge room when we use the remote to turn up or down the volume, the dial also moves accordingly. I have to say, it's one of the coolest things to have, and I absolutely love it.
How would I be able to add that to a kookaburra?
Sorry I'm absolutely new to all this (not electronics, but audio gear), and this will probably be my first amp/preamp building project, so apologies for the probably silly questions.
Cheers,
--Nathan
How would I be able to add that to a kookaburra?
Sorry I'm absolutely new to all this (not electronics, but audio gear), and this will probably be my first amp/preamp building project, so apologies for the probably silly questions.
Cheers,
--Nathan
Wow I can't believe I missed this thread on such a cool topic, made even more cool for me since I just designed a (and partly built so far) an 8 channel, 6.1/2, preamp with 8 digitally selected inputs (this option I am still testing but for now I think it sounds OK). Option to sum mains for the sub or run stereo and even run summed front / rear and a digially contolled volume control using the Intersil X9C303 controlled by rotary encoders for both volume and input.
I am using the $2.03 Panasonic EVE version from Digi-Key, it's quite nice but I can only get the detented version in low torque. Still looking for a supplier of the detent-less low torque for volume to emulate the feel of a pot better.
Funny thing is I abandoned using a micro and built it all out of individual gates, works well but is complex... maybe the micro was a better choice seeing this design
MunkeeVegetable not 100% sure but in my experience the volume control you described is a pot with a built in motor to move it. it's neat and all but a) they are damned expensive and b) the motor would draw a fair but of currrent might be too much for the regulators. Otherwise it behaves just like a normal pot.
Anyone care to tell me if using the digital pot directly in the signal path of something like a OPA604 will degrade the sound considerably?
Right now I have it set up as the ground path for a voltage divider so the audiable signal never flows through the pot just a single 33K fixed resistor.
To use a digital pot as a volume control, you really need to impliment a wheatstone bridge for it. Dallas Semi has a good paper on this. Search their site for DS1802 (one of their volume controls), paper is about implimenting digital pots as volume controls.
Anyway, we are using the venerable PGA2311PA, which is very good, very clean, and, of course, very expensive. Highly recommended though. Use the PA version.
Anyway, we are using the venerable PGA2311PA, which is very good, very clean, and, of course, very expensive. Highly recommended though. Use the PA version.
so for a nice stereo/5.1 preamp one would need:
3 kookaburra boards
one of those nice input selector boards
hook up all 3 boards to one volume pot, use the switchboard (sic) to select the stereo signal going to one of the kookaburra's.The front channels of the 5.1 input are routed through this board aswell. The remaining four 5.1 signals go directly to the other two kookaburra's. That, or use the +V of the relays on the switchboard to switch these four channels aswell.
This way you have a single 5.1 input and 2 stereo inputs.
Take a good dvd player (panasonic?) with 5.1 outs and hook it up to the 5.1 input. For stereo stuff, use anything you like (say the same dvd player with a nice reclocking dac or something).
This gives you a nice and compact stereo/5.1 setup. Be that sacd or movies or whatever.
Or, better still...
Get/build a remote control board which allows you to change the volume and switch the inputs.
Russ, I think you said:
what about a 6ch kookaburra? Shouldn't be too much work as the basic system is finished!
Great project!
3 kookaburra boards
one of those nice input selector boards
hook up all 3 boards to one volume pot, use the switchboard (sic) to select the stereo signal going to one of the kookaburra's.The front channels of the 5.1 input are routed through this board aswell. The remaining four 5.1 signals go directly to the other two kookaburra's. That, or use the +V of the relays on the switchboard to switch these four channels aswell.
This way you have a single 5.1 input and 2 stereo inputs.
Take a good dvd player (panasonic?) with 5.1 outs and hook it up to the 5.1 input. For stereo stuff, use anything you like (say the same dvd player with a nice reclocking dac or something).
This gives you a nice and compact stereo/5.1 setup. Be that sacd or movies or whatever.
Or, better still...
Get/build a remote control board which allows you to change the volume and switch the inputs.
Russ, I think you said:
I consider it my job to keep you swamped.
what about a 6ch kookaburra?
Shouldn't be too much work as the basic system is finished!Great project!
matjans said:so for a nice stereo/5.1 preamp one would need:
what about a 6ch kookaburra?
Great project!
Thanks man.
Its been a really fun project, at first I was very worried how it would turn out, but it performs much better than I had hoped. Keep watching I have something in the oven you will want to see, but have a few othe things to finish up first.
Cheers!
Russ
matjans said:so for a nice stereo/5.1 preamp one would need:
Texas Instruments actually manufacturers a sister-device, the PGA4311 which allows 4 channels. It's a 28 SOIC.
jackinnj said:
Texas Instruments actually manufacturers a sister-device, the PGA4311 which allows 4 channels. It's a 28 SOIC.
Exactly!
The 7.1 Pre I am currently working on (almost done) uses two of them.Cheers!
Russ White said:
Exactly!
Cheers!
in one word: great!
keep us up to date!
Well I received the beta kit yesterday and assembled last night. With a few minor hang ups took about an hour and a half. In all went pretty smooth. Great quality kit. I hope to be up and running this weekend. I may need a little help with the transformer hookup and with the jumpers at the input. Brian and Russ are you going to make a assembly guild? If so I can provide a little input on that. I'll keep everyone posted on the progress.
bender460 said:Well I received the beta kit yesterday and assembled last night. With a few minor hang ups took about an hour and a half. In all went pretty smooth. Great quality kit. I hope to be up and running this weekend. I may need a little help with the transformer hookup and with the jumpers at the input. Brian and Russ are you going to make a assembly guild? If so I can provide a little input on that. I'll keep everyone posted on the progress.
Hi Bender,
Great you can shoot me an email if you have any specific build input.
I will see about a build guide. I think I could throw one together.
As far as the jumper for omitting the input buffer it simply goes where R4 and R5 go neer the input buffer, only you put one leg of the 0R resistors(jumpers) in the jumper pads PAD1 and PAD2.
here is a PIC:
Attachments
FWIW I would use the input buffer in most situations, it does just seem to make the thing sound better overall. You can use just about any unity gain stable SOIC dual opamp. A good relatively cheap choice is the OPA2227, or you could spring for another AD8620, you could even use two of either one. I have actually built one with both buffers being OPA2227 and one with both being AD8620, they both sound awesome, and you would be hard pressed to distinquish between the two.
Cheers!
Russ
Cheers!
Russ
Hi there Russ. From your previous posts that is what I thought on the jumpers thanks for clearing that up. An assembly guild is just a thought. I would put myself at a medium level builder. The guild would have only saved me from searching this thread once. So really this thread is a good guild by itself. But for a real novice 
But for a real novice - Status
- This old topic is closed. If you want to reopen this topic, contact a moderator using the "Report Post" button.
- Home
- Amplifiers
- Headphone Systems
- Digitally controlled preamp/headphone amp