The amp is repairable but it would be time consuming. I'd suggest that you reassemble it and return it to its owner.
For drivers, if the through-holes are large enough, I generally use BD139s and BD140s as subs for most all driver transistors in amps that use 2S or KT prefix transistors.
For drivers, if the through-holes are large enough, I generally use BD139s and BD140s as subs for most all driver transistors in amps that use 2S or KT prefix transistors.
Perry,
Im Gonna try to get this amp up and running again since he said he will pay good to have it repaired . I will order new driver transistors for it .
Also since the pads for the driver borad are burnt off the board and i need to make the connections more reliable . whats the best stuff to use to to make better connection on the pins of the driver board to the main board?
I was thinking something like computer ribbon wire and stripping the coating off Or should i use something else?
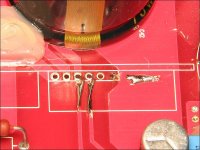
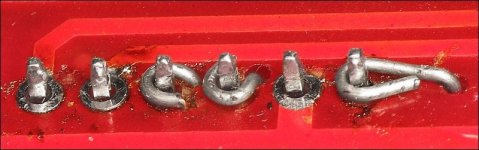
I generally do something like you see in the attached photos. Scrape the solder mask away on the top of the board and lay a wire (resistor leg or similar) and pass it through a hole that's been drilled in the board near the missing pad. Then form a loop around the through-hole.
A number 60 drill bit is a good size for this.
Make sure that there is no copper on the opposite side of the board where you'll be drilling.
Don't attempt this on boards with more than 2 copper layers unless you confirm that there is no hidden copper where you're going to drill. This can sometimes be done by shining a bright light at the opposite side of the board and confirming that light is passing through the fiberglass where you want to drill.
Attachments
- Status
- This old topic is closed. If you want to reopen this topic, contact a moderator using the "Report Post" button.