Hi Phivates have an old delta unisaw clone but he blade tilts toward the fence. and yes my fence has more clearance by a few thousands at the back of the blade thanks for reminding me of that I am thinking about cutting the baffle and then the assembly. and then using the disc sander after assembly to touch up the angle. the sever angle is also a little concerning again the tilt is the wrong way to do that on the table saw. My small shop is way too small for another table saw. the planer, joiner and sanding area and router area are all in the table saw area and under the fence rails now. I could use the RAS but would have to rip the angle. I may be able to make a jig have to to think some on it
thanks
Ben
thanks
Ben
any reason I cant use 2 pcs of cedar to make up the wider spacer - 4 3/32 spacer would save some time?.
Any non-similar material should be OK. I;d use the same material for all the spacers just for aesthetics. Western Red Cedar is a surprisingly good speaker building material, the downside being the ease which one can mar the box… spacers would not be subject to that.
dave
Ben - if you're talking about the "second" bevel on side of the trapezoid enclosures, yes those will be at 90dg to the front baffle. I've built a few of these tricky buggers, and with a 10" blade on Delta Unisaw, it's a tight squeeze to get the full height of that cut on deeper boxes. If not too late, I can suggest building the 3-layered sides as sub-assemblies, and cutting that angle before putting the whole box together. Sometimes the extra thickness of the baffle is enough to prevent getting all the way through. When that's happened to me, I finish off with a Japanese draw saw - it's usually only a matter of fractions of an inch.
thank you Chris Yes the second bevel is the issue I will put the 45 angle on as a sub assembly. I am still not sure how to put the second angle on as a sub assembly the saw tilt is the wrong way to use the fence unless I have it complicated in my mind which is a very common problem for me. This build is probably at the edge of my woodworking ability but I did want to challenge my knowledge level. I guess I could move the fence to the left and realign it with clearance to the left instead of to the right but the saw is working so darn good and it took a while to get the alignment this good and I have a boat load of other work and resawing to do that I would prefer not to change it. My RAS has a 12" blade but I have not ripped on that since I got a table saw. otherwise all the panels are cut the vent spacers are cut and ready for glueup later this week the holey brace. the drivers will hope fully show up soon. the final coat just went on the cabinet console. thanks again for your help and advise.
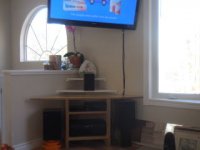
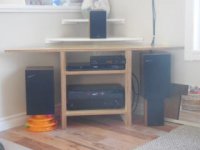
quick pick of console cabinet. the Mar-Ken trapezoid speakers will tuck under the wings and pull out for listening. Thinking about putting them on rollers instead of my go to speaker to floor connector which of course is hockey pucks or like I am currently using one old speaker and a cat toy. Could make the rollers and speaker stands with a 5 degree back tilt to cover the low speaker height. I know that corner placement is not great but because the area behind the 1/2 wall is open to the stair way on one side and has a 8' bow window on the other it may be better than conventional wisdom predicts.
Attachments
Build a trapezoid speaker they said it will be fun they said. I could not figure out how to cut the 45 on the panels without having the fence on the left.so ended up using the RAS for the 45 I think I am going to skip the second bevel unless after building the speaker I can do it on the RAS Safely. everything looks good for assembly everything looks like it will fit. I did everything by the cut sheet and it all came out great.. I wanted a challenge but this is a little masochistic. Stop laughing Chris. is there a reason why you skip the bezel cover? I dont have the drivers yet are the drawings close enough to cut the baffle before the drivers are here or should I wait to get the drivers. thanks again
Ben
Ben
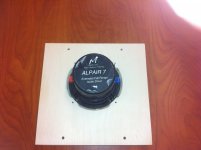
There is some question about the CCUrcy of my driver drawings. I recently had to revise them as the measure i had estimated using the caliper turned out to be off. I changed the cutout to 134mm, which i pulled off of the prototypes for the speakers you are building.
The side champher (90° to the front) has been left off before.
We do not use the bezels as it creates a lip around the driver. Mark says it increases the basket stiffness, but once you have the driver attached to the baffle we do not think that significant.
As an aside, only tighten the screws so much as to stop an imaginary (or real) washer to not turn. Things wil sound better. (Mark Audio don’t come with washers, but the Fostex do.)
dave
Ben, I’ve done a few of these, and tried several approaches to cutting both the initial 45 and the second ( 90dg to front) side bevel. This may be too late for this build* but depending on the configuration of the mounting rails for the rip fence on your Unisaw, there may be enough room on the left side of the blade to cut the 45dg bevels without risk of pinching/ burning. The off-cut should fall free of the blade, and not get kicked back into your hip as can happen when cutting on the right side with an MDF sacrificial box over the main fence.
Chris knows this how, exactly? Had something like that happen a couple of times, but still have all my fingers, nor have I fallen off any ladders")
You’ll likely get a much cleaner cut. Just remember that if you’re making this cut after the top & bottom are attached to tail with a scrap piece to avoid tear-out at the end of cut.
* as hockey great Mark Messier was once paid handsomely to say “betcha can’t eat just one”
Chris knows this how, exactly? Had something like that happen a couple of times, but still have all my fingers, nor have I fallen off any ladders
You’ll likely get a much cleaner cut. Just remember that if you’re making this cut after the top & bottom are attached to tail with a scrap piece to avoid tear-out at the end of cut.
* as hockey great Mark Messier was once paid handsomely to say “betcha can’t eat just one”
thank you Chris and Dave
My table saw is an very accurate $80 cabinet saw with a good fence. The RAS actually did a good job on the 45 degree angle on the panels. I may be able to use it for the second bevel after the speakers are assembled. I dont have the baffle cut yet and hope to hit that just right. Have not thought too much about the top and bottom yet. thank you for the tip on following with a scrap piece. The BB is very prone to tear out. I have had a couple of belly bruises over the years. When those jams happen it is shocking how fast and powerful that saw really is and how fast it can wreck a project. thank you again for all the help all kidding aside this speaker build is a fun and challenging build. I did say the thors would be my first and last speaker and was really excited about the idea of building another set of speakers. The small thors are fantastic but I made them in a few days just to see if a diy speaker was really as good as a store bought. I still have not finished them so may rebuild them at some point. These are more fun because I know the time working on it is well spent and my equipment is very old but very good commercial equipment I built the thors on an portable crapsman table saw that kept falling over because the folding legs went the wrong direction and a craftsman RAS that would go out of adjustment everytime you moved anything. anyway thanks again Ben
My table saw is an very accurate $80 cabinet saw with a good fence. The RAS actually did a good job on the 45 degree angle on the panels. I may be able to use it for the second bevel after the speakers are assembled. I dont have the baffle cut yet and hope to hit that just right. Have not thought too much about the top and bottom yet. thank you for the tip on following with a scrap piece. The BB is very prone to tear out. I have had a couple of belly bruises over the years. When those jams happen it is shocking how fast and powerful that saw really is and how fast it can wreck a project. thank you again for all the help all kidding aside this speaker build is a fun and challenging build. I did say the thors would be my first and last speaker and was really excited about the idea of building another set of speakers. The small thors are fantastic but I made them in a few days just to see if a diy speaker was really as good as a store bought. I still have not finished them so may rebuild them at some point. These are more fun because I know the time working on it is well spent and my equipment is very old but very good commercial equipment I built the thors on an portable crapsman table saw that kept falling over because the folding legs went the wrong direction and a craftsman RAS that would go out of adjustment everytime you moved anything. anyway thanks again Ben
Last edited:
any reason not to use the back as an access instead of the bottom - thinking 6 screws and buttons. used the bottom on the thors but really cannot access anything arms are too short.
wrecked one baffle with the router too deep - almost wrecked another when I launched it out of the RAS always hated ripping on that machine, dented but not bad enough to throw away. have many other projects in the way right now but I would like to keep working on speakers on the side.
Actually thinking about using the disc sander to do the final 90 degree angle. will not risk using the RAS for that part after today.
thanks
Ben
If you want, leaving the back removable is fine… closed cel weather stripping (the black stuff at Home Despot) and lots of screws — including into the holey brace. It would be somewhat difficult to add cleats without obscuring the vent entrance so likely have to be full-width, height and screw into tops/bottoms. We just use glue… with A10, even with the holey brace, one can get into the box… binding posts need to be on a removable plate (and the long thru the box Dayton posts so many use are kinda ugly).
dave
dave
Thank you Dave it sounds like the bottom will be the better bet. I will use 2 screws to temporarily attach the back so I can glue the front I cant figure out a different way to do that. Once the front is on I will remove the back add the holey brace add the top and bottom and stuffing wires and glue the back on I think I will glue the top and bottom on too. the front driver is big enough to add stuffing I think. I do not want screws in the top
thanks again the design of these speaker is really cool
Ben
thanks again the design of these speaker is really cool
Ben
hi again
on the holey brace I have about .003" pressure is this correct my measurement system is a feeler gauge above the driver with finger pressure against the brace I have 100% polyfil for quilts will this work for batting. I can steal it from my wifes sewing room?
thank you
on the holey brace I have about .003" pressure is this correct my measurement system is a feeler gauge above the driver with finger pressure against the brace I have 100% polyfil for quilts will this work for batting. I can steal it from my wifes sewing room?
thank you
Attachments
Last edited:
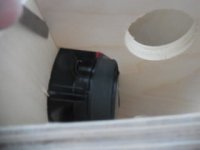
Ben- the only comment I'd make looking at your posted photo is that the rear side of driver opening should be relieved with as large a chamfer as you can manage.
Granted that with the combination of flange width and thickness on most of the smaller FR drivers with round frames, and rather close spacing of the screw holes, that makes for not a lot of core material when rebated for flush mounting, but what I've found to work very well is to scallop that chamfer to leave small pads of fuller thickness for the screws - attached photo hopefully makes sense.
As for the fit of brace to driver magnet, I tend to err on the side of a small gap, and cushion with a piece of thin foam gasket. The last thing you want to do is to stress any part of the basket or mounting flange by over -tightening. I have a hard enough time sensing the "magic" amount of torque on those screws without trying to deal with an imaginary washer .
I prefer all my imagining to be of the guitar solo type - in my mind, I'm eating Watermelon in Easter hay
holy snappin ashtrays - it just occurred to me that that album is almost 40yrs old.
Attachments
Last edited:
on the holey brace I have about .003" pressure is this correct my measurement system is a feeler gauge above the driver with finger pressure against the brace I have 100% polyfil for quilts will this work for batting. I can steal it from my wifes sewing room?
The holey brace should be firm against the magnet but dhould not be so much as to stress the basket. Some polyfill — batting is best can be put on the centre side of the holey brace (including across the holes, to help kill any side to side standing waves — the middle of the box is the most effective place to damp this. Natural felt is best for the outside walls. Volume fill of damping i to tsdtr, but we have never found a need.
dave
- Status
- This old topic is closed. If you want to reopen this topic, contact a moderator using the "Report Post" button.
- Home
- Loudspeakers
- Multi-Way
- Console?