Clamp a scrap board to the drill press table and use that as a fence.
Then cut slices of scrap and stack them, each one is as thick as your hole spacing.
Drill the first hole with all scraps in place, next hole pull 1 scrap and drill next hole, rinse lather & repeat. That will be as close as machine shop youll get with standard tools.
OK... I still think this was a great idea, but I see a fly in the ointment now. Using the fence in one direction is fine. Any slight inaccuracy would not make a huge difference. At least all the holes will be exactly aligned. But for the scraps you mentioned for spacing the holes, I see a problem. The holes MUST match the PC board, because the buttons that will pass through the holes are PCB mounted.So... lets say these holes are exactly 0.30" apart, and I cut some scraps as you suggest. Well now any slight inaccuracy is going to bite me. The holes will end up evenly spaced, but any inaccuracy will now be multiplied by the number of holes. So I don't have a high confidence that after 8 holes its going to be right.
I think I have to go back to the idea of using the guide holes I made in the PCB, and use it as a drill. BUT, now that I know a thin drill bit is likely to bend, I will make sure the guide is clamped over the outside, and right up against the work, where any error would be most visible! I was originally placing the guide on the inside, and not only that, but with some 1/4" spacers which I neglected to mention. So that apparently allowed for a lot of drill "wandering" in a thin .02" bit, especially as it passed through the plastic. Second, since I DO have this drill guide, I'm going to do as another poster suggested and widen the guide holes to at least .04. The hard PCB material seems to be much more predictable when it comes to widening existing holes, and the drills don't grab into the material as they do with plastic. Then finally, like another poster mentioned, I'm going to have to see about shorter bits. It LOOKS like I can just put the existing drill bits further into the chuck, but that will probably make it clamp in the chuck off center. So maybe I'll invest in some shorter bits.
Tomchr was closest. ")
What you need is to get some metallurgical/machine shop professionally make a "drill guide" for you.
I use them to accurately drill holes in speaker magnet plates and stamped or cast frames and have them critically align for later bolting or riveting.
What you need is a flat steel plate, 1/4"to 3/8"thick, with perfect holes, same diameter as drill, so it has no play at all (a few mils tolerance is acceptable so it turns freely, but not more than that).
You rigidly clamp it to the box, inside or outside, your choice, and drill using a bench type one.
The drill guides I use have "hard metal" inserts (Widia) so they *never* enlarge.
If anything, the drill wears after a lot of use, but it's cheap and disposable.
To keep costs down, yours would not use inserts, but ask them to have it cemented, nitrurized or any surface hardening they suggest.
It will be good for a few thousand holes anyway, at which point you might either go for a custom case or switch to something else.
By the way', if the job must look good but is really *not* that critical, you may even avoid clamping , just drill most separate holes, insert guide pins (which may be old/broken drill bits) and then proceed to drill the intermediate ones, which will nicely align.
Being a small amp maker, I use that kind of semi-low-tech solutions all the time.
In concept, something similar to this:

Although without inserts it might look closer to this:
What you need is to get some metallurgical/machine shop professionally make a "drill guide" for you.
I use them to accurately drill holes in speaker magnet plates and stamped or cast frames and have them critically align for later bolting or riveting.
What you need is a flat steel plate, 1/4"to 3/8"thick, with perfect holes, same diameter as drill, so it has no play at all (a few mils tolerance is acceptable so it turns freely, but not more than that).
You rigidly clamp it to the box, inside or outside, your choice, and drill using a bench type one.
The drill guides I use have "hard metal" inserts (Widia) so they *never* enlarge.
If anything, the drill wears after a lot of use, but it's cheap and disposable.
To keep costs down, yours would not use inserts, but ask them to have it cemented, nitrurized or any surface hardening they suggest.
It will be good for a few thousand holes anyway, at which point you might either go for a custom case or switch to something else.
By the way', if the job must look good but is really *not* that critical, you may even avoid clamping , just drill most separate holes, insert guide pins (which may be old/broken drill bits) and then proceed to drill the intermediate ones, which will nicely align.
Being a small amp maker, I use that kind of semi-low-tech solutions all the time.
In concept, something similar to this:
Although without inserts it might look closer to this:
An externally hosted image should be here but it was not working when we last tested it.
Last edited:
Sometimes using a different angle on the cutting edge helps (Brass is another material that is a bugger for this), do you have a means to grind drill bits?.
Personally I would mount it on a mill and use a spot drill in a collet to get things started (The TIR on most cheap drill presses is awful), you want to have as little drill bit extending beow the collet as possible and raise the table to minimise the amount of quill travel for best rigidity.
With bits down in the mm region, conventional three jaw drill chucks are the kiss of death, go with collets every time with the shortest bit you can find.
Generally, the secret to good drilling is to have everything mounted ridgidly and to use low speed with high pressure (Milling machines rock for this compared to a drill press).
73 Dan.
Tomchr was closest.
What you need is to get some metallurgical/machine shop professionally make a "drill guide" for you.
Thats a pretty nifty jig, but what are the costs involved with having something like that made? If we're talking several hundred dollars, I'd be better off paying the company that makes the boxes to do all the hole cutting for me.
Sometimes using a different angle on the cutting edge helps (Brass is another material that is a bugger for this), do you have a means to grind drill bits?.
Personally I would mount it on a mill and use a spot drill in a collet to get things started (The TIR on most cheap drill presses is awful), you want to have as little drill bit extending beow the collet as possible and raise the table to minimise the amount of quill travel for best rigidity.
With bits down in the mm region, conventional three jaw drill chucks are the kiss of death, go with collets every time with the shortest bit you can find.
Generally, the secret to good drilling is to have everything mounted ridgidly and to use low speed with high pressure (Milling machines rock for this compared to a drill press).
73 Dan.
The collets sound like a VERY good idea. But I'm inclined to believe the material (the ABS (plastic) has been more a problem for me then the chuck. Maybe I was lucky, and the chuck in my cheap drill press was NOT made on a Friday, but I've used some very tiny bits to drill holes in homemade PC boards, with nothing to guide the drill beyond the guide hole I'd etch in the copper, and on the same drill press have gotten way better results than I have with this plastic. Smaller amounts of exposed drill bit, and shorter quill travel I definitively will do!
But now you're recommending a slow RPM? Are you sure? When I've used my drill press as a "poor mans milling machine" with plastic, I've always been told to use the highest RPM possible. But maybe that's for sideways cutting? Maybe for straight hole drilling I'm better off with a lower RPM?
Sometimes using a different angle on the cutting edge helps (Brass is another material that is a bugger for this), do you have a means to grind drill bits?.
Personally I would mount it on a mill and use a spot drill in a collet to get things started (The TIR on most cheap drill presses is awful), you want to have as little drill bit extending beow the collet as possible and raise the table to minimise the amount of quill travel for best rigidity.
With bits down in the mm region, conventional three jaw drill chucks are the kiss of death, go with collets every time with the shortest bit you can find.
Generally, the secret to good drilling is to have everything mounted ridgidly and to use low speed with high pressure (Milling machines rock for this compared to a drill press).
73 Dan.
IMO, the fence + drill press is the answer, plus grinding the bit so it doesn't grab. I think they call it "dubbing" when drilling brass. Plastic will melt at high speeds, so don't go too fast.
Another cheat is to get an X-Y table for the drill press.
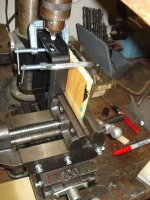
OH I *LOVE* My X/Y vise! This has been my long sought solution to cutting nice rectangles in plastic (see photo)! Just a tiny bit of filing, and they look factory made! BUT... for this seemingly simpler task of cutting a row of holes, I know it will help the holes be perfectly aligned, but I can't seem to get the hand of spacing the holes exactly equal. I'll give it another try, but its amazingly difficult to just get the absolute center point of the bit to come down EXACTLY at the mark. Maybe I need some light shadowing techniques or something. But yeah... here's my "poor mans milling" machine for cutting rectangles...IMO, the fence + drill press is the answer, plus grinding the bit so it doesn't grab. I think they call it "dubbing" when drilling brass. Plastic will melt at high speeds, so don't go too fast.
Another cheat is to get an X-Y table for the drill press.
Attachments
Hi,
I'd open up the holes in the circuit board that is used as a guide
and use a sensible sized drill bit for the pilot holes. Riveting the
the guide holes is a easily done replaceable method as the
guide wears. Use a drill size that cleans out the centre of
the rivets first pass for a nice tight fit for the pilots.
Seems to me you are using a silly sized pilot drill and
guide hole size, getting your guide right should fix it.
rgds, sreten.
Thats a pretty nifty jig, but what are the costs involved with having something like that made? If we're talking several hundred dollars, I'd be better off paying the company that makes the boxes to do all the hole cutting for me.
Clamped Big Gator drill guide ($25) or similar and set of transfer punches ($12) to index to center-punched marks on your workpiece?
BK
Hi,
I'd open up the holes in the circuit board that is used as a guide
and use a sensible sized drill bit for the pilot holes. Riveting the
the guide holes is a easily done replaceable method as the
guide wears. Use a drill size that cleans out the centre of
the rivets first pass for a nice tight fit for the pilots.
Seems to me you are using a silly sized pilot drill and
guide hole size, getting your guide right should fix it.
rgds, sreten.
Yes, the original guides probably were too small.. My thinking was that tiny holes would assure precisely centered pilot holes, which in itself isn't too silly. But it just goes to show how easy it is to visualize something that seems to make sense, but ends up impractical. With experience comes wisdom I guess. Hopefully I can gain that wisdom without blowing too much time and money ruining more pieces!!!
I always lay out for drilling using a fence, a steel rule and masking tape when drilling lines of evenly spaced holes. A piece of masking tape on the drill press plate running along the fence is all you need to get the spacing dead on.
Fix your drill press at the correct height to drill your piece and clamp it. The plate must not move from this position. Insert a bit in the drill and select a fence that you can use to slide your work along (a straight piece of steel is best). Calculate the distance from your holes to the sliding face of the work (the part that will contact the fence). That's the offset distance. Lower the drill bit and set your fence that distance from the drill bits center and clamp it securely checking and double checking the distance. If you measure from the side of the drill be sure to subtract half the drill diameter from the measurement.
Set the work up where you want the first hole and clamp it. Mark the masking tape with a fine line at the end of your work furthest from the drill. You are going to slide the work along the fence away from this line as you go. Drill the first hole, un-clamp the work and using a steel rule slide the work along the fence until its the exact hole spacing from the line you made. Make sure its against the fence, re-clamp, check the measurement and drill the next one. Always make your measurements from the first line so you don't compound any errors.
With some patience and careful math you can drill a perfectly straight line of holes with any number of different spacing's. It's a bit more tricky but you can turn your drill plate vertical and do the same kind of thing.
OH I *LOVE* My X/Y vise! This has been my long sought solution to cutting nice rectangles in plastic (see photo)! Just a tiny bit of filing, and they look factory made! BUT... for this seemingly simpler task of cutting a row of holes, I know it will help the holes be perfectly aligned, but I can't seem to get the hand of spacing the holes exactly equal. I'll give it another try, but its amazingly difficult to just get the absolute center point of the bit to come down EXACTLY at the mark. Maybe I need some light shadowing techniques or something. But yeah... here's my "poor mans milling" machine for cutting rectangles...
Getting a bit to bite exactly where you want it to do is almost impossible without an indent for the drill to center on particularly in hard materials. Get yourself a machinists pin punch. It's a spring loaded punch that you can place precisely on a drill mark using a magnifying glass. Pressing down with the punch causes it to trip a small hammer inside which punches the starter mark for you. No hammer swinging and very precise.
You can also use it to bring back a drill that ran out when you started drilling. Using the pin punch you can make a precise mark (indent) in the cone of the misaligned drill hole. The drill will grab the indent and move the center in that direction. It's for fixing small initial drill errors.
Are you clamping the PCB template to the box or just holding it by hand?
I was actually mounting it in the box. That is, the PCB had two large screw holes for mounting, along with smaller "guide" holes for all the controls. So I first drilled the mounting holes, and then mounted the PBC inside the box, on its 1/4" standoffs. I think that was my big FAIL! I was now drilling through the guide holes which were already 1/4" away from the surface, and also drilling from the outside of the box out through the front, with a very small and thin drill bit. So the drill was bending on its way through the material, so that by the time it came out the front, it was unacceptably off, from its intended position. I'm going to try this again, this time with slightly widened guide holes and a slight larger bit, but this time with the guide clamped directly to the outside surface, so there is no wiggle room at all. If that yields a better result than my problem is solved. If not, I'll try some of the other very good suggestions offered me on this thread. I still have a lot to learn about QUALITY fabrication, and of course working on a budget is always a challenge. But I'm determined to get this right.
It's a PITA, but when playing machinist I've learned that all drilled holes get spotted first with a center drill (combined drill & countersink), no exceptions.
A good old fashioned machinist, using nothing more than a pointed scribe gauge, surface plate, steel rule and center punch, can put a pattern of holes within about 5 thou of perfection. Oh, and a loupe.
A good old fashioned machinist, using nothing more than a pointed scribe gauge, surface plate, steel rule and center punch, can put a pattern of holes within about 5 thou of perfection. Oh, and a loupe.
It's a PITA, but when playing machinist I've learned that all drilled holes get spotted first with a center drill (combined drill & countersink), no exceptions.
A good old fashioned machinist, using nothing more than a pointed scribe gauge, surface plate, steel rule and center punch, can put a pattern of holes within about 5 thou of perfection. Oh, and a loupe.
Can you give me an example of a center drill? Never heard of that!
One other thing I'm going to have to build, is some kind of jig with an array of bright white LEDS facing inward, at least enough to complete a quarter of a circle. Even for less critical drilling, the lack of good light on the subject has often frustrated me. I'm thinking that a series of LEDs pointed inward would at least cast several shadows, which would allow me to watch them converge on a point as I lower the bit, clearly see exactly where the point of a drill is headed. This was especially apparent to me in my current situation, where I was drilling with black bits, into black ABS plastic. Its surpisingly easy to lose track of the exact spot the bit will come down on, and a pain to correct once you miss.
- Status
- This old topic is closed. If you want to reopen this topic, contact a moderator using the "Report Post" button.
- Home
- Design & Build
- Construction Tips
- can't drill a set of aligned holes to save my life!