Hi,
It looks like Bill has beaten me to it, and I agree with what he says here. Even if you are an experienced engineer, the chance of seeing such a problem, unless a wire is not connected (broken) at one end maybe, is very remote. Bad soldered joints (especially which are old) often look OK until you test them with a meter, so I would be surprised if you were to see anything here.
Now that you have described the symptoms, it must a problem in some of the 'shared' parts of the circuitry, as I suggested earlier.
Practically, this eliminates much of the amp's parts, and narrows down the search a lot. Trouble is, there is still quite a bit left to consider, and without any test gear it may not be so easy.
Bill's comment on the relay is a very good starting point, and (carefully with the amp open) listen for any relay clicking shortly after switch-on from cold, as he says. If you do hear a click, it is then less likely (not impossible) to be the output which is bad. Try it several times, and wait for a few minutes if necessary, to establish this point for certain.
If there is no click at all, then it is most likely that this is the area which has failed.
At all times when the amp is open and you power it up, keep your hands (and any other parts!) well away from the unit as you don't want to get any shocks here. If you can do it this way, it is safer to use a wall switch at the electrical supply to do this switching, leaving the amp's switch permanently on, of course. With the amp open, you shouldn't need to get your ear very close to the unit when listening for any relay clicks.
Another test, which you should be able to carry out, and which I would do at this stage, is to determine if it is heat build up which is having some effect here. One of the most likely causes for the amp to change in 'status' after a few minutes (i.e. you say it only came on by itself after a delay) is that some part(s) of the circuit has (have) got hotter as the unit warms up. 'Movement' between parts does tend to occur due to thermal expansion and contraction, which frequently causes the kind of problem you have here where the parts which should be electrically connected, move apart when cold due to 'shrinking'.
A good and easy way of testing for this is to use an ordinary hair dryer, carefully heating up the insides of the amp and the case with hot air. From what you say, it seems unlikely that you could cause any further damage in doing this, and you have little but your time to lose in trying this out.
Make sure that the power cord is completely detached from the electricity supply *before you start* and that the amp has not been switched on for several minutes beforehand. The big capacitors will retain quite a high voltage for a while, possibly for several minutes after you switch off, and you don't need any shocks here!
Keep the hair dryer moving around so that all of the amp gradually heats up similarly (it should be quite safe to touch the various parts after it has been switched off for several minutes) but try not to touch any 'earthed/grounded' parts of the amp like the case with one hand and at the same time feel the other parts for temperature, with the other. Just use one hand, and feel the various parts one-by-one as you move around with the heat. If you have a thin latex rubber glove to wear (like Doctors use) this is an additional worthwhile precaution, and keep any metal parts like finger-rings or watch bracelets well away while you just use your finger-tips to test the temperatures.
The heavy bits like the metal sides and transformer etc. will need a lot more heating than the circuit boards and wires, and you don't want to 'fry' these more delicate parts while you are doing this. So long as everything feels quite warm, this temperature is not critical, but it doesn't need to be any hotter than you can keep your hand comfortably on any part for a long time. The entire amp should then be rather hotter than it would ever get in normal use, and this should replicate and 'go a bit further' than would have been the case when you allowed it to warm up, initially, and when it came to life.
At this stage, connect it up and try switching the amp on again, and see if there is any sound at all from the speakers, making sure that the volume control is not down, or any mute buttons are activated etc. Don't put your face over the amp too close, at least to begin with, in case the heating has affected anything.
If there is then some sound at all, we have established that it is a thermal problem, and we are halfway there!
There are ways which we can later try to establish whereabouts in the amp this thermal fault is located, but this is getting ahead of ourselves.
I know you have already opened the amp from your pics, but do please be very careful not to touch anything inside it when the amp is powered up, or for several minutes after it has been switched off, as we don't want any chance of an accident here.
If there is anything at all which is unclear in what I have suggested, please don't do anything until you have asked about it beforehand.
Good luck, and let us know what you find.
Regards,")
EDIT: I removed some inappropriate wording which was due to my stupidly thinking your flag was Italian!
It looks like Bill has beaten me to it, and I agree with what he says here. Even if you are an experienced engineer, the chance of seeing such a problem, unless a wire is not connected (broken) at one end maybe, is very remote. Bad soldered joints (especially which are old) often look OK until you test them with a meter, so I would be surprised if you were to see anything here.
Now that you have described the symptoms, it must a problem in some of the 'shared' parts of the circuitry, as I suggested earlier.
Practically, this eliminates much of the amp's parts, and narrows down the search a lot. Trouble is, there is still quite a bit left to consider, and without any test gear it may not be so easy.
Bill's comment on the relay is a very good starting point, and (carefully with the amp open) listen for any relay clicking shortly after switch-on from cold, as he says. If you do hear a click, it is then less likely (not impossible) to be the output which is bad. Try it several times, and wait for a few minutes if necessary, to establish this point for certain.
If there is no click at all, then it is most likely that this is the area which has failed.
At all times when the amp is open and you power it up, keep your hands (and any other parts!) well away from the unit as you don't want to get any shocks here. If you can do it this way, it is safer to use a wall switch at the electrical supply to do this switching, leaving the amp's switch permanently on, of course. With the amp open, you shouldn't need to get your ear very close to the unit when listening for any relay clicks.
Another test, which you should be able to carry out, and which I would do at this stage, is to determine if it is heat build up which is having some effect here. One of the most likely causes for the amp to change in 'status' after a few minutes (i.e. you say it only came on by itself after a delay) is that some part(s) of the circuit has (have) got hotter as the unit warms up. 'Movement' between parts does tend to occur due to thermal expansion and contraction, which frequently causes the kind of problem you have here where the parts which should be electrically connected, move apart when cold due to 'shrinking'.
A good and easy way of testing for this is to use an ordinary hair dryer, carefully heating up the insides of the amp and the case with hot air. From what you say, it seems unlikely that you could cause any further damage in doing this, and you have little but your time to lose in trying this out.
Make sure that the power cord is completely detached from the electricity supply *before you start* and that the amp has not been switched on for several minutes beforehand. The big capacitors will retain quite a high voltage for a while, possibly for several minutes after you switch off, and you don't need any shocks here!
Keep the hair dryer moving around so that all of the amp gradually heats up similarly (it should be quite safe to touch the various parts after it has been switched off for several minutes) but try not to touch any 'earthed/grounded' parts of the amp like the case with one hand and at the same time feel the other parts for temperature, with the other. Just use one hand, and feel the various parts one-by-one as you move around with the heat. If you have a thin latex rubber glove to wear (like Doctors use) this is an additional worthwhile precaution, and keep any metal parts like finger-rings or watch bracelets well away while you just use your finger-tips to test the temperatures.
The heavy bits like the metal sides and transformer etc. will need a lot more heating than the circuit boards and wires, and you don't want to 'fry' these more delicate parts while you are doing this. So long as everything feels quite warm, this temperature is not critical, but it doesn't need to be any hotter than you can keep your hand comfortably on any part for a long time. The entire amp should then be rather hotter than it would ever get in normal use, and this should replicate and 'go a bit further' than would have been the case when you allowed it to warm up, initially, and when it came to life.
At this stage, connect it up and try switching the amp on again, and see if there is any sound at all from the speakers, making sure that the volume control is not down, or any mute buttons are activated etc. Don't put your face over the amp too close, at least to begin with, in case the heating has affected anything.
If there is then some sound at all, we have established that it is a thermal problem, and we are halfway there!
There are ways which we can later try to establish whereabouts in the amp this thermal fault is located, but this is getting ahead of ourselves.
I know you have already opened the amp from your pics, but do please be very careful not to touch anything inside it when the amp is powered up, or for several minutes after it has been switched off, as we don't want any chance of an accident here.
If there is anything at all which is unclear in what I have suggested, please don't do anything until you have asked about it beforehand.
Good luck, and let us know what you find.
Regards,
EDIT: I removed some inappropriate wording which was due to my stupidly thinking your flag was Italian!
Hi Madmadra,
Since my post above, I just saw your pics.
Well this could be the answer to the problem if what I see here is correct.
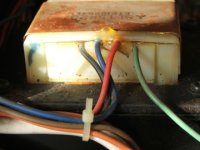
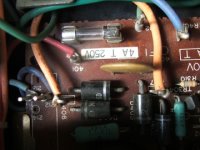
On the board with the fuses on, the red wire going to "401" looks as if it is a 'wire-wrapped' connection, and so do some of the others, too!
These are not soldered but the end of the wire is simplywrapped many times tightly around a sqare peg to make the connection.
Have a look at this area and let us know what you see.
If there is no solder on some of these joints, then a pound to a penny this is where the problem lies. These kind of joints are unreliable in the long term, especially if the unit has been in poor atmospheres like smoke-filled rooms, or whatever.
Keeping my fingers crossed!
Edit : Looking again at pic #4, *all* these joints look like wire-wrapped joints there too!
I would virtually stake my life on the fact that this is the root of your problems, but let us know what you see, as the pics are not absolutely clear.
Since my post above, I just saw your pics.
Well this could be the answer to the problem if what I see here is correct.
On the board with the fuses on, the red wire going to "401" looks as if it is a 'wire-wrapped' connection, and so do some of the others, too!
These are not soldered but the end of the wire is simplywrapped many times tightly around a sqare peg to make the connection.
Have a look at this area and let us know what you see.
If there is no solder on some of these joints, then a pound to a penny this is where the problem lies. These kind of joints are unreliable in the long term, especially if the unit has been in poor atmospheres like smoke-filled rooms, or whatever.
Keeping my fingers crossed!
Edit : Looking again at pic #4, *all* these joints look like wire-wrapped joints there too!
I would virtually stake my life on the fact that this is the root of your problems, but let us know what you see, as the pics are not absolutely clear.
Hi Bob, yes the red wire going to 401 is indeed wrapped, not soldered as are all the others around the sink as you spotted - the wires look well wrapped but old and a little tarnished - i tried manipulating these a little to see if i could re-establish a connection but nothing doing so far - what is the red wire at 401? At the moment i'm warming up the board with a blow heater on medium and will try it again in a few mins. As for the relay switch i don't hear anything happening when switching on (and after waiting for several minutes) or indeed at switching off - should i hear a reverse click? anyways nothing though there is a hum from the board (around the transformer?) and the lights in the vu meter windows are on. I tried the headphone socket as well but dead as a dodo. I'll fire it up again in a minute and let you know if i hear anything 
Hey Bob!! we have lift off!!! after heating the board i switched it on, heard the relay (i think) click after just a few seconds and the sound came thru! great feeling - and then it went dead again after a few minutes i presume after it cooled down - what do you think's the next step? there are 3 other wires, blue , navy and green around the same place as the red wire and their all wrapped as well
Amazingly in my experience the wire wrap connections are very reliable (if done well), that is I cannot remember having to fix one, which of course does not mean that I didn't or that it is not possible, and if I ever had to undo one I always twisted and soldered it back on.
If you hear no relay click: This circuit usually has two things that control it, a delay from turning on and a way to sense DC offset of the power amp. So it is logical to check the DC offset of both channels first as this is easy, and to check the power supply to the relay circuit which should also be easy.
The new pictures do not show the area that looked discolored to me, so no further comments.
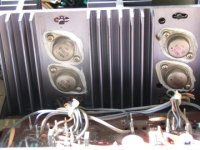
Continuing education: In the picture of the heatsink and output transistors, the small transistors in the two holes at the top will be the 'bias' transistors for the output stage, they sense the temperature of the outputs to prevent termal runaway. The one on the left looks like it is not in its hole, almost looks dangerously close to it leads touching the heatsink, hopefully they are not and the leads are insulated!
Bill
If you hear no relay click: This circuit usually has two things that control it, a delay from turning on and a way to sense DC offset of the power amp. So it is logical to check the DC offset of both channels first as this is easy, and to check the power supply to the relay circuit which should also be easy.
The new pictures do not show the area that looked discolored to me, so no further comments.
Continuing education: In the picture of the heatsink and output transistors, the small transistors in the two holes at the top will be the 'bias' transistors for the output stage, they sense the temperature of the outputs to prevent termal runaway. The one on the left looks like it is not in its hole, almost looks dangerously close to it leads touching the heatsink, hopefully they are not and the leads are insulated!
Bill
Brilliant!
Hi,
Great news, and it just shows what a bit of detective work will do.
If it was me doing the job, I would heat it all up as you have just done and get it playing OK, and then use a spray can of 'freezer' (available from electronics suppliers) which you can direct with a long narrow pipe at each joint in turn, until the problem comes back.
That's the way most techs would do this, I think, as you can soon identify precisely which joint is the culprit.
I wonder if in your case you could get any results by using say a drinking straw in your mouth (or any other way you can think of to direct some cold air at the joints) to isolate which joint(s) is are at fault.
What is happening here is that, as I explained earlier, the entire joints will expand marginally as they get hot in normal use. As the square peg expands in size, it will accordingly expand or stretch the inside of the coil of wire around it, but as it cools down and contracts a little, it leaves the inside of the wire coil fractionally loose on the then slightly smaller peg. Normally, when the wire and pegs are new and clean and shiny, there is still a good electrical contact being made, but during the life of the amp, and especially if it has been in say a smoky atmosphere, a bit of corrosion and oxides form between the parts, and you lose this electrical conductivity.
Anyway, first of all congratulations, you have just become an audio repairer and have (almost!) done your first repair, and you can quite rightly tell all of your friends!
All we need to do now is finalise the work, and you are away.
Personally, I don't like those connections in a domestic amp as they are often troublesome, which, regrettably means you may have some further problems in the future. However, looking on the bright side, now you are an accomplished repairer (and here, the diagnosis is by far the hardest part with any repair like this) you should be able to sort it out.
See how you get on with the heating and cooling tip I suggested above, and take your time here. You now know it can be fixed OK, which is what is important, so don't rush things and spoil anything through impatience. However, this time you will be working with the circuits live, so you must be very careful, both for your safety's sake, and so as not to do any damage to the amp.
It may even pay you to assume that all the contacts will need looking at on that small board, but I am not certain how to best suggest you make the final cure when you know which parts are the problem areas.
Do you have anyone who can do some soldering for you FOC, maybe, as this would probably be the best long-term answer here?
Are there any schools or colleges locally, which might be able to help you, now you know what needs to be done? Just the cleaning up of the parts and the soldering might be an interesting project for someone who is keen to get some practice.
Also, do you have access to any electronics stores like maybe Maplins, who could supply you with some contact cleaner maybe.
Anyway, don't worry, if the worst comes to the worst, I may be able to send you something for this without any cost to you, but I do need to think about the matter a bit more first.
I would always solder these joints, myself, simply because I can so easily, and this would give the best long-term repair IMO, and you don't really want to have to keep on playing about with this for ever and ever in the future, do you?
I will come back to you later, when I have had some food and a big think (like Winnie the Pooh!)
Regards,
Edit for crappy spelling!
Ah thanks alot Bob for the offer but i should be able to get my hands on some contact cleaner - it's time i took a trip to the big smoke anyway - i think getting someone to solder should be possible - it would have been getting someone to diagnose the problem in the first place that would have been very difficult but thanks to your help i can now narrow down the problem for someone to go at it - i'll try to get some info on soldering and maybe even try it myself using my orangutan approach - crude but effective - it's great to know that it's not a component that would have been difficult to aquire and replace so that's excellent! i tried heating up the board again and find that it cuts out very quickly once the heat source is removed (5 seconds max) - don't know if that's significant. Anyways don't feel obliged to respond straight away - we all deserve our weekends off - i'm going to start making enquires on monday re getting the job finished and i'll certainly keep you informed as to developments - i'll try not to screw it up - prob next time you hear from me i'll be languishing in a south American jail wondering how a stereo amp could have led to this - I won't have anything to bring to this forum as i barely know how to switch things on but so i'll make a donation to the cause cuz it's an excellent facility and apart from getting my amp fixed i've had a good time getting there - Many thanks Bob, your a star
Hi madmadra,
No need for any thanks as you did the work, anyway. I just showed you where to look and how to do a simple test to establish something positively, mostly based on your answers to some simple questions, and using some logic. (Maybe some 40 yrs. experience helped a bit, too!)
Actually, what saved us both a lot of additional 'detective' time was pure luck in that you posted the later pics which indicated to me there were some wire-wrapped connections. Consequently, as I said even before you verified it, I would have almost staked my life on this being the cause of your problem. (That's where the 40yrs. bit comes in)
Anyway, I still feel you would be best off to get these joints soldered and if you are interested in learning how to solder, I will send you a soldering iron and some solder FOC, if you wish.
Using conventional contact cleaner might not do the job very well, anyway, and the problem could recur in the future. If you did wish to avoid soldering for now, and if you can stretch the budget a bit, I would recommend some Caig De-Oxit, which you can get mail order (I think its about £15 though, but would need to check) as this is vastly better than anything else here.
Also, this De-Oxit would be good to squirt into your volume control pots to clean these up internally, and this should overcome any 'scratchy' noises which you mentioned before when adjusting the volume knob. If you are interested, look at Caig's website as their excellent products are used in aircraft & space travel situations etc.
The soldering iron I will happily send you at your reqest, was a freebie 25 watt, sent to me by an electronics supplier who I do a lot of business with, and this would be ideal for this job of yours.
I'll never use it myself, as I already have 8 irons to choose from, including a (£300+ temp.-controlled soldering/desoldering station, mainly for SMD work) but for 75% of my soldering time, I still use an old Antex iron I bought maybe 40 yrs. ago for 19 shillings and sixpence! I've replaced the heating element maybe 6 times since then, but I always pick this iron up first when I am at my bench, so it is a real old favourite of mine! The one I could let you have is very similar, but it is brand new, and never been used.
The joints you are initially concerned with here are reasonably substantial, and not too delicate, and with a bit of practice elsewhere first (on some bits of scrap wire, or whatever) I am confident you could sort this out OK for yourself. In fact, after some practice, I would suggest such an area as this for a first 'real-life' electronic repair, anyway, as access is quite easy here too.
There's plenty of info on soldering on the 'net, but I can help you with any specific details/advice etc., if needed, but don't start on the amp, itself, until you are happy with your technique here. It would be great shame to spoil things now due to rushing matters.
If you know anyone who can solder, a bit of hand-holding here would probably be a good idea for your first few attempts.
Let me know which way you intend to go, and if the iron and solder will be of any use, I will need your details where to send it.
If some advice here from an old man is worth anything, I wouldn't post such details openly on any Forum, though, just in case.
Remember, "No matter how long the journey, it always starts with a single step", and you have already taken several steps towards becoming an accomplished Audio DIYer!
I hope this helps.
Regards,
If u can reach at the copper side, then select the portion of the pcb that is discoloured and take a few, very closeup photos and post.
Oh, so much explained over the weekend...
Now that u have got some nice explanations and taken the first step of repairing as explained, it narrows down to a disconnection normally called open circuit. One possibility is already explained. The second and not the last possibility is the dry solder which IMO is most likely.
At first, I have to ask u is, can u get visual access of the other side of the board easily (by opening a cover) which is the copper side... If u can, then u have to take some pics as earlier and post. From this u can be taught how a defective solder joint looks like, if there is any on your board.
Gajanan Phadte
Hi madmadra,
Some further thoughts after more thinking time.
Although we have established that it is a thermal prob. and that it is also in a part of the circuit which is shared (like power supply, or output prot.) it would be as well to do a few more tests if poss. before spending out much cash on this. Presumably, your time is free, though.
It certainly doesn't seem likely now that any components will need replacing as you say, and it is better (IMHO) that it 'cuts out' when cold than (more usually!) when amps get hot.
If it shuts down when hot, it could be a prob. with a part like a transformer which may have an inbuilt cut-out to avoid overheating, and this would doubtless be expensive even if a replacement was available, or certain parts will fail internally (and intermittently) when under heat-stress.
I am quite happy with my general diagnosis. i.e. that when the amp warms up, some parts which should be in good contact permanently (but for the reasons mentioned, this is not so when cold) then expand in some way, and the circuit is 'restored'.
However, until you have actually made the repair, there can always be some doubt as to the culprit, and there are ways of narrowing down the area, which we have not yet explored.
Gmphadte is right in that it could be a dry joint, and I was thinking about this possibility, myself, but I still go with the wire- wrapping as you also mention some tarnishing of the parts here.
Mostly with amps like these, you cannot access the undersides of the circuit boards unless there is a removable plate underneath, which I guess you will not have with this amp. Otherwise, you would probably need to remove an entire circuit board from the amp. for inspection, and I don't recommend doing this at this stage, as hopefully, this may not ever be necessary. If my guess is wrong (and I hope it is!) remove the cover plate from underneath, and look if you can see anything below this board which has the fuses on.
What can also happen is that with quite tall posts like the wires are wrapped around, some sideways strain can 'unseat' and loosen these pegs in the board, and the soldering underneath the board will then suffer. Also, with time, passage of current, vibration, and heating/cooling effects, this can spoil the integrity of the joints where the bottom of the pegs are soldered to the copper 'traces' under the boards. The soldered joints can become brittle and fracture due to this 'work-hardening' of the metal, but this would usually need some good light and possibly a magnifier to see readily.
Some pics like gmphadte has suggested, should give us an idea if this type of failure is likely, and none of this would cost anything but your time if you are able to access this area.
Ideally, it would be better if we could isolate the problem area better, and this would have been my next suggested step to take before doing anything else. Is there any way you could perhaps only apply the heat to some smaller areas at a time here, maybe by shielding with some cardboard or whatever, in the hope we can narrow things down a bit? Many years ago, I had some success with using a small travellers hair dryer with some thin cardboard taped around it to form a nozzle, before I had proper heat guns to use for this.
It's surprising what you can come up with for free, if you think about it, and it could make life easier in this now more specific diagnosis. Don't get tempted to try anything like a fag-lighter though, as direct flames will burn some parts very easily.
If you could just be certain the prob. is on that fuse board, or any other particular area, it would be a great help right now.
Failing this possibility, I would just solder *all* of the unsoldered joints on that board to begin with, to see what happens. This is 'fail-safe' and cannot be harmful. However, when you (or whoever else) come to do this, bear in mind that any heat applied will travel down the pegs, and you don't want to unwittingly unsolder the joints underneath the boards, especially if you cannot access the underside easily later on to fix it.
Luckily, these square pegs are quite long, so if you solder near the tops of these, rather than right down at their bases, this will mean a longer 'path' for the heat to travel and to disperse, which will make it less likely to cause any problems here at the lower solder junction. This would still be fine electrically.
Let us know what you can see, and how you get on when you have the time available.
Regards,
Hi guys - sorry, been off line for a couple of days - firstly Gajanan looks like it would be difficult to get at underneath - and Bob i tried the hairdryer trick and the more sensitive area looks to be the left hand side where the transformer and those wires are - to be honest i'm not absolutely sure as it's difficult to keep the heat from the dryer isolated in one area but it seems to come back on sooner and stay on longer when i heat around there (the red/orange/brown/blue wires. Many thanks Bob for the offer of the solder iron and i may yet take you up on it though i think it's time to call in the experts if i can get someone qualified to do it - as a once off thing i don't need to learn how to do this but i may yet so hold that thought - i'll send you the shipping costs if i do. As for the contact cleaner i found a place on the web where i can get the deoxit - do you think the spray is the easiest to use? can this be a long term solution if it cleans up the connection well? i'm off to my bed.
Thanks guys
Thanks guys
Hi madmadra,
I've just 'looked up' Deoxit myself, and I see that (nowadays) there are plenty of UK suppliers offering this product. What you need to know is that there are several alternatives, and several varying prices, too!
It appears that the tiny squeeze tube at approx £6 is about the cheapest, and this is 100% concentrated solution, as well.
Then there are mini-sprays of approx 15ml, at anywhere between £9 to £15'ish! but these are 5% concentration sprays with a tube to direct the application.
I bought mine from the 'States a long while ago (I have 3 different varieties, for slightly different applications) and the products were called by different names then, but it lasts almost forever, even though I use it a lot.
Russ Andrews sells the much larger spray can I see (200ML, as opposed to 15ml!) for just under £14, so this looks like good value if you go for a spray can.
The basic 'ingredient' (Cramolin) has been much the same for many years, and, as I said, this is by far the best contact cleaner around for any electronics (IMHO), but how you use it will determine the choice you make here. Generally I prefer the spray, as it can be used more generously to literally 'wash' the old oxides away, especially in enclosed areas like volume pots and switches etc. Using *sufficient* of the 5% solution will have virtually the same overall effect as the 100%, and if it mattered, you could simply let some 5% stuff evaporate in say a small container like a bottle cap, until it resembled 100% in strength, anyway.
If it was me, at this stage I would get a spray can, because it is so beneficial, anyway, for all kinds of electrical cleaning/enhancing purposes, and just give all of these wire-wrapped connections a good squirt, and see what that does. It cannot do any harm, as it mostly evaporates anyway in due course, but don't do this when the amp is live. Wait until it has mostly dried up before you power up again, but there will always be a (deliberate) oily residue afterwards, which will not harm anything.
Assuming this is successful, you can then give the volume pots a good squirt inside through any holes in their bodies you can find, and it will even migrate along shafts etc. and into inaccessible areas in due course. (see later reference). I have even soaked almost-sealed components in this stuff before, and then shaken the surplus out and let it dry before firing things up again, and it is very effective due to this 'creeping' action. A single drop on any surface will soon spread all over.
Whether it will effect a cure in your case remains to be seen, but this is certainly what I would do in your position. You can give all connectors/plugs/sockets and whatever a good clean too, and you will probably experience better sound as a result than ever before. If you clean the ends of batteries, bulbs and connections etc., in say a torch, you will get a brighter light afterwards!
If it is not entirely successful for this purpose, at least it will have given the parts a good clean which will aid any subsequent soldering here, as this is another of its uses, as a pre-soldering aid!
If it is successful, it will doubtless last at least as long as originally(unless something quite unusual has occurred here) since it leaves a thin film behind to enhance and preserve the contacts for the future. I will never make any (non-soldered) connection anywhere nowadays (and haven't for over 20 yrs) in *any* electronics work I do without 'treating it with a Caig product, so this should show how much I rate their products. Also, it has enabled me to 'fix' many intermittent electrical problems, usually without even needing to dissemble the parts.
See post # 8 in thread "Make my own Dual-concentric pot??" for more details on cleaning/restoring volume pots for details of a successful repair job I suggested to an enquirer a while ago, together with the enquirer's subsequent note of success in post #9.
The offer of the soldering-iron and some solder is still there, if you want it, and I wouldn't be concerned about the carriage costs, either, thanks. I am always pleased to help someone who is keen to 'have a go' for themselves, even though I don't need much assistance myself, nowadays. However, I do still benefit from others' advice and assistance from time-to-time, as you can never know too much, and there is always something new to learn from people who have had more experience than one's self, in certain areas. This is one of the nice things about this hobby, and this Forum can help you a lot.
Regards,
Thanks guys - well i ordered 2 small (squeeze) tubes of caig deoxit from hifi cables in the uk - i tried to get the spray Bob but UK and US companies don't seem to want to ship aerosols - none of the ones i tried would anyway. The tubes are only 2ml but are 100% and i can get a contact cleaner here in a spray can called SWA (ever heard of it?) that i can supplement the caig cleaner with - i would have ordered more of the caig deoxit but the shipping charges are pretty hefty, 15 pounds sterling to ship either one or 2 tubes and 25 to ship 3 etc and i did shop around and tried the states but I've found the problem with buying stuff in the US is that you often have to use UPS or some other shipping crowd to get it over which often involves import tax and VAT at this end as well as an extra charge from the shipping company to handle the paper work that arises from the import charges - it can amount to quite a bit in the end so at least this way i know how much it's going to be from the outset and i want to try this stuff if you recommend it. If i simply put a few drops on each of the posts with the wrapped wire and give it time to act would this be the way to go? If i can get it going again what areas should i concentrate on with the cleaner to improve the overall sound of the amp? Sorry for not making more contact but been a bit sick the last few days - Cheers for now
don't mean to hurt anybody...
The truth...U are wasting your time and money. May be u get some improvement but the soldering has no alternative solution(answer)
If u cannot find someone to do it, may be we can help u open up the amp and DIY. This will need u to post pictures, or u should get someone to open it for u so as to access the solder side.
Don't mean to disappoint u...
Gajanan Phadte
If i simply put a few drops on each of the posts with the wrapped wire and give it time to act would this be the way to go? If i can get it going again what areas should i concentrate on with the cleaner to improve the overall sound of the amp?
The truth...U are wasting your time and money. May be u get some improvement but the soldering has no alternative solution(answer)
If u cannot find someone to do it, may be we can help u open up the amp and DIY. This will need u to post pictures, or u should get someone to open it for u so as to access the solder side.
Don't mean to disappoint u...
Gajanan Phadte
Hi,
Thats a fag, but I forgot you were in Ireland when I mentioned Russ Andrews. I know he will mail the aerosols certainly in mainland UK, though, as an acquaintance of mine had some from him a while ago.
Yes, I would put a drop on all of these wire-wrapped connections, and see what this does. It should creep between the parts OK and help to dissolve any oxidation present. Maybe after a while, you can briefly flush any badly soiled parts off with the cleaner you have, and when that has dried out, put a little Deoxit back again afterwards.
It certainly won't do any harm, anywhere, and if it doesn't do the trick, it will have helped with any later soldering which might be needed, as it is an effective pre-soldering aid. What I can say with every confidence, is that if Deoxit doesn't effect a cure, then no other 'lesser' cleaner will do either, and as gmphadte says, it will probably need the soldering job doing.
I don't agree with gmphadte over wasting anything other than your time (possibly!), as this product is so useful in any electronics contact cleaning/enhancing situation, as I have tried to explain, and a little of it goes a very long way. Just look at the list of users like computer manufacturers, telecoms, aircraft makers, space exploration guys etc, etc., and they wouldn't waste their money on something which is ineffective or unreliable, as lives can be at stake there!
I feel sure that there must be a lot of info on the 'net about Deoxit's specific uses and applications, like my suggestions which worked for the guy in the "Make my own dual-concentric pot" thread, and probably there will be some info on Caig's site, too.
Cramolin (the original) and Pro-Gold are much the same products made by Caig, so searching under these might help, but I haven't looked for some years, myself, as I already know all that I need to know about it being a long-term satisfied user.
Basically, any non-soldered connectors, plugs, sockets, relay contacts etc., will all benefit from being treated with this stuff, and quite a few high-end audio manufacturers use it on their products.
I hope you have some success, and let us know the outcome when you have time, please.
Regards,
- Status
- This old topic is closed. If you want to reopen this topic, contact a moderator using the "Report Post" button.
- Home
- Amplifiers
- Solid State
- broken amp