@redjr Thank you for your kind comments ") ......this project was a very long process which was REALLY enjoyable.
......this project was a very long process which was REALLY enjoyable.
I used an Arduino which is a super system to enable you to build anything you want and a simple programming language, do you know Arduino?
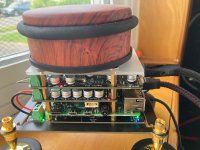
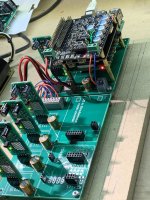
In the last picture I have highlighted below where the Arduino resides.....its actually connected underneath the customer designed PCB. Really fun to build PCBs and to write the code but I must give a shout out to my friend Doede for his great support and assistance when I did this part of the project. FANTASTIC DIY audio community helping each other - the best!

......this project was a very long process which was REALLY enjoyable.I used an Arduino which is a super system to enable you to build anything you want and a simple programming language, do you know Arduino?
In the last picture I have highlighted below where the Arduino resides.....its actually connected underneath the customer designed PCB. Really fun to build PCBs and to write the code but I must give a shout out to my friend Doede for his great support and assistance when I did this part of the project. FANTASTIC DIY audio community helping each other - the best!
You're welcome. I am aware of Arduino, just never thought of using one along aside an RPi. My programming skills are a bit weak. I may have to reconsider this idea. Would you share the Arduino code and interface points(GPIO)? I probably have a 4-line display around here someplace.
Thx.
I may have to reconsider this idea. Would you share the Arduino code and interface points(GPIO)? I probably have a 4-line display around here someplace.Thx.
That’s one serious dac, Simon.
For me was the last upgrade with UcPure-Eaton 3000F, feeding the clocks, almost a gamechanger.
I just wonder how much better dddac will be with UcPure/Eaton replacing the rest of the psu’s.
That said, I think clean power to the clocks is very important, and UcPure/Eaton proves it. Hearing is believeing.
Thanks you @smooth dancer and 100% agree with you that the power suppliers make a HUGE difference in the sound. It makes senses as the audio wave form itself cannot exist without the power supplies, the cleaner the PSU (s) are the better the wave form
Hello,
My Virtue sensation amp came with a rather basic power supply.
This was replaced by a lclc supply after a few months
After a year or so i tried two big 12 volt batteries in series.
When these expired i bought the biggest batteries that would fit in my rack. If i remember well the pair was close to 500 Euros.
When they had to be renewed again i bought a big surplus Philips transformer from the sixties that cost me less than 40 ¢ and abig Lundahl Ll2771 to make a lclc again. .
The last one is superior to the previous ones.
The dddac has Tent shunts right at the spot where they are needed.
Recently i saw an interview with the people from Grimm audio they consider it a big advantage to try to locate things closely related to each other also close to each other.
One of them is an expert on emc and things related to that so he will be able to engineer things to make it work. Most of us just install things kind of rondomly maybe creating an unknown problem while resolving qnother.
Greetings Eduard
Nice work! in your photos it seems you connected all transformers to this (in pic). What is it called?Today I built all the eaton supercapacitors and modules in a case.
Everything works perfect I also listened to the usbridge signature with the eaton supercapacitors this is also a good combination much beter than the shanti power supply.
But with the ian modules I make a step forward this is a beautiful sound nobody will regret how this sounds, so open and transparant.
Everybody thanks for the helpful feedback.

Hello,
Looks like a good one. Most diy folks have one tool that they use for all kind of connectors.
There is a lot of quality difference in the tools.
Most people will think i only need to crimp a few connection let us buy a cheap one and then they end up with 50% of the connections being bad.
Greetings, Eduard
I tried to buy the clock control you have, but was unable because of not enough interest. I was all in but it wasn't to be.I am building three different Streamer/DACs just for the fun of it and why not. Here are a few pics of what I call my "Signature DAC" which is based on the famous DDDAC super pimped and using Ian's kit as the streamer/PSUs with Andrea clocks. Super fun!
View attachment 1200988 View attachment 1200989 View attachment 1200990 View attachment 1200991 View attachment 1200992 View attachment 1200993
Could you please give the link to "kroonsteen" (i think they are called terminal block here) . I could not find one with fuse in them.The transformers are 50va each so I have no problem with that.
I have a special crimping tool to connect them together 😉
We name it a kroonsteen and there is a fuse inside.
@triode4 which exact control are you referring too please? maybe I can help....I tried to buy the clock control you have, but was unable because of not enough interest. I was all in but it wasn't to be.
Hello,
I will do the same and wont do any switching on the shieldpi pro MK2 that nobody is using.
I thought that the biggest issue with raspberry is that it is not conceived as a first class audio device so it should be used with all kind of tricks.
Greetings, Eduard
I will do the same and wont do any switching on the shieldpi pro MK2 that nobody is using.
I thought that the biggest issue with raspberry is that it is not conceived as a first class audio device so it should be used with all kind of tricks.
Greetings, Eduard
Hello,
I think shieldpi pro is a good investment. I think the extra power supply caps on that one is a good idea too. I agree with some designers that the supply needs to be as close as possible to the '' user ''. That is why the Tent shunt work that well at the DDDAC.
Mr. Tent says that the shunt needs to be where the decoupling cap needs to be. His circuit has the decoupling cap integrated. But once the shunt is at a greater distance you will need to put a decoupling cap again at the spot where the shunt should be. haha
Greetings, eduard
Hello,
When i see this stack it looks like a good idea to use a shieldpi pro.
If i read the old French l'audiophile magazines from decades ago i admire their attention to detail. I remember one of the contributors made a mc phono amp kind of integrated into the aluminum machined arm base. It was designed by jean Hiraga and it had an impressive gain. So if you connect to a so so power supply or the best power supply with long cable runs to the actual circuit it wont be that perfect.
Of course the French diy were very fanatic at that time. They tried a lot of things that were considered at bit weird by most folks.
I will use the UCPI as a 5 volt supply just for the Raspberry but i will supply it with 5 volt coming from the power supply i use right now for the big lifepo4 board . I will have to adjust the regulator circuit ( From DDDAC designer) and the power transformer to lower the voltage.
The lifepo4 board needed a voltage between 12 and 19 volt. At the board there was a preregulator followed by a dedicated 5 volt regulator that would go to the Raspberry. I used a 5 volt ultracap board ( forget the exact name because Ian makes to many boards!) on top of the Raspberry.
I expect that the Raspberry will benefit from ultracaps being as close as possible AND a choke input combined with Doede's circuit because it takes considerable current and it is a computer ( famous for polluting power supplies)
If the '' digital stack '' in the picture is sensitive to vibrations ( airborne as well) someone ( possibly well equipped ) should do some test to minimize the effects of vibrations to the stack. The very basic French test used a stethoscope to detect vibrations. But they were all about turntables and loudspeaker ( enclosures)
There was a brief mentioning about '' un condensateur qui parle''a capacitor that could talk basically a capacitor that would function like an electrostatic loudspeaker. The same people who talked about diodes for audio in the early eighties.
It could well be that this tack is more sensible to vibrations than people can imagine so we should start investigating instead of just buying the latest boards all the time. Some '' thoughts ''
Adding a weight on top will make the spikes better very probably.
If the vibrations cannot enter the stack because of the spikes they will surely enter by the garden hose cables.
If the stack is not producing to much heat could it be beneficial to mount it inside an enclosure? Of course there will always be the cables going in or out.
Will it work better when using a heavier enclosure?
Maybe keep it hanging like a swing.
This time it is mainly investing time.
The famous Italian clock designer already taught us some things about using his clocks. It could well be that digital gear is more sensitive to vibrations we cannot detect using a stethoscope but they can be made visible using a scoop??
Greetings, eduard
Attachments
Hello,
Is there any way to safely switch ON and OFF the RPI? I’m using the shieldpi pro, switching off is possible with settings in GPIO buttons according shieldpi pro datasheet. But
How on earth get is back ON, without disconnecting power supply?
Is there any way to safely switch ON and OFF the RPI? I’m using the shieldpi pro, switching off is possible with settings in GPIO buttons according shieldpi pro datasheet. But
How on earth get is back ON, without disconnecting power supply?
Attachments
Hello,
I think the button is used for switching off and on.
I will be using the purepi 5 volt combined with the shieldpi pro for PI3+
Will leave the shieldpi pro switch in on position all the time and will connect a switch as copied from manual
J2: External on/off control switch connector, in 2-pin PH2.0 connector External on/off control switch is functionally equivalent to the on-board switch S1. To use the external on/off control switch, On-board switch S1 must be at off position. External on/off switch is not supplied in the package.
Can the shieldpi pro not just be connected like the ''oldfashion '' uchybrid/conditioner boards without any switch??
I expect people leaving the group buy if to many questions keep popping up.
Greetings, Eduard
- Home
- Source & Line
- Digital Line Level
- Asynchronous I2S FIFO project, an ultimate weapon to fight the jitter