So which do you prefer then? The MA's or Amish.
I must say that I'm really impressed with your work to date. It just goes to show what can be done with basic tools, patience and far dose of common sense.
Can't wait to see how you get on finishing them. Any ideas about where you will be getting your veneer? What method are you planning to use to stick the veneer on? I've never veneered anything in my life and the thought of it scare the hell out of me")
I must say that I'm really impressed with your work to date. It just goes to show what can be done with basic tools, patience and far dose of common sense.
Can't wait to see how you get on finishing them. Any ideas about where you will be getting your veneer? What method are you planning to use to stick the veneer on? I've never veneered anything in my life and the thought of it scare the hell out of me
Thanks for the comments. I think practice also helped along the way, along with trying to be a perfectionist. I have surprised myself with they way some of this has worked out and spending a little bit of time with basic tools can yield some very good results.
The MA's are good and I don't regret buying them at all, but they will be going the way of Ebay to a new home where no doubt they will be loved. The Amish provides more detail and are very easy to listen to, put on something like Joss Stone or India Arie and the way it presents them is effortless, every breath and little hum is there. The 9700 does an excellent job with cymbals and the harmonics on guitars. There are some excellent tracks on the Foo Fighters - Echos, Silence, Patience and Grace that are captivating.
I am hoping that with them revealing more detail I'll have a bit more luck spotting differences when I do an Op Amp change in my pre-amp.
As for the veneer, i need to find a supplier nearby that i can buy from, I haven't chosen anywhere yet... am open to suggestions in the Northwest. To be fair, it is the bit that is scaring me the most currently! I am hoping that I can get some relatively easy to use iron-on veneer to keep things simple. As with various bits of the project there will be some practice undertaken before starting on the cabinets. Actually, thinking about it I am doing a swap of bookshelf speakers with my dad and have the opportunity to build some new cabinets for them, so that might be my practice ground as they are less critical than the Amish due to them going in the conservatory high up on a windowsill.
Keeping things moving along
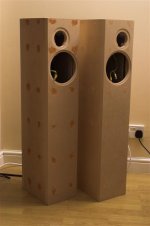
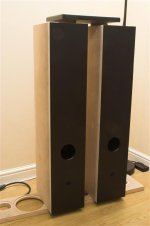
Whilst there haven't been any updates for a week or so things have been moving along. After enjoying listening to the Amish for a couple of weeks I have now filled all the screw holes and these have been sanded down as shown in the pictures below. I have also been painting the plinths, using halfords spray primer to get things started.
Whilst there haven't been any updates for a week or so things have been moving along. After enjoying listening to the Amish for a couple of weeks I have now filled all the screw holes and these have been sanded down as shown in the pictures below. I have also been painting the plinths, using halfords spray primer to get things started.
Attachments
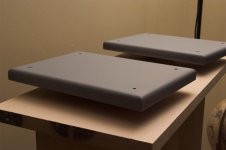
I applied two layers of primer then left overnight to harden, before sanding down and applying another couple of coats. These were again left overnight before the first couple of coats of satin black went on. As it was being applied it is very glossy and looked pretty good. When they dried they were exactly as I hoped they would turn out.
As with all things it this is not a strightforward process and I discovered that the edges were not as smooth as I would have liked. So they have been sanded back almost to the wood and the spraying has recommenced. I have attached photos of what they looked like before the sand down.
I'll be following a similar process with the back of the cabinets, though i am going to be less critical with these as I don't really expect people to be paying that much attention.
Attachments

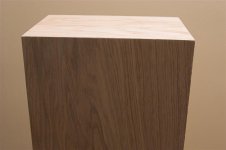
The final update of the night is the fact that my veneer has arrived! Very exciting... so I rolled it out to get a couple of photos of the beautiful european oak (crown cut) and I am not quite scared. It is very thin and very delicate easily splitting at the edges, so I am hoping I have plenty spare. To attach it to the cabinets I got an iron on glue film, which looks fairly strightforward, so I am hoping I can get that bit right at least!
If this works out as I hope then these are going to look gorgeous even if I do say so myself!
It is very thin and very delicate easily splitting at the edges, so I am hoping I have plenty spare. To attach it to the cabinets I got an iron on glue film, which looks fairly strightforward, so I am hoping I can get that bit right at least! If this works out as I hope then these are going to look gorgeous even if I do say so myself!
Attachments

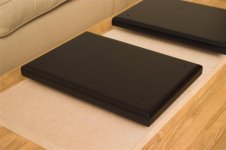
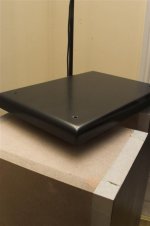
More spraying has been done and now the backs of the speakers are looking good. They'll get another couple of coats tomorrow night. And I have a final plinth... just the one as there was a bit of an issue whilst I sanded back the other one to get the edges smooth and the paint is not taking. So I am going to have to do a lot more work with that, but not to worry.
As well as the cabinets and the plinths the crossover box is going to get the same treatment so that it fits (looks) better in my TV unit.
As well as the cabinets and the plinths the crossover box is going to get the same treatment so that it fits (looks) better in my TV unit.
Attachments
Its not tightbond as far as I am aware. It comes in a large sheet with a paper back. You lay it over the piece to be veneered and with a warm iron you attach it to the work piece. It is then trimmed at the edges and the paper back removed. Then the veneer is placed onto the work piece and using the paper back from the glue as a protective layer a hot iron is run over the veneer and it is pressed onto the work piece (so it is like having iron on veneer, but you have to put the glue on yourself! )
The more I look at the photos of the veneer the more I like it. i was going to go with a wax finish for it like the rest of my furniture, however, I am concerned that this will leave the edges / joints in danger of being damaged. Also the wax is good, but if any water gets on it the wood swells and becomes messy, not so bad on a piece of Oak 25mm thick that you can sand back and rewax, not so good on 0.6mm veneer.
I have therefore chosen to go down the lines of using a satin varnish, which will give the level of protection i think they need. Depending on how that works out the rest of my furniture may get the same treatment. I now need to stay calm as it is all too easy to get excitied about getting them finished and rush the job and also to get scared and daunted by working with the veneer. I'll be working out if I have enough glue and veneer to do a test piece first. So this will be my Saturday job, wish me luck!

) The more I look at the photos of the veneer the more I like it. i was going to go with a wax finish for it like the rest of my furniture, however, I am concerned that this will leave the edges / joints in danger of being damaged. Also the wax is good, but if any water gets on it the wood swells and becomes messy, not so bad on a piece of Oak 25mm thick that you can sand back and rewax, not so good on 0.6mm veneer.
I have therefore chosen to go down the lines of using a satin varnish, which will give the level of protection i think they need. Depending on how that works out the rest of my furniture may get the same treatment. I now need to stay calm as it is all too easy to get excitied about getting them finished and rush the job and also to get scared and daunted by working with the veneer. I'll be working out if I have enough glue and veneer to do a test piece first. So this will be my Saturday job, wish me luck!
Interesting, this glue film. I haven't heard of it but it seems like a great idea. I use contact cement to veneer and have never had a problem.
I agree with you, veneer needs more protection. Using varnish will highlight the grain and colour of the wood also. Looks very good if you don't overdo it - 2-3 coats sanding in between gives a silky smooth finish without obscuring the feel of the wood.
Careful on your other furniture if they already have a wax finish you will probably not be able to varnish these as the wax will cause adhesion problems and is VERY difficult to fully remove.
Goodluck with the veneering
It has been very hard work as the glue film is not the easiest material to work with if you haven’t sealed the MDF with watered down PVA glue first. Once I got the hang of it things moved along, however, the veneer is very brittle and there is some minor filling to do in places. The hard part is going to be getting the holes cut out for the drivers due to the way the veneer splinters and there is only a thin section between the woofer and the tweeter. I have therefore, rightly or wrongly, decided to varnish this area now to help strengthen the veneer such that I can either cut or route out the holes neatly. It makes me very nervous, but I am sure it will be worth it judging by the way they look.
As you rightly say, the other furniture may be problematic with being waxed, lots of sanding required. I might give that a miss and choose a less time consuming hobby, like building starships (since you seem to be going with a Star Trek theme at the moment).
As you rightly say, the other furniture may be problematic with being waxed, lots of sanding required. I might give that a miss and choose a less time consuming hobby, like building starships (since you seem to be going with a Star Trek theme at the moment).
Attachments
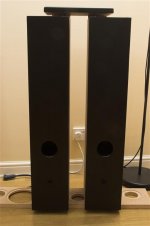
Well, they are starting to look reay good now... until you get close and inspect the edges!
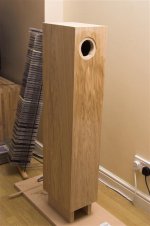
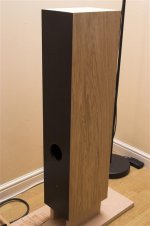
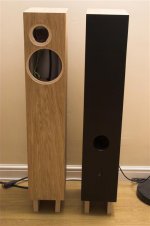
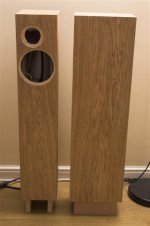
I have managed to get all the driver holes cut out and sanded back, which was a challenge where the veneer was more textured as they had a tendency to split or splinter. Still with a bit of sanding and using little fillets of veneer I managed to tidy them up a little. I'll get some wood filler at some point and make a better job of it.
They have had a few coats of satin varnish now which has brought out the grain nicely and makes me feel a little happier knowing that they are less likely to get damaged now. Whilst I feel I have learned a lot with the veneering I will think twice before doing it again... of course I have a tendency to forget how difficult things are pretty quickly
Anyway, a couple more photos. Later I'll have some with the drive units fitted and then I can sit back, relax and enjoy them again.
Attachments
Here endeth this journey!
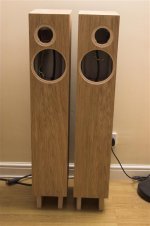
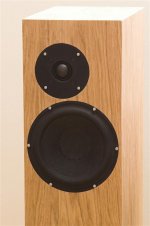
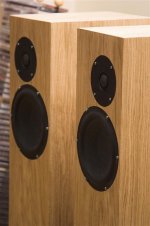
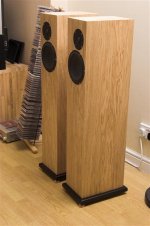
Well, here they are, drive units fitted and onto their plinths... I think they look gorgeous, but then I have just slaved over them, so I am biased! So was it worth it?

Need I say more?
Well, here they are, drive units fitted and onto their plinths... I think they look gorgeous, but then I have just slaved over them, so I am biased! So was it worth it?
Need I say more?
Attachments

Ole, thanks for the comments! Yes I am pleased, they sound great, Troels is to be commended on his design and Scan Speak for making such great drivers. I can see why the 8545 was the mid-range favorite for a long time. The 9700 is also sublime and handles cymbals and hi-hats so well.
Have you got a thread or pictures of your speakers? How have you implemented the 8545?
Have you got a thread or pictures of your speakers? How have you implemented the 8545?

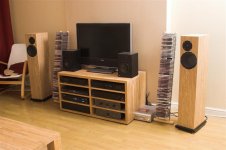
One question though... Where did the crossover go?
In the picture of the whole system there is a black box in the bottom left hand side, that is the crossover.
MJL21193, thanks... its been an informative journey that I can tell you. I am going to have to experiment more with veneer before I try something like this again.
- Status
- This old topic is closed. If you want to reopen this topic, contact a moderator using the "Report Post" button.
- Home
- Loudspeakers
- Multi-Way
- Amish 45/97 Construction Diary