my son thought they looked like CORK boxes!
Pictures to follow this weekend. Promise.
Please take a pic of the CORK boxes (and share that too), cos by the time you're done with the finishing, they'll look great anyway...
")
Thanks Toppsy! I'm sure your finished product will be just as beautiful as all your work (very).
I am going to make custom stands for mine to raise them to exactly the right height, as you mention. I'm not sure yet exactly what they are going to look like. I think I might like to have the jacks on the bottom of the cabinet so I can completely hide the speaker cable in the stand column.
I'd like to figure out the port dimensions for a 2" pipe so I don't have to order them from across the pond.
).I am going to make custom stands for mine to raise them to exactly the right height, as you mention. I'm not sure yet exactly what they are going to look like. I think I might like to have the jacks on the bottom of the cabinet so I can completely hide the speaker cable in the stand column.
I'd like to figure out the port dimensions for a 2" pipe so I don't have to order them from across the pond.
Thanks Toppsy! I'm sure your finished product will be just as beautiful as all your work (very
I am going to make custom stands for mine to raise them to exactly the right height, as you mention. I'm not sure yet exactly what they are going to look like. I think I might like to have the jacks on the bottom of the cabinet so I can completely hide the speaker cable in the stand column.
How about Speak-on terminals on the bottom of the box for a tasty installation ? Route a channel or Laminate 3 layers of ply for the support leg with a removable strip, held in place with velcro, or magnets as in this recent bamboo sculpture for BudP
I'd like to figure out the port dimensions for a 2" pipe so I don't have to order them from across the pond.
Doesn't Dave have a formula /spreadsheet for that somewhere?
Colin: them's sure gonna be pretty when they're done
Attachments
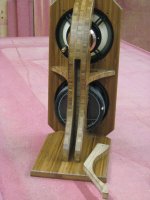
OK guys you wanted photos of the finished speaker and pedestal, minus the driver, port tube and terminals. Note I have yet to cover the bases of the stands. I decided to finish the veneer in a clear satin acylic varnish and a final waxing with Liberon Neutral Black Bison polish. Gives them a nice sheen without being over glossy.
Not the best of photos as it's getting dark here in the UK and close up flash doesn't do anything to the photos. But hey I'll take better pics when they are fully done and in natural day light (no flash).


Not the best of photos as it's getting dark here in the UK and close up flash doesn't do anything to the photos. But hey I'll take better pics when they are fully done and in natural day light (no flash).
The finish will bring them alive!
That is the FINISHED look! 2-coats of satin acrylic varnish rubbed down betwwen coats and a final waxing rubbed in with fine wire wool and light buffing to back off some of the varnish sheen.
Re bracing, i'm leaning toward one cross brace consisting of two 1.25" wooden dowels off centered on both x & y axis and about a third of the way down from the top of the box.
I plan on playing around with the port flair and tube shape, given less power compression with flared vs. straight, although to much flare would be counterproductive to that end.
I'd like to try a asymmetrical smaller radius flare or doughnut at the inlet/larger radius outlet.
Also interested in heating up the PVC tube and see if i can form a slight "hourglass" taper from the center the port tube outward toward the flared ends for lower noise/distortion. I'm sure i'll construct a few to try before settling on one.
I already have roundover bits for 1/4", 3/8" and 1/2" radius curves, at the very least i'll get the one that'll do a 3/4" but really want the 1" radius -
Bosch 85433M 2-1/2" Roundover Bit, Carbide Tipped
Some good ideas on the following link:
Port Flares
That is the FINISHED look! 2-coats of satin acrylic varnish rubbed down betwwen coats and a final waxing rubbed in with fine wire wool and light buffing to back off some of the varnish sheen.
yah, even in the best of hands, the direct flash from a single camera mounted unit doesn't do justice to the depth / life of grain & finish on the fine veneers - nice work always Colin
Ah ha, found a reasonably $$ carbide tipped 2.5"/1" radius round over bit! I hope it turns out to be a good one, will update when i build. http://www.ebay.com/itm/1-pc-1-2-Sh...ltDomain_0&hash=item27ca3572c8#ht_2205wt_1156
Doesn't Dave have a formula /spreadsheet for that somewhere?
I do. But not able to search out the URL ATM... likely in the microTower thread
dave
Not sure on the vent. I think I'm just going to use 2" i.d. PVC pipe and just give it a minimal round over, like 1/8". I guess I'll need to figure out how to adjust the size though for the 55hz tuning though. I have a Mac so Win isn't usable for me
I had a go in WinISD with this tuning. In a 16L BR box, your 2" pipe would be 3.375" long for a 55.5Hz tuning. 3.5" long would give you 54.8Hz, etc....
jeff
I do. But not able to search out the URL ATM...
http://p10hifi.net/FAL/downloads/Changing-Port-Size.pdf
dave

Steven, as mentioned in your PM to me. This design is by Scott.
Scottmoose on this forum (and others).
I am not at liberty to give the design specs/paramaters of these speakers freely on the forum. The stands are my own design and not that difficult a task for anyone who can draw a couple of compound curves to get the shape they want. Just remember to make the centreline of the curved pedestal vertical and both shelves central to the speakers.
However, Scott is prepared to share if you, or anyelse contact him direct on a one-to-one basis.
Colin
when You emailed me asking for a copy of the plan for these stands in June of this year I politely refused, explaining that they were commercial copyright of Vitalstates Ltd. I'm really not sure what you are trying to say to me here but I can only assume that by ignoring my answer you are trying to antagonise me.
To take the design of another person, a commercial design, and promote it for home construction would appear to fly in the face of copyright ownership, and could possibly lead to loss of revenue for the copyright owner. To then claim the design to be yours causes me to respond thus.
In your first post you allude to me being flattered , well surely the resulting emotion is mine by right, and in this case I am offended.
hma - picture gallery
http://www.vitalstates.org/diy/misc/amon-4.jpg
- Status
- This old topic is closed. If you want to reopen this topic, contact a moderator using the "Report Post" button.
- Home
- Loudspeakers
- Full Range
- Alpair12P gen2 standmount speakers