Dear Steve,Happy New Year from Miami!
RPG Modex Plates can’t be beaten!
nice to hear from you! Yes RPG plates look fantastic, but my money has been converted to concrete and cinema stuff...

So I am looking for some cheaper variants for experimenting...
BR, Toni
IXYS IXTH80N20L and IXTH48P20P models by David Zan
David gave me the permission to distribute the successful tested IXYS mosfet models.
Attached the SA2016 - VMOS IXYS asc file and the 2 models for the IXYS linear MOSFETs IXTH80N20L and IXTH48P20P models created by David Zan.
You can find the models also here: Better power MOSFET models in LTSpice
Many thanks to David Zan bringing the two linear mosfet from ixys into the light and for creating the ltspice models for them!
BR, Toni
Attachments
Last edited:
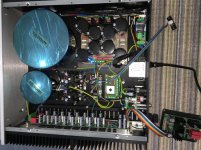
First power-up of my 120V mono build of astx's SA2014 amp. No smoke!
Unfortunately all my audio gear has been relegated into the utility room of our new house in Miami. It seems my wife is reneging on the deal we had re where I could place my gear made at time of purchase of the house. This is the problem with arriving 6 months after her. Possession is 9/10th of the law and she has taken full advantage. I will have to drag a speaker out to test the amp, perhaps with my iPhone as the source.
Unfortunately all my audio gear has been relegated into the utility room of our new house in Miami. It seems my wife is reneging on the deal we had re where I could place my gear made at time of purchase of the house. This is the problem with arriving 6 months after her. Possession is 9/10th of the law and she has taken full advantage. I will have to drag a speaker out to test the amp, perhaps with my iPhone as the source.
Attachments
Dear Steve,First power-up of my 120V mono build of astx's SA2014 amp. No smoke!
...
really really nice! Congratulation that it works out of the box!
Are you planning an iron shield between output stage and toroids?
I like your idea with the power switch. Can you post some detail pictures of the front mounting and steel-button?
Best regards, Toni
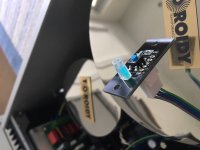
Wife still here. Protective plastic gone.
I wasn't planning anymore shielding. I have the output from the OPS to the speaker relay board running through rectangular iron tubing (visible in pic above) but that's it.
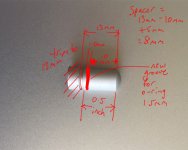
The front panel switch is rather simple. The boards are shown in this post. Basically anything can be used as a button to press the push-to-make SMD switch on the board. All it needs is an o-ring to stop the button from falling forward through the front panel (the board stops it moving the other way obviously). I have a bunch of these buttons but unfortunately they are meant for thicker than 10mm front panels and so I have to get them trimmed to size and a new groove cut for the o-ring to sit in. Oh to have a little lathe... This post has a pic of what the button looks like when finished. I have Modu do the mounting holes for the board threaded for standoffs, the holes for the button and led, and at the rear of the front panel the LED hole is wider so a piece of clear tubing can be slotted into the wider hole and run over the LED on the switch board. This just helps channel the LED light to the small hole in the front panel.
I wasn't planning anymore shielding. I have the output from the OPS to the speaker relay board running through rectangular iron tubing (visible in pic above) but that's it.
The front panel switch is rather simple. The boards are shown in this post. Basically anything can be used as a button to press the push-to-make SMD switch on the board. All it needs is an o-ring to stop the button from falling forward through the front panel (the board stops it moving the other way obviously). I have a bunch of these buttons but unfortunately they are meant for thicker than 10mm front panels and so I have to get them trimmed to size and a new groove cut for the o-ring to sit in. Oh to have a little lathe... This post has a pic of what the button looks like when finished. I have Modu do the mounting holes for the board threaded for standoffs, the holes for the button and led, and at the rear of the front panel the LED hole is wider so a piece of clear tubing can be slotted into the wider hole and run over the LED on the switch board. This just helps channel the LED light to the small hole in the front panel.
Attachments
Last edited:
...
The front panel switch is rather simple.
...
Yes: simple AND good! I like those nice details. Where have you got the buttons from?
Thx, Toni
Ah now there lies the difficult part. The idea came from my Theta Digital gear. I searched everywhere for something similar and could not find them. In the end, I begged Theta for some. Neal Feay designs their enclosures. Someone with a mini lathe could churn them out in a heartbeat.
Speaker testing completed. I never thought it would be so nice, even after such a long time away from my audio gear, to listen to just my little centre Egglestonworks Andra III playing one channel of music from my computer.
Waiting on modified front panel button to finish it all up and bolt down the lid. The first 120V SA2014 lives!
Waiting on modified front panel button to finish it all up and bolt down the lid. The first 120V SA2014 lives!
...
little centre Egglestonworks Andra III
...
If you call them "little" - how big are your speakers for the left and right channel?
Thx! What would you like to drink?Good!
Yes it is a wonderful experience listening at your amplifier!
BR, Toni
If you call them "little" - how big are your speakers for the left and right channel?
Oh the "centre" Andra III is just the tweeter and mid-range woofers of the Andra III (my front left and right). The two drivers are placed side-by-side rather than one above the other. (Chop the Andra across the middle and rotate the drivers.) I don't think they make it anymore but I have had mine 'upgraded' to match the Andra III. (My Andras are the original I upgraded to III. All stuff I could no longer purchase.) My rear speakers are the original Rosa. (They likely need to be upgraded/refurbished also.)
- Home
- Amplifiers
- Solid State
- 2stageEF high performance class AB power amp / 200W8R / 400W4R