6" diameter, not 6" focal length!
Thanks for finding all of those 6" focal length lens for me, but those would work with a 3.5" diagonal LCD! The lens I mentioned is an old 6" diameter ariel photography lens that has a focal length of about 23 inches (584 mm). These were used in some U2 spy plane cameras to expose 8" by 10" film.
OHP triplets are available very cheap, and they can be used to project 15" LCDs. Problem is, they all have a focal length around 325 mm, so they give you a large image from a short distance. Like a 100" diagonal image from a 98" throw distance. My media room needs a throw distance of 14 feet and has a screen area of 95" diagonal.
The longest large format projection lens I have found, can go up to 500 mm fl: 95" image from 12 feet (I may just have to go for one of these.)
But I just put together a lens mounting for the 571 mm fl 142mm diameter positive meniscus lens I got yesterday, and I am getting three-color-stripe screendoor all the way across the screen.
")
Guy, I don't understand what you mean.But I just put together a lens mounting for the 571 mm fl 142mm diameter positive meniscus lens I got yesterday, and I am getting three-color-stripe screendoor all the way across the screen.
DJ
three-color-stripe screendoor
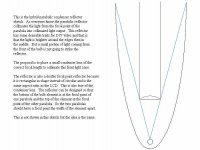
It focusses so well, that I can see the individual columns of red, green, and blue sub-pixels when I get a couple of feet from the screen, and it does that in the middle and all the way to the edges of the image.
In other words: It works pretty well!
Actually, now that I have fiddled with it a bit, I can see that the middle and the edges don't focus at exactly the same place. I can get either one really sharp, but it looks best in the compromise position with middle and edges not quite perfect. Masking out the extreme sides of the projection lens made it a lot clearer. (This discards the rays coming from the ends of the lamp arc.)
I am also seeing some "fogging" at the bottom of the screen: White letters light up a black background. I think that is probably because I am using a normal second surface mirror in the image path. (But I have no idea why I only see it at the bottom of the image!) I put it in there so I could see how big a first surface mirror to buy. Maybe I am seeing a light leak. I'll try adding some black cardboard around the condensor lens to see if that is the cause.
I am also seeing some "fogging" at the bottom of the screen: White letters light up a black background. I think that is probably because I am using a normal second surface mirror in the image path. (But I have no idea why I only see it at the bottom of the image!) I put it in there so I could see how big a first surface mirror to buy. Maybe I am seeing a light leak. I'll try adding some black cardboard around the condensor lens to see if that is the cause.
I think you might be correct in assuming it to be the mirror. The greater the angle of incidence the more the light will be reflected from the glass surface instead of the mirrored surface. So the bottom of your screen would appear to have two light sources, one from the glass and one from the mirror, more so than the top.
Good to here you are getting things to work. Are you using a single meniscus?.
DJ
Guy,
If your miniscus is a singlet lens the color bans are probably the
result of color abberation. Single lenses are not color corrected unless they have a complex aspherical surface. The different colors focus at a slightly different place because they each have a different degree of refraction.
This is the problem that multi element lenses seek to avoid.
If your miniscus is a cemented triplet then I would say the problem lies elsewhere.
Best wishes,
Hezz
great results now
Turns out, my fogging problem was spherical aberration from the condensor lens! I started playing with it's position to see if I could get rid of the unlit corners, and I could not get it close enough to the lamp arc. (I have a 15/8" diameter bulb and a hot mirror filter before the condensor lens location.) So I tried replacing the 165 mm fl condensor with a 200 mm fl lens, and then a 220 mm fl lens. Still not wide enough to fully light the corners. I gave up for now on using a condensor lens, and readjusted the location of my fresnels to focus on the lamp arc without it.
This is a bit dimmer (with a 15" LCD, condensor doesn't collect all that much more light), but it became much sharper. All the fog is gone. I do see second surface reflections on white letters against a black background. They appear as ghosts just on the top edge of the letters: exactly as I expected.
The three color stripes I can see when it is sharply focussed are not chromatic aberration, because I can see it right in the center of the screen! It is the fine structure of the LCD pixels: Red, green, and blue columns. It looks just the same at the center, and all the way to the top, bottom, and sides of the image. of course, this is a 1024 by 768 LCD, so I have to be just a foot away to see the subpixel columns.
So this tells me my hypothesis about lenses is correct: You don't see many triplets above 500 mm fl, because nobody needs a triplet with that low a magnification. For a 571 mm fl lens with a 15" LCD, a 100 mm diameter positive meniscus works just fine, because the field angles are so low. I also tried the ~525 mm fl symmetrical duplet I made for $20, and it works very well, too.
Guy,
good to hear of your experiences. It seems from other other
builders experiences that I have read over the last couple of years that the light engine is the hardest part to get dialed in.
If you have to get within one foot of the screen to see the screen door or the individual pixels that sounds like pretty good performance. From many of the sub 2000 dollar front projectors you can see the screen door from as far away as ten feet.
I am posting my lastest light engine idea but the second part of the light recycler will have to wait because I had the TurboCad sketch nearly completed and I forgot to save it when my computer suddenly and mysteriously rebooted. Must have been some hardware thing. I lost about a 3/4 an hours work and I am too lazy to go and redo it right now.
Hezz
Attachments
Also,
If you have a good quality picture but it is kind of dim you can build a high quality high gain screen for a small investment.
I plan on doing this so the projector can be watched in the daytime. The guys who are building the lower resolution projectors out of televison sets have dome up with some good designs. One poster named Prof even staed that his screen which has a gain of about 8 improved the overall color clarity and contrast ratio.
I am planning on using this method but I haven't tried to build it yet.
For good viewing what the initial light wave hitting the wall needs is good diffusion. But to get high gain you need high reflectivity.
So here's my plan. Once I get the correct screen size measured go and buy a thin piece of clear acrylic. This should be less than 1/8 inch thick and preferably about 1/16 inch thick.
Then get a random orbital sander and rough up the whole sheet on one side only with not too low of sandpaper grit like 150 - 200.
After the one side is fully sanded and the surface has become opaque it should be washed of all plastic residue. Then it can be tried like this or lightly sand blasted with a cheap portable hand held sand blaster to give the surface a more satin finish. Then clean the plastic again to remove all loose plastic particles.
Now reflective mylar is bonded to the back of the sheet that wasn't sanded with clear contact cement or spray adhesive.
This completes the screen and it can be bonded to any stiff light frame to hang on the wall.
Hezz
high gain screen ideas
The small screendoor pattern is just because this is a 1024 by 768 LCD, running in the native resolution with a rescaler. Screendoor is a good thing: It means you have a projector that can really focus sharply.
Regarding the high gain screen idea, there is a thread on this somewhere here. I remember reading about somebody spraying the wall with aluminum paint, and then putting a thin coat of brilliant white over it. I think the result will be similar to your proposal.
Another idea is to get some reflective glass beads (3M makes them), and add those to a clear coat you put on over a brilliant white painted wall.
One thing to keep in mind: The higher the gain, the lower the viewing angle. If you need a lot of people in the room to see the screen, then you may not be able to use a high gain screen.
Second thing to keep in mind: The higher the gain, the brighter your 350:1 (or whatever) blacks are going to look. If you crank the screen gain up too high, all the black areas of the image will look washed out. I just went and setup my aluminized slide projector screen in front of my video projector's flat off-white painted wall to check on this. The image is about twice as bright, but so are the blacks. I like the version on the wall better.
This is what I always thought would be the case but the Prof screen design seems to counter the typical logic. What happens in this hybrid design is that the viewing angle is not reduced with high gain and the contrast ratio is even increased with the high gain screen.
This is how it works.
The first surface is diffuse and white enough so that the image striking it will act mostly like an image hitting a standard white screen. In fact the bumpiness of the surface acts like glass beads. Now, the material may seem white but it is actually transparent so a lot of light still passes through it to hit the reflector. In order for this to have the best clarity the first and second surface should be quite close together.
Second, because the light hitting the reflective surface is much reduced in brightness it needs to be as highly reflective as possible. The more like a mirror the better. Shiney paints are not reflective enough.
When the light is reflected back it goes through the roughed first surface and is diffused even more thereby increasing the angle of view further.
You get both high gain and high viewing angle. And the extra diffusion increases the darkness of the blacks.
Hezz
Hezz's screen idea
Okay, I sanded one side of a piece of 0.093" lexan I had in the scrap pile, until it was pretty much translucent. I had to use 100 grit to get anywhere, since lexan is much tougher than acrylic. Then I put a piece of 98% reflective mylar film on the non-sanded side.
I put it up against the flat white painted wall I am using as a screen. The light areas in the image are definately brighter, and the dark areas do not look any more washed out. So the premise looks good.
One problem I did notice: It also has a very bright reflection that is just a few degrees wide. I think this would translate into a bad hot spot that would appear at the point halfway from the center of the image to a point exactly perpendicular to where your eyes are. This may just be a matter of getting the diffusion layer less transparent, but I wonder if that would be very easy to do with a sanding process. It might be better to find some uniform material to use as the diffusion layer.
Just for a comparison, I replaced the mylar with aluminum foil. The shiney side resulted in a very strong hot spot reflection. But the matte side of the aluminum foil against the lexan really worked pretty well: Brighter than the flat painted wall with no hot spot reflection. You might want to try that. Or maybe try sanding both sides of the acrylic.
Keep us posted if you do figure out a good implementation!
Here is the guide to the high gain screen, i was going to build one just haven't had the time yet. http://www.diyprojectiontv.com/THE_ULTRA_HIGH_GAIN_SCREEN.pdf And a link for the all the guides . http://www.diyprojectiontv.com/
I went with 75% light silver 25% peral with my screen, the results werevery nice. Brighter and the blacks were deeper.
Clinton
I went with 75% light silver 25% peral with my screen, the results werevery nice. Brighter and the blacks were deeper.
Clinton
Guy,
good work. This makes me feel that the sanding alone is not enough as it does not created quite enough surface irregularity.
If you try sanding both sides let us know how it works. Also you can get a cheap handheld sandblaster at harbor frieght tools if you have an air compressor. This will make a deeper irregularity more like glass beads in the surface than the sanding alone.
I think the ideal surface to emulate is frosted glass which is essentially sand blasted glass. Also, as I recall the Prof did use some kind of translucent bumpy plastic material. It has a name but I forget it.
Hezz
Hi Guys,
I've just come across your discussions on my UHG screens....
I joined this forum a long time ago, but I spend all my time on the development of DIY TV Projectors, at the MSN forum.
I think I can save you a lot of time and money by explaining a few things about my screen design...
There are two basic types....
One consists of an acrylic mirror reflector, with a sheet of single sided matte acrylic on top as the diffuser....
The other is the same except a white "Tulle" material is placed betwen the two acrylic sheets...
The white Tulle ( which is like a very fine net and used on bridal gowns ), has the effect of reducing the gain a little, and increasing the viewing cone, with the introduction of white to the screen material...
This latter type would be more suitable for your higher output LCD projectors.
There is a down side however, that you have alluded to....that is there will be warm-spotting....
Both types of screen MUST be curved to be effective.
If you are prepared to go to this extent, then the results are well worth it...
I estimate the gain to be higher that that of the "Silver Star" screen
I don't advise you to use a double sided matte diffuser, because you will find that the image will be reproduced on both sides of the acrylic diffuser, thereby producing almost a double image.
I hope that is of some help.
Prof.
Well guys,
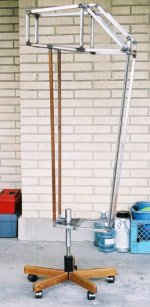
not a lot is happening at the moment on the projector as the wether is bad and I have to work outside. I did start working on the DIY first surface mirror. The piece of aluminum cost me 30 USD so it will be a little bit more expensive than buying one but there are some advantages. First the mirror is exactly the size that I need and since this projector frame can accept 17 inch widescreen LCD and 15 inch 4:3 and widescreen I will have a mirror that will work with any LCD size that fits the frame.
Since it is going to cost about 700 - 800 USD to get the high resolution 1920 x 1200 LCD in 16:10 aspect ratio. I am thinking about getting a cheaper used 4:3 15 inch LCD to get started. Then I can upgrade. I will built an anamorphic lens to squeeze the 4:3 picture into 16:9 and 2.35:1.
Here is a picture of the frame during construction.
Attachments
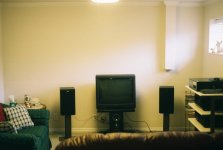
I have had to do some major reorganization for this projector project. First I put the prior TV stand and equipment rack over agains't the right hand wall because it was too high to allow for an image to be projected on the wall. The rack was a custom made one the I built and now it works pretty good with the HTPC on top instead of the TV.
In this picture you can see the HT layout that I am trying to achieve. I rebuilt my Madisound center channel speaker into a custom TV stand/center speaker and it works really well except that I think I still need to lower the TV about four more inches.
Here is a picture of the HT layout as of this date. I have some customed designed speakers that I am going to build in the planning stages and I have designed a two way center channel stand that will drop the TV down about four more inches.
Hezz
Attachments

- Status
- This old topic is closed. If you want to reopen this topic, contact a moderator using the "Report Post" button.
- Home
- General Interest
- Everything Else
- The Moving Image
- DIY Projectors
- 17 inch 16:9 assault on high end project