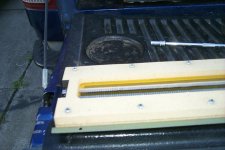
Working on new 2-way ribbon, with cone woofer. finished the midrange ribbon
7my alu one paper, 75cm long 12,5 cm wide. The tweeter will be 12mm*750mm. the woofer AE dipole 18".
AB, what method ae you using to make those diaphragms....
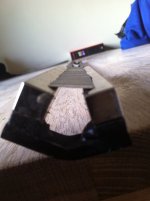
This is how the tweeter ribbon will look like. The ribbon will be attached to the
magnetes by using nano iron in the glue.
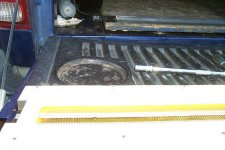
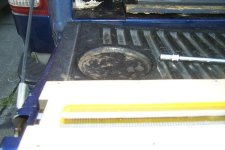
Why the curve ...?
AB, what method ae you using to make those diaphragms....
Why the curve ...?
In denmark you can buy alu foil with thin paper in the supermarket.
I cut alu strips and tape them together one the paper side. Then i lay thin paper one the alu side and brush it with thin glue.Then the tape is removed cautiously.The paper that originally sat on aluminum is removed with water.
I have made the magnets curved because no paralelle faces. Magnets closer together. The ribbon touches only slightly.Ribbon is magnetic. To make the a better magnetic field, and dampen resonances in the ribbon.
Last edited:

Is this something similar we can use for the ribbon with mylar glued into it -
Amazon.com: CAP 2 mil Mylar Reflective Film - 25 feet x 50 inches: Patio, Lawn & Garden
Thanks.
Srinath.
Amazon.com: CAP 2 mil Mylar Reflective Film - 25 feet x 50 inches: Patio, Lawn & Garden
Thanks.
Srinath.
Yoy can buy 25my. 0,5 mil . mylar selfadhesive here:Psp Mylar Tape 50mm X 3m - Clear - Marine Tapes - Other Chandlery
Bernt Båndsei.
Bernt Båndsei.
1 mil too
Also available in 1 mil - obviously its too heavy ... its for garden reflective sheeting ...
Cool.
Srinath.
2mil (0.002") seems too heavy.
Also available in 1 mil - obviously its too heavy ... its for garden reflective sheeting ...
Cool.
Srinath.
Here is the 0.5 mil mylar selfadhesive:http://solutions.3m.co.uk/wps/portal/3M/en_GB/ElectricalMkts/ElectricalSupplies/SolutionsFor/OEMSolutions/InsulatingTape/PolyesterTape/#
Bernt Båndsei
Bernt Båndsei
There is Aluminized Mylar available. I bought a 12 micron, 24" wide x 400 feet for $30. I have tons left after a few experiments.
I have to try a 1" wide and 1/2" wide strip of it to see what resistance I get.
I used it for a few ESL diaphragm with OK results.
The roll I got came from a vendor that supplies message parlors with reflective blankets.
I have to try a 1" wide and 1/2" wide strip of it to see what resistance I get.
I used it for a few ESL diaphragm with OK results.
The roll I got came from a vendor that supplies message parlors with reflective blankets.
Oooo check this out - I pulled the carver ribbon apart yesterday.
Cool.
Srinath.
Cool.
Srinath.
Attachments

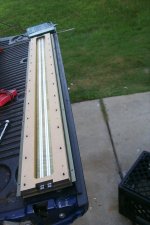
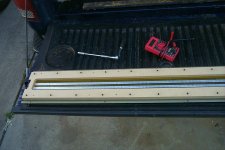
The first couple of modifications I am going to make as well as some tools I would be fabbing are in the interest of taking it apart easier, and putting it back easier and without failure.
To that end.
1. Get the mother of all glues. Maybe even 2 sided emblem tape. Or the spray on with spray hardener emblem adhesive.
2. Get Little plastic or wood dowells cut to keep the magnets the same distance across and get them glued in as well. That way you wont have them go crooked like mine did.
3. Get long bolts. So you can use like 8-10 to bolt em in wide apart and set a 2X4 on it then weight it and bolt it all in. The glue and spacers etc will keep en from dislodging.
I also have 1/2 a mind to re fab this whole thing with neo's and steel tubing all of which will be bolted ito place. Nothing to come apart while assembly.
The reason this is a little daunting for people is that this is a whole lot of moving parts that need to stay put, and its all sandwiching a delicate item.
I'm gonna make the delicate part stay put and the moving parts stay put and get it to where it works as intended but doesn't threaten to come loose and tear up stuff.
Cool.
Srinath.
- Status
- This old topic is closed. If you want to reopen this topic, contact a moderator using the "Report Post" button.
- Home
- Loudspeakers
- Planars & Exotics
- 0.6my aluminium ribbon