I'll let Wesayso respond in detail to mayhem13 because it's his thread. Suffice to say I've heard your concerns before and simply don't agree. Is there any point in rehashing the old discussion?
I have built massive horn-loaded systems, OBs, single-driver full range speakers, multi-way speakers, and coaxial speakers. I am not trying to show off, I am saying that I myself have built many different types of speakers so I am not biased against any particular approach. There is no doubt in my mind that my current floor-to-ceiling arrays (coupled with DSP) are the best speaker I have heard. The other approaches can be made to sound very good also. But in the home environment, the floor-to-ceiling arrays are making the right set of compromises.
I totally agree!
One of the reasons why this is so could be: Lacking of notoriously problematic crossovers with their phase problems and sudden change in directivity.
I totally agree!
One of the reasons why this is so could be: Lacking of notoriously problematic crossovers with their phase problems and sudden change in directivity.
Plus the separate drivers having to do next to nothing each, making a clean CSD plot and low distortion, especially in the mid frequencies, the even loading of the room without significant lobes, pleasing sound everywhere.
Absence of floor and ceiling reflections help immensely.
You can't escape the comb filtering but as it is moved way up at listening distances I have never experienced it as being degrading in SQ.
It just works! I agree, this is my favourite set of compromises so far. Can't think of an alignment that can do the same. But it needs good enough drivers that are small. The TC9 fits that bill perfectly. If money would be no issue I'd love to see what the Scan Speak 10F could do under similar conditions.
Is there any minimum number of drivers required for a line-array? I would like to build a zigmahornet-styled speaker with 3-5 drivers each speaker.
I imagine the more speakers in a line array, the less floor/ ceiling reflections?
Size of the driver is important to get them close together, the numbers are to fill the floor to ceiling length for at least 70% or more. Than you benefit from all the advantages we speak of. So yes, more speakers is better.
Using less drivers you run into other problems. I wouldn't do shorter arrays personally. But you could try it, maybe apply some shading. I looked up the Zigmahornet. Personally I wouldn't use a ported enclosure but I understand why people do that. It does not fit my goals, but there are enough people that would never consider DSP as part of their chain.
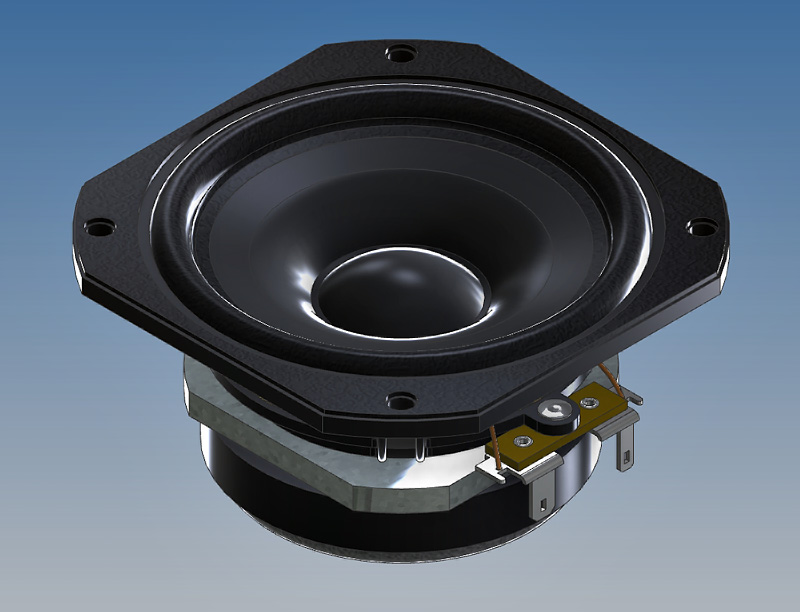
I got a request in PM for the 3D model I made of the Vifa TC9 FD18-08. I've had similar requests before and made a "branded" version to share.
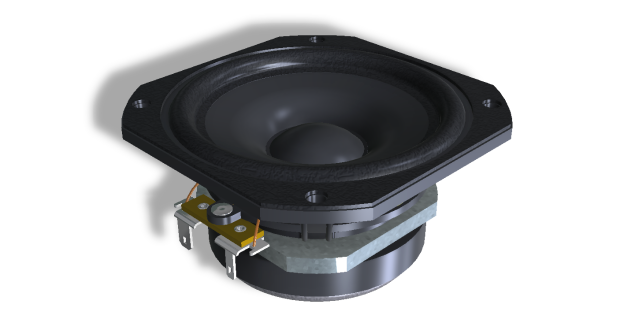
On the magnet and basket spokes it will read: Vandermill Audio
Hope you guys will keep that embossed in there and not just run away with my work") .
.
Here's the model: http://www.rsr-concepts.com/diyma/Vifa-Branded.zip
So how many have bought a huge amount of drivers in this TC9 sale?
I wish I could have... no fun being broke!
On the magnet and basket spokes it will read: Vandermill Audio
Hope you guys will keep that embossed in there and not just run away with my work
.Here's the model: http://www.rsr-concepts.com/diyma/Vifa-Branded.zip
So how many have bought a huge amount of drivers in this TC9 sale?
I wish I could have... no fun being broke!
Just got the email that the 40 I ordered are on the way. Now to figure out what I want to do for the enclosure. I like your laminate style enclosure a lot but I'm not sure if I would be biting off more than I can chew.
Wes
Well, like I said: you'd need to be a little crazy. But CNC or laser cutting could work? You'd only have the glue job after that etc. That's do-able.
I had my templates cut with water jet cutting. They claim to do wood too but somehow I didn't want to do it that way, it didn't feel right to get that wood all wet. Bendable ply in layers maybe?
I also liked koldby's all aluminium enclosures. I'd rather have a bit more volume (about 2 liter for each driver) bit it was a very good idea with some damping of the walls. The alu/butyl damping mats used in car audio come to mind like Silent Coat. I actually used that in my build, the 4 mm version.
WMD916,
I know what Wesayso looks complex as far as building the enclosure seems but if you think about it you could do a few simple things to make it happen. There are only really a couple of different pieces of wood, they are just multiplied by the number needed to make your array length. With a simple band saw and a router you could make all these parts. With a template and a router it would just be a matter of making lots of dust! you rough cut the individual pieces and then make them to the final shape with the router and a set of simple templates for the router to follow. If that isn't something you would want to do I would think you could find a CNC woodshop who could do this rather simply. The material costs for the wood isn't that great, it is just producing that mass of individual pieces that makes this look overwhelming. A nice router could do the majority of the production and a simple tabletop type of bandsaw would do the rough cutting. Drill a hole in the middle to start the router for the inside section and go to town.
I know what Wesayso looks complex as far as building the enclosure seems but if you think about it you could do a few simple things to make it happen. There are only really a couple of different pieces of wood, they are just multiplied by the number needed to make your array length. With a simple band saw and a router you could make all these parts. With a template and a router it would just be a matter of making lots of dust! you rough cut the individual pieces and then make them to the final shape with the router and a set of simple templates for the router to follow. If that isn't something you would want to do I would think you could find a CNC woodshop who could do this rather simply. The material costs for the wood isn't that great, it is just producing that mass of individual pieces that makes this look overwhelming. A nice router could do the majority of the production and a simple tabletop type of bandsaw would do the rough cutting. Drill a hole in the middle to start the router for the inside section and go to town.

I used 3 different shapes, made by these 2 templates. Having the front open meant I could interlock them to save wood. The semi closed ones are 15mm birch ply, the chamber walls (same profile for both, just stacked upside down) are 18 mm ply. All together this makes the spacing ~ 85.5 mm center to center.
128 pieces make up one array.
On the table you see the router bit with bearing that's used to follow the templates. I would have loved to have a band saw, I used my jigsaw (and that was actually the least pleasing job) to make the rough cuts. Leaving about 5 mm for the router bit to cut. A rough cut sample can be seen under the right template. For each repeating job make some sort of template or guide tool. That saves time and gains precision.

Last edited:
Wesayso,
I'm wondering how much real advantage there was to using the Birch ply over just making this from MDF? It would be much cheaper with the MDF, much easier to finish the outside surfaces and I'm not sure you are getting that much extra hoop strength from using the plywood in that wall thickness. The MDF would be heavier so you would actually have some added mass in the walls. Just an idea for those who want to copy your design but don't want to pay for all that Baltic Birch and most of it is hitting the ground as waste. It would relieve someone of having to seal all those ply layers and you could easily use wood veneer to finish the outside of the enclosure or paint them without having to resort to the epoxy step you had to take. Just my ideas looking in from the outside.
I'm wondering how much real advantage there was to using the Birch ply over just making this from MDF? It would be much cheaper with the MDF, much easier to finish the outside surfaces and I'm not sure you are getting that much extra hoop strength from using the plywood in that wall thickness. The MDF would be heavier so you would actually have some added mass in the walls. Just an idea for those who want to copy your design but don't want to pay for all that Baltic Birch and most of it is hitting the ground as waste. It would relieve someone of having to seal all those ply layers and you could easily use wood veneer to finish the outside of the enclosure or paint them without having to resort to the epoxy step you had to take. Just my ideas looking in from the outside.
Last edited:
WMD916,
I know what Wesayso looks complex as far as building the enclosure seems but if you think about it you could do a few simple things to make it happen. There are only really a couple of different pieces of wood, they are just multiplied by the number needed to make your array length. With a simple band saw and a router you could make all these parts. With a template and a router it would just be a matter of making lots of dust! you rough cut the individual pieces and then make them to the final shape with the router and a set of simple templates for the router to follow. If that isn't something you would want to do I would think you could find a CNC woodshop who could do this rather simply. The material costs for the wood isn't that great, it is just producing that mass of individual pieces that makes this look overwhelming. A nice router could do the majority of the production and a simple tabletop type of bandsaw would do the rough cutting. Drill a hole in the middle to start the router for the inside section and go to town.
I have everything except a band saw. I do have the jigsaw but that would be a huge process. I would also have to polish up on my Sketchup skills to design the templates. I keep going back through this thread to make sure I'm not missing anything. Once I have a plan in place and start making some dust I will post it up. Thanks for all the input.
Wes
I made mine (or designed mine) to be three sided but that's because it was going to go into the corner:
http://www.diyaudio.com/forums/multi-way/284371-corner-floor-ceiling-line-array-using-vifa-tc9.html
You can make it as complex or as simple as you want but pay attention to things to the important things. You could make a simple tall box and apply constrained layer damping to damp the cabinet panels. The TC9 has a non-round frame. How will you handle that? Flush mounting is not simple. If you rear mount, it has to have a smooth transition to the outside. Wesayso has done that.
WMD916,
Perhaps Wesayso would send you a copy of the template layout? That would take that task out but that is something that you may want to do yourself if you want to change the look for your own taste or to change the internal volume for a specific speaker you may have in mind. A simple bandsaw isn't that much money and would surely make life a lot simpler, a jig saw is a lot of work, of course it would work but I'd get tired of pushing one around that many pieces. At the same time you may be really surprised how cheaply some CNC wood-shops would cut all those pieces for you.
Perhaps Wesayso would send you a copy of the template layout? That would take that task out but that is something that you may want to do yourself if you want to change the look for your own taste or to change the internal volume for a specific speaker you may have in mind. A simple bandsaw isn't that much money and would surely make life a lot simpler, a jig saw is a lot of work, of course it would work but I'd get tired of pushing one around that many pieces. At the same time you may be really surprised how cheaply some CNC wood-shops would cut all those pieces for you.
Last edited:
We could start a debate about the materials but a fact is: I hate MDF. I wanted something more rigid to hold the baffle etc. Plus the way I stacked these would be in the worst direction for MDF potentially soaking up moisture. I did briefly think about MDF, but remembering the last job I did with it...

made me reconsider and use the birch ply...

Sub enclosure for my Car.

Vibration damped mounting construction.

Carpet back in...
The inside of the famous smugglers box in Porsche 911's where the sub is located:

made me reconsider and use the birch ply...
Sub enclosure for my Car.
Vibration damped mounting construction.
Carpet back in...
The inside of the famous smugglers box in Porsche 911's where the sub is located:
Wesayso,
I am not going to argue materials with you. That is for each person to make that determination I guess. I have worked with both materials and I could see a combination of both materials so your baffle was still made of the ply in that section. I'm just thinking out loud here and throwing out suggestions for someone who perhaps doesn't want to spend the money for the Brich ply which you and I know is not cheap. Here in the US it is real expensive and the quality of some of it is not great. American plywood is junk, I wouldn't consider using that, it is full of voids and filler sections. I've used pallet loads of imported Baltic Birch for other things I have manufactured and finding a good source wasn't easy here. I think your design is great, I don't suggest you change a thing. The only time I have had problems with moisture and MDF is when I've done piano black finishing and then you have to seal every surface inside and out or you are not going to be happy with the end results.
I am not going to argue materials with you. That is for each person to make that determination I guess. I have worked with both materials and I could see a combination of both materials so your baffle was still made of the ply in that section. I'm just thinking out loud here and throwing out suggestions for someone who perhaps doesn't want to spend the money for the Brich ply which you and I know is not cheap. Here in the US it is real expensive and the quality of some of it is not great. American plywood is junk, I wouldn't consider using that, it is full of voids and filler sections. I've used pallet loads of imported Baltic Birch for other things I have manufactured and finding a good source wasn't easy here. I think your design is great, I don't suggest you change a thing. The only time I have had problems with moisture and MDF is when I've done piano black finishing and then you have to seal every surface inside and out or you are not going to be happy with the end results.
The in between braces are holding the baffle, it would be easy to keep that part a stronger material. I wouldn't do it any different than I did but I can imagine others starting a project like this would do things a little different/easier.
I liked the materials I worked with here, obviously not cheap, not even here, it was void free Baltic ply B/B grade. I'd even do the double aluminium baffle again, but this time use butyl rope as damping from the start. The mass loaded vinyl with neoprene could not match the butyl rope in damping. It's sort of a floating baffle construction an I do believe it has its benefits. Plus I wanted that part to be even more rigid. Turned out pretty good.

A shot of the back baffle holding the enclosure in shape during the epoxy stage. That piece was also used for the glue job. It shows some planning can go a long way. The chamfering of the back baffle wasn't done yet.
A lot of fun with the router:

If I see these pictures again I'd almost run into the garage and do it again. I loved building these.
I liked the materials I worked with here, obviously not cheap, not even here, it was void free Baltic ply B/B grade. I'd even do the double aluminium baffle again, but this time use butyl rope as damping from the start. The mass loaded vinyl with neoprene could not match the butyl rope in damping. It's sort of a floating baffle construction an I do believe it has its benefits. Plus I wanted that part to be even more rigid. Turned out pretty good.
A shot of the back baffle holding the enclosure in shape during the epoxy stage. That piece was also used for the glue job. It shows some planning can go a long way. The chamfering of the back baffle wasn't done yet.
A lot of fun with the router:
If I see these pictures again I'd almost run into the garage and do it again. I loved building these.
Last edited:
Earlier today...
Tempting, VERY tempting! As many of You already know, I am considering alternate drivers for my All Aspiring Array project. Even so, I could do a "beta" run on cabinet design (which I have not completely figured out), which would be a whole lot better then my slap together "Cheap and Cheerfuls". The TC9 arrays can be my fronts channels and the "Cheap and Cheerfuls" can be moved to the back channels. I could then focus on getting my career on a better path, help my daughter get an education, And save up for my ultimate build. I can improve the cabinets more for the All Aspiring Array and still have no loss for the TC9's, as they can be my surrounds.
Okay, now the Devil's Advocate: Lots of unfinished Audio projects as is, lots of Dental work coming, still works lots of jobs...
Hours pass...
Always kept these drivers in mind...
Always keep an eye on them...
25 TG9 10-08 for the center, so I might as well just build side and back + atmos channels
Arrays for ambient channels would have been better as I do notice the distance to speaker plays a larger role with the point source ambient channels.
$ 9,00 a piece... new spec sheet, lighter cone, stronger motor.
Tempting, VERY tempting! As many of You already know, I am considering alternate drivers for my All Aspiring Array project. Even so, I could do a "beta" run on cabinet design (which I have not completely figured out), which would be a whole lot better then my slap together "Cheap and Cheerfuls". The TC9 arrays can be my fronts channels and the "Cheap and Cheerfuls" can be moved to the back channels. I could then focus on getting my career on a better path, help my daughter get an education, And save up for my ultimate build. I can improve the cabinets more for the All Aspiring Array and still have no loss for the TC9's, as they can be my surrounds.
Okay, now the Devil's Advocate: Lots of unfinished Audio projects as is, lots of Dental work coming, still works lots of jobs...
Hours pass...
Always kept these drivers in mind...
Always keep an eye on them...
Attachments


Pulled the trigger... lCome On! $576 is a steal!
Opps, just realized the photos for this post is on the other post! Explanation below.
I think I have lost my mind, mind You!
After 20 mins on the phone with Parts-Express, I pulled the trigger: 64 TC9's on the way - (30/array) - four extra, just in case. They could not give an additional discount, as I am not a wholesaler. But I did get an additional $15 promo code off. Total sale for the order with free shipping is: $561, I can not go wrong! (cheaper then my custom Alpairs for the Avebury!).
Just spent $746 last month on my first one build also. Moving forward in my audio this year. Glad I am going to Evening shift in one week, so I will have my right mind back to build this stuff.
You guys got that right: No more Mid Nights, No more Mid Nights, No more Mid Nights, I can sleep again! I can be human again!
Now to the photos in the post above...
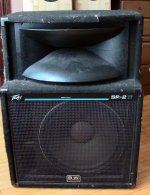
I got these Peavey SP-2s last spring to play with - first photo.
The passive cross-overs are broke, and I can not be bothered to repair them, so I have not had a chance to hook them up yet. But they do have direct inputs for an active cross-over, so once I get my First One going, I will be able to hook them up actively, using JRiver's DSP. I can even time align the unaligned horn. So we will see how a horn system tuned to my room will sound compared to: first my cheap and cheerfuls, and eventually, my TC9's, which I will give a name to when it comes. Something that has something to do with finding greatness with-in our means.
On our way to that greatness there will be some horn to array comparisons.
The last three photos are of the venue that I spoke of in post #1843. No, that is not me in the photos, but one of my musician friends. Also, I forgot to mention the speakers in the show: Yamaha club series with the 15" mids on top and sonic 18" woofers (local Wisconsin company) on the bottom.
Now relapsing, wiat did I jsut buy a bunch of speakers!
Holy Cow, now I have four builds to finish:
Avebury
777 Open baffles
First One Amp
TC9 Array
777 Open baffles are on hold, as my brother is moving to a new house and it looks like he is giving up the media room. But, who knows, he may prefer the TC9 array anyway, (I know my nieces would) and that could fund my Aspiring Array, IF indeed I Really feel the need to after building the TC9.
Allen
Opps, just realized the photos for this post is on the other post! Explanation below.
I think I have lost my mind, mind You!
After 20 mins on the phone with Parts-Express, I pulled the trigger: 64 TC9's on the way - (30/array) - four extra, just in case. They could not give an additional discount, as I am not a wholesaler. But I did get an additional $15 promo code off.
Total sale for the order with free shipping is: $561, I can not go wrong! (cheaper then my custom Alpairs for the Avebury!). Just spent $746 last month on my first one build also. Moving forward in my audio this year. Glad I am going to Evening shift in one week, so I will have my right mind back to build this stuff.
You guys got that right: No more Mid Nights, No more Mid Nights, No more Mid Nights, I can sleep again! I can be human again!
Now to the photos in the post above...
I got these Peavey SP-2s last spring to play with - first photo.
The passive cross-overs are broke, and I can not be bothered to repair them, so I have not had a chance to hook them up yet. But they do have direct inputs for an active cross-over, so once I get my First One going, I will be able to hook them up actively, using JRiver's DSP. I can even time align the unaligned horn. So we will see how a horn system tuned to my room will sound compared to: first my cheap and cheerfuls, and eventually, my TC9's, which I will give a name to when it comes. Something that has something to do with finding greatness with-in our means.
On our way to that greatness there will be some horn to array comparisons.
The last three photos are of the venue that I spoke of in post #1843. No, that is not me in the photos, but one of my musician friends. Also, I forgot to mention the speakers in the show: Yamaha club series with the 15" mids on top and sonic 18" woofers (local Wisconsin company) on the bottom.
Now relapsing, wiat did I jsut buy a bunch of speakers!
Holy Cow, now I have four builds to finish:
Avebury
777 Open baffles
First One Amp
TC9 Array
777 Open baffles are on hold, as my brother is moving to a new house and it looks like he is giving up the media room.
But, who knows, he may prefer the TC9 array anyway, (I know my nieces would) and that could fund my Aspiring Array, IF indeed I Really feel the need to after building the TC9.Allen
Final rely for the day
Wesayso,
In regards to your build: I realize You went with the lamination technique because of the diffusion chambers you wanted to create. Is there another advantage to this construction technique sonically? I have a different technique planned, but I am interested in learning more about why You chose this technique. You are more then welcome to link me to the answer, as I am dead certain in is in this thread somewhere.
And what about the shape?
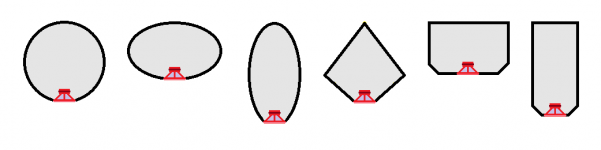
I have these shapes in mind (see drawing):
In a single driver application, the first one, followed by the either of the last two would be better for cabinet defractions. But this is an array, so I am thinking they all would work well. What I want to dig into is whether to go wide or narrow, gradual radius or small, or big bevels verses small bevels... I know wider cabinets help with bass reinforcement, but that is not as important for these arrays. I like the circle the best, followed by the diamond. I am thinking mostly in terms of outside cabinet performance, as I will be including some type of diffusion chambers inside also.
Wesayso,
In regards to your build: I realize You went with the lamination technique because of the diffusion chambers you wanted to create. Is there another advantage to this construction technique sonically? I have a different technique planned, but I am interested in learning more about why You chose this technique. You are more then welcome to link me to the answer, as I am dead certain in is in this thread somewhere.
And what about the shape?
I have these shapes in mind (see drawing):
In a single driver application, the first one, followed by the either of the last two would be better for cabinet defractions. But this is an array, so I am thinking they all would work well. What I want to dig into is whether to go wide or narrow, gradual radius or small, or big bevels verses small bevels... I know wider cabinets help with bass reinforcement, but that is not as important for these arrays. I like the circle the best, followed by the diamond. I am thinking mostly in terms of outside cabinet performance, as I will be including some type of diffusion chambers inside also.
Attachments
- Home
- Loudspeakers
- Full Range
- The making of: The Two Towers (a 25 driver Full Range line array)