nah I'm guessing on the entrance angle of the QSC. It's noticeably narrower than the JBL pt waveguides.
I also use BMS 4540ND on the tiny JBL 6" square PT unit, probably a fairly large mismatch there as the throat seems pretty wide with a fast transition to 90°.
I have always been curious about using fiberglass or CF over a wooden horn. Because it looks pretty and seems to flow better in my head. But I thought I heard the corners are a good thing in the SH?
I know the transition from CD to square will be the most important but I figured I would do my best on the whole thing. I will be trying to build a small 2way SH using 3.3" mids. Might not be ideal drivers but I have them already and want to build something to learn from. Probably a small horn just slightly bigger than the QSC WG.
My Gedlee Summas are carbon fiber over wood.
I have no idea how Geddes sold them for $4000 each back in the day, CF is $$$$
Steam can be virtually any temperature from near the boiling temperature of water (212 F at sea level) to many hundreds of degrees hotter, though what we usually refer to as "steam" is condensing water vapor, as steam is invisible. Invisible superheated steam can be very dangerous.Dave applies heat with a heat gun. I think you could probably do the same thing with a pot of boiling water or with steam. (Need to determine what temperature the plastic gets soft.)
212 F is not hot enough to smoothly bend any plastic I'm aware of, even poly requires temperatures in the 300s to soften up. A heat gun is probably the easiest method to reach those temperatures.
As an aside, recently heated candle wax to pot some guitar pickups, even though it melts slightly below 212 F, took almost 8 minutes in a microwave. Didn't seem to be heating at all until some water was added...
Steam can be virtually any temperature from near the boiling temperature of water (212 F at sea level) to many hundreds of degrees hotter, though what we usually refer to as "steam" is condensing water vapor, as steam is invisible. Invisible superheated steam can be very dangerous.
212 F is not hot enough to smoothly bend any plastic I'm aware of, even poly requires temperatures in the 300s to soften up. A heat gun is probably the easiest method to reach those temperatures.
As an aside, recently heated candle wax to pot some guitar pickups, even though it melts slightly below 212 F, took almost 8 minutes in a microwave. Didn't seem to be heating at all until some water was added...
Until I read Dave's article, I wasn't aware that PVC melted at such a low temperature. According to this (THERMOFORMING: Determining the Right Temperature for Thermoforming: Plastic Distributor & Fabricator) it's within a few degrees of what's required to melt vinyl. And of course, anyone that's lived in the southwest recalls melting records simply from too much sunlight. It looks like PVC should get pliable at somewhere between 200 and 300 degrees.
An externally hosted image should be here but it was not working when we last tested it.
Amazon.com: Dorkfood Sous-Vide Temperature Controller (DSV): Rice Cookers: Kitchen & Dining
I bought one of these a year ago, and honestly there is nothing in my house that I use more, except for my bed, my phone and my computer.
It's a temperature controller; basically you throw the sensor into a rice cooker, turn it on, and the temperature controller maintains the temperature that you set.
I use it mostly for Sous Vide, but it has other uses too.
In this case, here's what I would do:
1) put a sheet of PVC in a rice cooker or a crock pot
2) cover with water
3) set the temperature controller to about 170
4) come back in an hour and bend the PVC, as instructed by Dave P
5) if the PVC isn't pliable, go gung ho and crank the rice cooker up to high, which is somewhere around 212
The nice thing about using water is that it should get the entire sheet to a nice 'liquidy' consistency. Hopefully just bend the PVC like it was made out of clay.
Of course, this is all conjecture as I haven't tried it yet. If I wasn't moving this week I would be all over it

You are not going to get PVC soft enough with boiling water to do anything with. You will need to have a temperature of at least 300 degrees to get the PVC soft.
You can put it in the oven and heat it up. I've built several things like that for my car audio install. That is how windshields for funny cars are made- heat a sheet of lexan in an oven and then drape it over a buck mold.
You can put it in the oven and heat it up. I've built several things like that for my car audio install. That is how windshields for funny cars are made- heat a sheet of lexan in an oven and then drape it over a buck mold.
And there is a lot stopping you from making a 30" waveguide with a method like Dave uses.
For one thing you will never get constant heat to do it.
Second is you will not keep the material heated long enough to do it.
Third is the material itself may or may not stretch enough if the mold is too deep.
What he is doing is fine for smaller shallower stuff.
For one thing you will never get constant heat to do it.
Second is you will not keep the material heated long enough to do it.
Third is the material itself may or may not stretch enough if the mold is too deep.
What he is doing is fine for smaller shallower stuff.
Extending a smaller QSC cone horn is the obvious way to go.
Sooo.........
Qsc Waveguide extended to over 30" check,
Simple template to cut entry holes for amount of (?) mid driver
Dsp to match it all up. Anyone have a recipe for the QSC horns and a good compromise mounting positions of these drivers in this horn?
Like....cut 3/4 inch holes here' here' here attach speakers?
Your conjecture ignores that unpressurized water will not rise above 212 degrees, and the lower processing point for PVC is 290 degrees- at 212 it will be nearly as hard to bend as it would at room temperature, and will not permanently take a set- no thermoforming.It looks like PVC should get pliable at somewhere between 200 and 300 degrees.
In this case, here's what I would do:
1) put a sheet of PVC in a rice cooker or a crock pot
2) cover with water
3) set the temperature controller to about 170
4) come back in an hour and bend the PVC, as instructed by Dave P
5) if the PVC isn't pliable, go gung ho and crank the rice cooker up to high, which is somewhere around 212
The nice thing about using water is that it should get the entire sheet to a nice 'liquidy' consistency. Hopefully just bend the PVC like it was made out of clay.
Of course, this is all conjecture as I haven't tried it yet.
Even Vinyl requires a temperature above water boiling to begin to bend, though that surface temp can be reached in an enclosed auto in direct sunlight.
An oven resulting in plastic temperatures within +/- 5 degree F of the "orientation" temperatures are required for smooth thermoforming.
Attachments

I'm set to build another pair of conical horns, and still wondering if Unity/Synergy is worth a go, as the parts can be had so cheap.
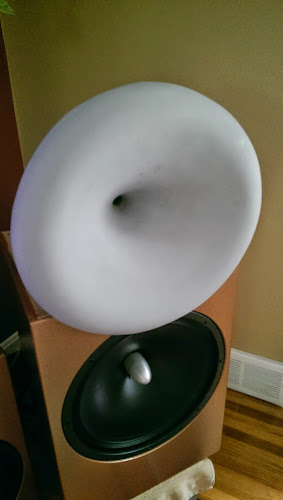
This is my 600Hz conical, curious if 4 x 4" drivers could be added. This is with a 2" CD, but a 1" could easily be fitted, and like the OSWG waveguide, the transition between CD exit angle and horn entry is turned to match with a smooth transition. Maybe round over the horns mouth too ala JMLC?
An externally hosted image should be here but it was not working when we last tested it.
This is my 600Hz conical, curious if 4 x 4" drivers could be added. This is with a 2" CD, but a 1" could easily be fitted, and like the OSWG waveguide, the transition between CD exit angle and horn entry is turned to match with a smooth transition. Maybe round over the horns mouth too ala JMLC?
I used a similar "drape" method only with fabric to build waveguides recently.....documented here: http://www.diyaudio.com/forums/multi-way/258674-diy-18-elliptical-waveguide.html
I got the idea from a post Danley had on the Asylum. It works really well for making quick horn prototypes and can be used for any mouth shape you like.
I made those "small" waveguides to test and see if the method would work before diving into larger (36" wide) Synergy horns. If you check out my thread you can see they aren't perfect, but they came out really well for my first time ever doing something like this. I'm really liking my these speakers now and I've got some even better waveguides in the works (after some investigation into an active cardioid midrange for these wg speakers) so the Synergy project will continue to sit on the shelf until next year probably.
1)Mid drivers could be added, the only problem being your throat assembly for the 2" or 1" exit drivers pushes the mid driver exit further away from the HF driver. That said, since the 2" exit driver can be crossed fairly low, the mid driver exits may still be within 1/4 wavelength of the HF (preferable for even dispersion). Using a large diaphragm HF as you have opens up the possibility of using 6" or 8" mids, which can go down low enough to cross into subs directly.1)This is my 600Hz conical, curious if 4 x 4" drivers could be added. This is with a 2" CD, but a 1" could easily be fitted, and like the OSWG waveguide, the transition between CD exit angle and horn entry is turned to match with a smooth transition.
2)Maybe round over the horns mouth too ala JMLC?
2) A large round over, or a smoothed secondary "break" (mouth angle roughly double the rest of the horn angle) as used by Keele and DSL will reduce diffraction and midrange off axis "waistbanding", as well as providing a bit more pattern control to a lower frequency, all good things.
CF cloth is cheap and easy to work with. SO I may attempt to cover the horn with the cloth. That being said I have to worry about building one first.
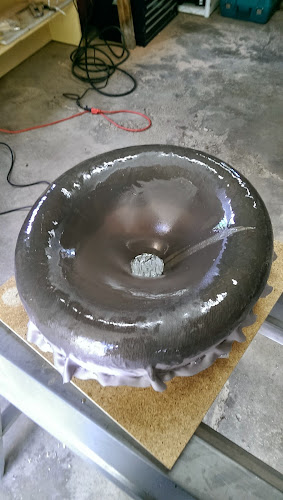
I built a waveguide using Dave's method on Sunday.
As someone who's built about a hundred waveguides out of carbon fiber and fiberglass, I gotta say that Dave's method appears to be superior.
Here's some things I like:
1) It requires a fraction of the time. My fiberglass waveguides are typically built up over a matter of DAYS. I can make an ugly waveguide in a couple of days, investing about 1-2 hours per day. Basically I can make an ugly waveguide out of fiberglass in about three or four hours. It requires a couple of days because you have to let it cure between layers.
If I finish the waveguide, forget about it, we're talking as much as 8-12 hours for a waveguide.
Dave's method, no joke, takes less than 30 minutes.
2) It's cheap. A fiberglass horn is about ten bucks worth of resin and fiberglass. Dave's PVC waveguides cost about three or four bucks to make.
3) the finish looks good. My fiberglass waveguides always have a rough surface that's begging for some bondo.
The main problem by far, as pointed out by Art Welter, is that it's hard to make them good and make them big. I started by making a 12" x 12" waveguide, and found that it's really hard to get it symmetrical. If it was half the size it would've come out a lot better.
You are not going to get PVC soft enough with boiling water to do anything with. You will need to have a temperature of at least 300 degrees to get the PVC soft.
You can put it in the oven and heat it up. I've built several things like that for my car audio install. That is how windshields for funny cars are made- heat a sheet of lexan in an oven and then drape it over a buck mold.
Yep this seems to be the ticket.
I tried a heat gun on Sunday, and it didn't work too well.
Baking it in an oven worked great. The PVC basically has the consistency of pizza dough when you heat it up. When you take it out of the oven you have about thirty seconds to mold it into shape.
If you made a wood mold and draped the PVC over the mold, I think that would work the best by far. Basically the flat sheet of PVC would 'drape' itself over the mold. Obviously, you could do the same thing with fiberglass. The advantage of the PVC is that it's cheaper, you don't have to finish it with bondo, and a single layer of PVC is far stronger than even two or three layers of fiberglass.
Not to try to promote fiberglass construction (been there, done that) but fiberglass (either polyester or epoxy over woven glass) of the same thickness is far stronger and stiffer than PVC. Rather than using multiple thin layers of glass mat, a single layer of thicker glass (typically called "woven roving") can be used over a gel coat painted over mold release and provide a mirror-smooth finish, assuming the mold is mirror-smooth.If you made a wood mold and draped the PVC over the mold, I think that would work the best by far. Basically the flat sheet of PVC would 'drape' itself over the mold. Obviously, you could do the same thing with fiberglass. The advantage of the PVC is that it's cheaper, you don't have to finish it with bondo, and a single layer of PVC is far stronger than even two or three layers of fiberglass.
That said, if cost, stiffness, and ease of construction are of equal consideration, plywood beats both fiberglass and PVC for a few cabinets, as good molds are quite labor intensive and require considerable materials themselves.
x2 on what Art said.
Mold and mold quality are the blood of making parts...especially if you are pulling a lot of pieces from the mold.
I can make a pretty good mold pretty quickly, like the one I did of my Image Dynamics horns...but I won't be able to pull a lot of parts from it without a proper tooling gel coat.
And if you are going got a specific contour, it would be impossible to do without a proper mold be it a plug mold (which would be the only one I would use if you are concerned about the interior of the horn) or other mold.
Full Range Speaker | Danley Sounds Labs | Danley Sound Labs, Inc. - 10" + 1".
and asymmetrical horn is interesting..
and asymmetrical horn is interesting..
It's really easy these days:
1) buy eight Pyle PDMR5s ($76) Pyle PDMR5 5" Sealed Back Midrange Speaker Driver
2) Buy that big QSC waveguide (2) ($70) QSC PL-000446GP Replacement Waveguide Horn for HPR152i
3) Buy any ol' 15" woofer (2) ($130) Eminence Alpha-15A 15" Driver
4) Buy a miniDSP ($80) MiniDSP kit | MiniDSP
5) Buy that four channel "T-Amp" at Parts Express ($30) Lepai LP-269FS 4x45W Mini Amplifier with Remote USB MP3 Media Card FM
6) Buy a USB mic ($75) UMIK-1 | MiniDSP
7) Download Arta or HolmImpulse ($0) HOLM Acoustics
8) Buy a plate amp ($80) (make sure it's good to 350hz, where the mids come into play.)
9) Buy a BMS 4550 (2) ($300) BMS 4550 1" High frequency Compression Driver - BMS 4550 - BMS 4550 1" high frequency compression driver. BMS neodymium 4550 high frequency compression drivers are available here.
Cut four pieces of wood into 5" squares. Mount the midranges face down on the plates. Gorilla glue them to the QSC waveguide. Drill two holes in the mounting plates at the edges with a diameter of 3/4" each. Mount your compression driver. Put your fifteen in a box. Hook up the plate amp to the fifteen. Hook up the four channel amp to your compression driver and your midranges. MiniDSP does the xover. Use that USB mic and the miniDSP to get flat response.
Seriously people, don't overthink this. You can get 90% of the way there in a Sunday. You don't even need a whole weekend.
It's easy to get lost in the details, because the devil is in the details, but you can get excellent results with very little effort and money. The plans I just laid out cost about $800 for a pair of speakers and it will blow you away. If you're not happy with the results, unloading the parts on eBay is trival. And every speaker builder needs a mic and a miniDSP.
Yes, you can get the price down by about $100-$200 if you use a less expensive compression driver. Don't use the Dayton it sucks.
When you're done it will look like this:
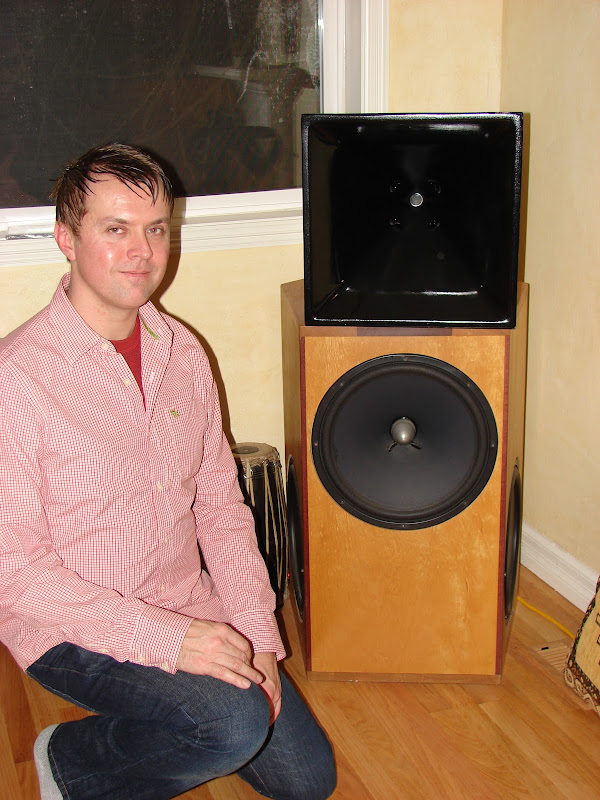
P.S. that's me
Hi all,
Did just this on a whim after a couple of months reading this fantastic thread.
My mate and I (here in Aus) are building a small horn sys for small EDM events.
Have built two of four 48x24x24" 40hz FLH subs and are looking to put together tops based on Synergy principles.
Purchased 8 PDMR5s, 2 QSC Waveguides and 2 BMS 4550's from the states last night. Shipping added a fair bit to the cost but we just wanted to get started. Have a 4way processor to do crossover duties. Looking at some 18 Sound 15"s for low mids to 500hz probably in separate W bins to start.
Hoping its as easy as you say Patrick
We are looking at ways to extend the waveguide and imitating the dimensions of the SH96HO seems like the easiest method, although we may pick up some 18mm mdf and knock up couple of SH60 prototypes ala Paul Spencers S2 version to get a feel for it.
Pretty excited for all the bits to arrive.
- Home
- Loudspeakers
- Multi-Way
- Suitable midrange cone, for bandpass mid in Unity horn.