They look nice Squiffy.
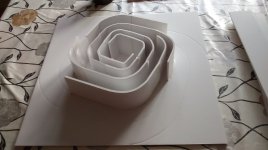
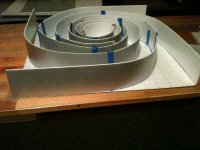
My Cornu's are progressing slowly. I've got one spiral about 2/3rds done. Not the neatest of jobs (I've hidden the worst joints and blobs of glue in the photo") )and burning my finger with hot glue didn't help either .
)and burning my finger with hot glue didn't help either .
My Cornu's are progressing slowly. I've got one spiral about 2/3rds done. Not the neatest of jobs (I've hidden the worst joints and blobs of glue in the photo
)and burning my finger with hot glue didn't help either .Attachments
They look nice Squiffy.
My Cornu's are progressing slowly. I've got one spiral about 2/3rds done. Not the neatest of jobs (I've hidden the worst joints and blobs of glue in the photo
Yup I got one of those, big ol blister on me index finger. Note to self do not try and smooth hot glue
Finally located the glue gun and fresh sticks...which coincided with an hour to my self which is a rare occurance
Managed to glue the spirals on one Cornu in place, worked very well. Hope for a second hr to my self later this evening so just might get the second one glued aswell. Gluing the second plates in place wont require much time so hope the Cornu's will produce sound very soon
Managed to glue the spirals on one Cornu in place, worked very well
. Hope for a second hr to my self later this evening so just might get the second one glued aswell. Gluing the second plates in place wont require much time so hope the Cornu's will produce sound very soon Got one spiral completed late last night. Not the neatest of glue joints in some places, but as it's my first attempt at building one of these and using hot melt glue I'm cutting myself some slack .
Hopefully I'll get some time tonight to get the other spiral built. Fingers crossed it'll go a bit quicker as I've learnt from my mistakes on the first one
Oddly my wife commented that she really liked the spiral pattern and it would be a shame that it was covered up when the speaker was completed, which is the most positive thing she's ever said about any of my DIY speaker projects. Let's hope the positivity stays once they're on the wall playing music
.Hopefully I'll get some time tonight to get the other spiral built. Fingers crossed it'll go a bit quicker as I've learnt from my mistakes on the first one
Oddly my wife commented that she really liked the spiral pattern and it would be a shame that it was covered up when the speaker was completed, which is the most positive thing she's ever said about any of my DIY speaker projects. Let's hope the positivity stays once they're on the wall playing music
Attachments
![IMG_20140309_221000173[1].jpg](/community/data/attachments/383/383909-96b93408d9af13cb8cdaf95941997e28.jpg)
Nice work BL21DE3! The foam core is translucent and you can put a string of led lights inside to light it up. having a wife give unsolicited praise is high praise indeed in the world of DIY.
Your handle is hard to remember, but oddly it looks like "Blaides" so I can remember it.
having a wife give unsolicited praise is high praise indeed in the world of DIY. Your handle is hard to remember, but oddly it looks like "Blaides" so I can remember it.
Last edited:
Squiffy, it's really nice to hear that your wife is happy with them also. Although I have the shop at our complex, you're right about the foam cores being built on the dining room table. Lots of newspaper though so I was unscathed at the end. I hope your table survives. Did you really mount the drivers before gluing on the backs?
X, you're right, it'll be easier to write Blaides, I hope that's ok.
Blaides, It looks like you spent enough time to get it right. From here we can't see anything wrong with your joints and gluing, it looks just fine.
Burning your fingers with hot glue is a right of passage. You're now one of us.
My wife liked the spiral pattern as well. I think that is inherent. Have you every watched them shop? They just go round and round and....
Halair, glad the gluing went well. I must say I was nervous at first so I did some test runs before going for it. X was good, giving the encouragement when it was needed and offering praise at the accomplishments so by the time I was halfway through the first spiral, I felt pretty confident.
Looking forward to your results, keep us posted.
Looking forward to your results, keep us posted.
Cal and xrk971, thanks for the kinds words and encouragement. The slightly poor photos probably help mask some of the dodgy glue joints .
I'm itching to get started on the second one tonight, hoping to have them running by the end of the week.
Out of interest, how much stuffing did you guys use in your 20" builds?
. I'm itching to get started on the second one tonight, hoping to have them running by the end of the week.
Out of interest, how much stuffing did you guys use in your 20" builds?
Squiffy, it's really nice to hear that your wife is happy with them also. Although I have the shop at our complex, you're right about the foam cores being built on the dining room table. Lots of newspaper though so I was unscathed at the end. I hope your table survives. Did you really mount the drivers before gluing on the backs?
Yup although I now think there may be a design flaw in mine
I secured the drivers using bolts and wide washers these obviously had to be tightened before the back went on. If they wobble they might loosen but that may take some time. Certainly there was no loss in quality playing them all day yesterday at volumes loud enough so that I could hear them outside and the wife upstairs painting The table came out looking like new and to be honest it needed a re-oil. Its a proper oak family kitchen table, a workhorse, full of nicks and dings, splashes of colour from food dyes to paint and pencil marks. We have brought up our girls with an interest in doing things and the table is the hub where it all takes place.
Cal and xrk971, thanks for the kinds words and encouragement. The slightly poor photos probably help mask some of the dodgy glue joints
I'm itching to get started on the second one tonight, hoping to have them running by the end of the week.
Out of interest, how much stuffing did you guys use in your 20" builds?
Blade, I picked up a bag of soft toy stuffing from a stichery shop in Newmarket and it cost me around £2.50 I'd say I used about two thirds of it.
Newby - collecting info
Hi all,
it's now a couple of years I'm looking around to build the Cornu but had found poor info on the Web, then I found this thread.....wow, fantastic.
So looking at your experience and expertise I'm feeling encouraged to move on to build these horns.
The speakers I had in mind (now already bought) are Jordan Eikona, I've seen that there have been not so good experience with other Jordan, is there someone able to simulate how the Eikona would do?
The link with characteristics is :
Eikona drive unit
What volume would be best recommended?
Apart from that, I see there are three important things : the shape, the foam and the glue.
I have a pdf with a scalable "spiral", would someone be so kind to remember me the kind of foam and where to find it in Europe? Same for glue?
Or please remember in what page (around) could I find this information?
Many thanks for your inspirative work, it is very interesting.
And thanks in advance for the help
Best regards
Giuseppe (Madrid)
PD
Is there anyone from Spain?
Hi G,
The experts will be along shortly with top advice but from my own try out I used a 5mm thick white foam board purchased from a craft shop. 4 boards A1 size (I think) A hot glue gun with loads of refill sticks and you will need loads. White PVA glue for the backs. I also used white bathroom sealant to smooth over the hot glue after it dried to make sure there were no gaps.
It really isn't difficult to put a pair of these together and as has been mentioned a lot of fun. Real dinner table project stuff just remember to put protection down on the table first ...... Ahem
Member
Joined 2009
Paid Member
The speakers I had in mind (now already bought) are Jordan Eikona, I've seen that there have been not so good experience with other Jordan, is there someone able to simulate how the Eikona would do?
Giuseppe,
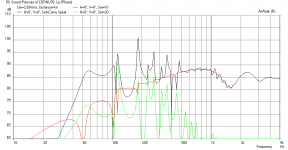
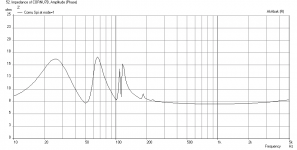
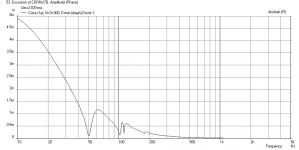
You are one of the lucky ones who has such a nice driver. The Eikona's are very special drivers that deserve a special Cornu. If you want to fully utilize the Eikona's capabilities, I recommend an extra large but thin Cornu that is 34 in x 4 in deep - that will give deep bass extension down to mid 40 Hz while keeping the sound balanced. Because of the large size, I recommend you make the front and back out of thin 5 mm plywood and use foam core for just the channels so that they can be curved and glued. Use stuffing in the main driver chamber and loosely stuffed in the horn channels leading from the throat to the bifurcation point. Put the stuffing in a porous cheesecloth "sock" with a string tied to it on both ends so you can pull it out to adjust amount of stuffing inside the sock, and pull it back into position.
Here are the results of the simulation for SPL vs Freq, Impedance, Cone Excursion.
It is important to mount it on a wall at the correct optimal height of 45 inches from the floor (adjust to taste but start there).
Good luck!
Cheers,
X
Attachments
It really is a trial and error. I found it was a less than for the larger unit, which is natural but behind the driver and at the start of the throats is where you can begin. Make sure you start with less as adding is easier than removing.Out of interest, how much stuffing did you guys use in your 20" builds?
OK, good. Mine is one of those, never used, all shiny, thick coated ones so if I **** up, I'm in big doodoo.Its a proper oak family kitchen table, a workhorse, full of nicks and dings
This project does rely on you having a certain level of skill and dexterity but if you start at the beginning, I think you'll find there lot's of info right there. I have added the drawing to the second post.Cal,
What would be really handy here is a short 'How To' guide
http://www.diyaudio.com/forums/full...k-building-cornu-spiral-horn-now-you-can.html
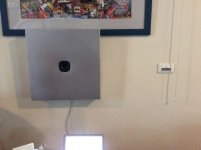
I needed a sweet little project to take my mind off my other experiments... and this was right on the spot as something fun to do and interesting at the same time.
Ran into a couple of problems right off the bat. My driver is not the best little 3" unit, but this was just for fun, so I didn't care too much. Also, I can't get nice foam core around here. The only thing I found was "half" foam core sheets. Basically, take one sheet and cut it in half. One side has paper, the other is foam. Quiet thin as well.
Nothing stopping me, I blew up the pdf and figured a 50x50cm and 8cm deep could work with my 3" driver (Sd is around 22cm2), printed it and made a grid on one sheet of foam core. Drew the patterns and used hot glue to do the channels. Used rockwool as stuffing.
Finished with sealing silicone the top part, installed the little 3" and hung it on the wall.
The construction is too light. It vibrates like crazy, but I can see the potential. It helped my little crappy driver to sound a bit better. Vocals and jazz at low volume were perfect. Daft Punk's Tron Legacy CD was a no-no! Still, it was fun and I think that using thin plywood and a better driver will do it justice.
Thanks for all who contributed on this fun project!
Attachments
I needed a sweet little project to take my mind off my other experiments... and this was right on the spot as something fun to do and interesting at the same time.
Ran into a couple of problems right off the bat. My driver is not the best little 3" unit, but this was just for fun, so I didn't care too much. Also, I can't get nice foam core around here. The only thing I found was "half" foam core sheets. Basically, take one sheet and cut it in half. One side has paper, the other is foam. Quiet thin as well.
Nothing stopping me, I blew up the pdf and figured a 50x50cm and 8cm deep could work with my 3" driver (Sd is around 22cm2), printed it and made a grid on one sheet of foam core. Drew the patterns and used hot glue to do the channels. Used rockwool as stuffing.
Finished with sealing silicone the top part, installed the little 3" and hung it on the wall.
The construction is too light. It vibrates like crazy, but I can see the potential. It helped my little crappy driver to sound a bit better. Vocals and jazz at low volume were perfect. Daft Punk's Tron Legacy CD was a no-no! Still, it was fun and I think that using thin plywood and a better driver will do it justice.
Thanks for all who contributed on this fun project!
Nice try there Perceval! Don't give up and have another go at it with the FE126en and plywood front and back with foam channels. You can also try bendy plywood for the channels.
- Home
- Loudspeakers
- Full Range
- Ever think of building a Cornu Spiral horn? Now you can!