Looks nice.. Before you get too far don't forget about the power entry hole..
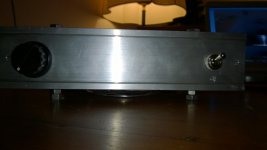
I thought about it, it would look nice if it would be in the back where the amp chips are but i decided to make it in the side together with the on/off switch to make sure it will not interfere with the input signals.
Kudos doctorzorro. Very unique and interesting design. Clever re-purposing of used parts. I like the tower concept.
Rick
Thanks!
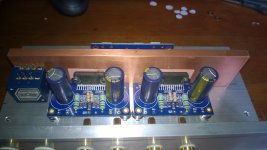
The tower concept came about because I had this idea about STK's resembling cpu's both in size and cooling requirements. This was the most logical approach putting the stk flat on it's back and mounting the cooler on top of it. From there it was a simple step to stack the transformer and caps like a tower so it's footprint would be the same as lga 775 sockets, 73 ~ 75 mm square.
Also, because i'm very aware of the ever-growing pile of electrowaste I always try to use as many salvaged parts as possible. There's a wealth of parts out there, you just have to know where to look.
Joerytech, looks good! Are you sure you get a good enough thermal transfer with the LM4870 mounted using only nylon bolts? Perhaps consider using a bar/clamp mount or if the mounting holes are plastic right through then there's no harm to use metal bolts. Good luck with the rest of the build ")
Joerytech, looks good! Are you sure you get a good enough thermal transfer with the LM4870 mounted using only nylon bolts? Perhaps consider using a bar/clamp mount or if the mounting holes are plastic right through then there's no harm to use metal bolts. Good luck with the rest of the build
Thanks for the advice.
Someone else already made the same comment and I have changed it.
Greetz,
Joery
Attachments
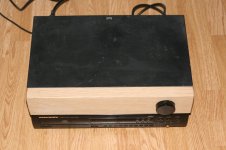
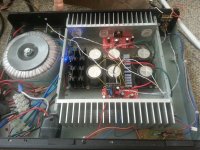
this is my first amp, the pcbs are from chipamp. the case needs finishing and wiring tidying up. its nothing compared to whats on this forum but im happy with sound.
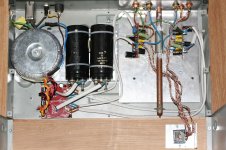
Do I see a heat-pipe you used for cooling?
Did you make it yourself? does it work good?
Getting along,
Still have to make the side panels, they will be from oak wood.
The plastic knob will be replaced with an aluminum one.
The power cable entry still has to be made.
Have to do some polishing of the aluminum
Greetz
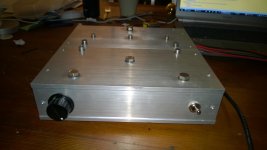
Still have to make the side panels, they will be from oak wood.
The plastic knob will be replaced with an aluminum one.
The power cable entry still has to be made.
Have to do some polishing of the aluminum
Greetz
Attachments
very nice - very thick chassis - as battle ship! (it can be used as a heatsink).
this is a good aluminum knob- I often use them.
http://www.ebay.com/sch/i.html?_trksid=m570.l3201&_nkw=39mm+aluminium+knob&_sacat=0
this is a good aluminum knob- I often use them.
http://www.ebay.com/sch/i.html?_trksid=m570.l3201&_nkw=39mm+aluminium+knob&_sacat=0
Last edited:
Joery
Pretty cool case. I think you might add some capacitance after listening for a while. Apex Jr sells some very inexpensive 33000uf 50V caps. About $4 each that would probably fit in your chassis. Good luck with the rest of your build.
I second this! believe it or not...it will improve his sound big time
I did build some LM3875/LM3886 long time ago and "experimented" with different values from 10uf to 20000uf per rail.very nice - very thick chassis - as battle ship! (it can be used as a heatsink).
this is a good aluminum knob- I often use them.
39mm aluminium knob | eBay
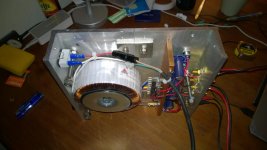
Yeah, I found the aluminum profile at a local scrapyard.
When running the amp at full power for some time it gets quiet warm but not to hot so I think its okay like this.
Thanks for the link for the knob but I would have to import it to Holland and actually already found some nice ones around here. Will order soon
I second this! believe it or not...it will improve his sound big time
There is quiet a lot of discussion about this on the P. Daniel Gainclone thread.
Some think its better to add capacitor value but others (including P. Daniel) think its degrading the sound quality, maybe improving the low frequency response.
At this time I'm very satisfied with the low frequency control.
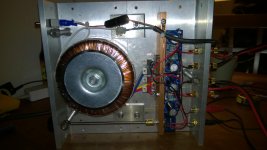
Don't forget, the capacitor value now is 1500uf, they are located on the amp boards
My feeling also would be to increase the value of the capacitors but to be honest...... It sounds pretty good the way its now.
Maybe later I will experiment with different values of the caps
Last edited:
Do I see a heat-pipe you used for cooling?
Did you make it yourself? does it work good?
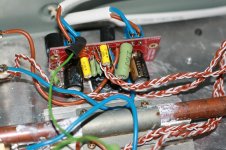
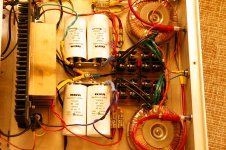
yes its a heat-pipe, it was taking from a old technics amp. the pipe gets warm after several hours use, but nothing to get concerned about.
i forgot to post its lm3886 with 1500uf each rail and a 24v 300va transformer.
There is quiet a lot of discussion about this on the P. Daniel Gainclone thread.
Some think its better to add capacitor value but others (including P. Daniel) think its degrading the sound quality, maybe improving the low frequency response.
At this time I'm very satisfied with the low frequency control.
Don't forget, the capacitor value now is 1500uf, they are located on the amp boards
My feeling also would be to increase the value of the capacitors but to be honest...... It sounds pretty good the way its now.
Maybe later I will experiment with different values of the caps
I respect your decision... at the end it is your amp
. 1500uf is not enough for sure. and I believe your amp sounds good now, but in the future you can "just" give it a chance to "explore" with more capacitance in the power supply (at least 10000uf per rail). it will be just for testing and if you do not like the sound...you can always leave it with just 1500uf.I respect your decision... at the end it is your amp
In what way you think the sound quality will improve when using bigger caps?
To be honest, this for me is the first amp I build so I'm very new with it.
I was already really surprised that what I created played right away after powering it up.
If I want to increase the capacitance, can I simply put extra caps parallel or do I have to exchange the existing ones?
I have used the chipamp.com miniA psu boards for my LM3886 builds. Then I stick about 60000uf on there with some great diodes and its really a fantastic sound.
Joery you can just add them in parallel. Easy with screw top caps. Just a bit of wire and add it to the power input wires going into the amp if you want to test the idea.
Joery you can just add them in parallel. Easy with screw top caps. Just a bit of wire and add it to the power input wires going into the amp if you want to test the idea.
Attachments
Last edited:
- Home
- Amplifiers
- Chip Amps
- Chip Amp Photo Gallery