Like Boscoe said -CNC machining. I'm toying with the idea of taking a CNC machining class. You set up a computer program, chuck a billet in a lathe, push the button, and out pops your custom made part.
You can make any knob you like with this setup too. Do billet aluminum knobs strike your fancy?
I make front panels the old fashioned way, with a hand operated shear/break machine. It's very old fashioned and requires actual skill. And I don't even have lettering on the panels.
You can make any knob you like with this setup too. Do billet aluminum knobs strike your fancy?
I make front panels the old fashioned way, with a hand operated shear/break machine. It's very old fashioned and requires actual skill. And I don't even have lettering on the panels.
Yes give me a couple of hours to get the link. There's a German company who do cnc cut front panels with engraving - they even have their own easy to use free software.
Did you mean Schaeffer ?
Home- Schaeffer AG - Frontplatten, Front Panels, Faces Avant
Like Boscoe said -CNC machining. I'm toying with the idea of taking a CNC machining class. You set up a computer program, chuck a billet in a lathe, push the button, and out pops your custom made part.
You can make any knob you like with this setup too. Do billet aluminum knobs strike your fancy?
I make front panels the old fashioned way, with a hand operated shear/break machine. It's very old fashioned and requires actual skill. And I don't even have lettering on the panels.
Its amazing what they can do with CNC.
I watch "Orange County Choppers" on TV and they come up with some amazing CNC parts.
This is the one Nigel..
I am currently using aluminium with sticky labels for volume controls etc and it looks amateur.
If youre an amateur, let it show !

Have anyone used this ?
Front Panel Express:*Front Panel Design Software and CAD Conversion Service
Have anyone used this ?
Front Panel Express:*Front Panel Design Software and CAD Conversion Service
Yes, with first rate results.
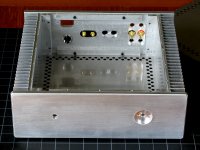
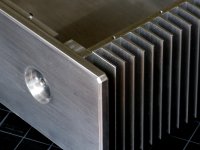
Or, just find a friendly local machine shop. A front panel, or even parts for a complete chassis are a pretty easy job for a good machinist, which is where this came from. (I just posted a few pics in the pictures forum b/f I saw this thread)
Attachments
I use a local laser engraving shop. The beauty of this technique is the high resolution, plus the ability to adjust the laser to achieve a light grey, almost sandblasted effect, through to solid black lettering.
The faceplate for this Dynaco cost 60 bucks, which included the stainless plate, hole cut for power switch, plus the engraving (large Dynaco logo plus fine text and rules near the power switch).
The faceplate for this Dynaco cost 60 bucks, which included the stainless plate, hole cut for power switch, plus the engraving (large Dynaco logo plus fine text and rules near the power switch).
Agree with SY. FrontPanel Express produces excellent looking panels - that you design using their free software. It's fairly easy to learn, a little longer to master. They are not cheap, but if you want pro-looking results look no further. Here's the link. Here is a link to a post of mine showing my DS 2012 Pre with panel from FPE.
Its amazing what they can do with CNC.
I watch "Orange County Choppers" on TV and they come up with some amazing CNC parts.
Chip Foose of "Overhaulin" uses a CNC machine to make his custom wheels. He chucks a big old aluminum billet in the lathe, pushes a button, and a little while later pulls a custom wheel out.
I believe some CNC machines use high pressure water jets. The water contains a fine abrasive.
Or, just find a friendly local machine shop. A front panel, or even parts for a complete chassis are a pretty easy job for a good machinist, which is where this came from. (I just posted a few pics in the pictures forum b/f I saw this thread)
That's really nice.
I modify old salvage chassis. Sometime I chop up a few and then reassemble one custom chassis. I typically use brushed aluminum (yes I buy it new) for the front. I can make a chassis for less than $20 like this.
I'm so cheap. I'm very crafty, but cheap. (I also think it's important to reuse and recycle.)
For a budget approach, I've thought about using rub-down transfer lettering then clear-coating, but I have not actually tried it very seriously.
I actually tried this quickly on a bead-blasted front panel as a test, but the rub-downs didn't stick at all.
......or perhaps try to use an iron to transfer laser printer ink (like making PCBs DIY)...but I haven't tried that either.
I actually tried this quickly on a bead-blasted front panel as a test, but the rub-downs didn't stick at all.
......or perhaps try to use an iron to transfer laser printer ink (like making PCBs DIY)...but I haven't tried that either.
Does anyone know how companies create pro looking front panels ?
I am currently using aluminium with sticky labels for volume controls etc and it looks amateur.
Here is another company who can make them for you
Front Panel Express: Front Panel Design Software and CAD Conversion Service
But to do it yourself, one method is to use glossy photo paper and print a picture of the entire panel, use a collored background lettering and whatever you like. Just print it on glossy paper. Then laminate it to the aluminum and then laminate some plexiglas over the paper photo
You have to drill through the entire stack for switches and volume controls but for LEDs and meters cut only the paper and aluminum so the plexiglass is an unbroken surface.
One other thing to do. This looks the "best". Just paint it a solid color and have no controls or lights. Then you place a small computer inside that hosts a small web site. The "Rasburry Pi" is perfect for this. The controls are now on you smart phone or computer..
It is really NOT "rocket science" to use a serial interface variable resistor in place of a normal mechanical pot for a volume or balance control.
For a budget approach, I've thought about using rub-down transfer lettering then clear-coating, but I have not actually tried it very seriously.
I actually tried this quickly on a bead-blasted front panel as a test, but the rub-downs didn't stick at all.
......or perhaps try to use an iron to transfer laser printer ink (like making PCBs DIY)...but I haven't tried that either.
I have used this method you describe when I did this PA project back in 1996 and the lettering has been there since then.
Honestly it does not have nothing to envy about in comparison with the Sansui preamp above. I even drilled and filed perfectly the rectangular vu meter holes, which was a real challenge to do and not give the panel a single scratch
Once the rub lettering was applied I clear coated carefully over each script with flux.
As a side note, it does not have switches. I built a TTL flipflop and relay logic activated by optocouplers.
An externally hosted image should be here but it was not working when we last tested it.
- Status
- This old topic is closed. If you want to reopen this topic, contact a moderator using the "Report Post" button.
- Home
- Design & Build
- Construction Tips
- Creating pro looking front panels.