First of all, Thank you @Saturnus for the design and all the work you put into this.
Im about to do my first build (original parts but without solar panels) and everthing is very well explained on the Wiki site, exept for the electronic part. I cant figure out how im going to create the electronic department in the middle...
I would love to have a nice and simple panel with a:
* 12v outlet (for phone charging)
* a on/off switch
* a 3.5mm audio outlet for my AUX-kable.
* Is it possible to have a "charging outlet" on the box for the batteries? Would be nice to not have to open the boominator every time i have to charge the batteries. Instead i would like to just plug a kable between the box and into the wallpocket when it needs to be reloaded.
This solution (Other Portable stereo systems for outdoor festivals (PIC HEAVY) - bit-tech.net Forums (the 8th picture)) looks nice, but how does he charge the batteri?
Im sorry if these are very obvious questions but I cant find the answears.
Hi hager
The wiring is up to you, there are many configurations that you could do and lots of wiring diagrams a scattered around this forum....
You can have all of the things that you mention and more but you'll have to use your initiative for mounting, placement etc... One of the only customisable part of the boominator is the electronics component....
BJ
the replacement cap to prevent pops when turning on the system, is it this one: https://www.elfaelektronik.dk/elfa3~dk_da/elfa/init.do?init=2&shop=ELFA_DK-DA&item=65-004-91 ??
the replacement cap to prevent pops when turning on the system, is it this one: https://www.elfaelektronik.dk/elfa3~dk_da/elfa/init.do?init=2&shop=ELFA_DK-DA&item=65-004-91 ??
Yes.
First of all, Thank you @Saturnus for the design and all the work you put into this.
Thanks

I would love to have a nice and simple panel with a:
* 12v outlet (for phone charging)
* a on/off switch
* a 3.5mm audio outlet for my AUX-kable.
* Is it possible to have a "charging outlet" on the box for the batteries?
What I have suggested earlier for a very basic, and easy to build system is to use a recessed dish like this 8705BLK Adam Hall Hardware 8705 BLK - Dish black unpunched. Mount it in the top or the one of the sides as makes most sense to your build.
Drill whatever holes are needed but the suggested is (it goes without saying that choosing round panel mount plugs and switches makes the cutting-out easier):
- cigarette lighter power socket. Use this for car charger adapters, and can also be used for charging input from external wall charger or solar cells.
- mini-jack input socket. Anything panel mount will work.
- power on/off switch. Again, anything panel mount that can carry minimum 5A will work fine.
After that options are open. There's a lot of space left in that recessed dish linked above for more.
The linked recessed dish is a perfect fit as it's a 65mm wide cut-out which match the 66mm width of the electronics compartment.
I've left the electronics compartment arrangements fuzzy on purpose because choices are so many and demands so different for different people.
Last edited:
Yes.
okay thanks
only sad thing is the shipping is 85 kroner???? wowbut thanks!
okay thanks
but thanks!
Get it from somewhere else
For example MKT Capacitor 470nF 63V 10% P2,5 Elektronik Lavpris ApS
I'm also quite certain that it's possible to find on fleabay or similar.
hehe, didn't help much with the prising. think i'll buy from brinck https://www.elextra.dk/main.aspx?page=article&artno=H12112 . I know its not 2,5mm but i should be able to fit it in anyways. Just not willing to buy 100 kroner for one (the cap+shipping) from Århus.Get it from somewhere else
For example MKT Capacitor 470nF 63V 10% P2,5 Elektronik Lavpris ApS
I'm also quite certain that it's possible to find on fleabay or similar.
Hi
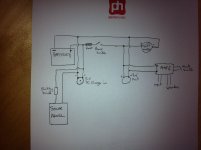
I've been thnking about the wiring for Power and Charging circuit....
I have a power switch, a voltmeter, a 12v cigarette lighter socket out, an input socket for a 12v DC charger as well as a solar panel (still have to source those).... I just want the facility to charge from the mains when I want to.... (I may never need it).....
My understanding is that the SLA batteries do not need charge management, the shottky diode protects the solar panels from power from the battery "backing up" and damaging the solar panels.
My question is, will the same shottky diode protect the solar panels from current from the DC charger damaging them too? or do I need something else.
another question is, while charging from the mains (via a DC charger), would there be any risk to the AMP6 if it were switched on and being used whilst charging? do I need some other "current blocking" devices?
Please have a look at my power and charging wiring diagram and see if you can see any blinding flaws, I am working in the dark purely on guesswork and what I can gather from other wiring diagrams....
Ta
BJ
Attachments
Hi
I've been thnking about the wiring for Power and Charging circuit....
I have a power switch, a voltmeter, a 12v cigarette lighter socket out, an input socket for a 12v DC charger as well as a solar panel (still have to source those).... I just want the facility to charge from the mains when I want to.... (I may never need it).....
My understanding is that the SLA batteries do not need charge management, the shottky diode protects the solar panels from power from the battery "backing up" and damaging the solar panels.
My question is, will the same shottky diode protect the solar panels from current from the DC charger damaging them too? or do I need something else.
another question is, while charging from the mains (via a DC charger), would there be any risk to the AMP6 if it were switched on and being used whilst charging? do I need some other "current blocking" devices?
Please have a look at my power and charging wiring diagram and see if you can see any blinding flaws, I am working in the dark purely on guesswork and what I can gather from other wiring diagrams....
Ta
BJ
A (schottky) diode prevents the solar panels being damaged. The panel may in fact already have one built into the connection box. Most finished panels do.
Your fuse is placed wrong. It should be the first thing the positive lead from the battery sees.
I would not put the voltmeter after the power switch. I would put it before the power switch and via a momentary switch so that it isn't on. That way you can check the voltage without turning the system on. Meaning you can get a no-load reading of the voltage.
I would use the cigarette lighter plug as both DC input and output.
I would use the awake pin, not the mute pin, on the amp6b to turn it on and off. It uses 2.5microAmps in sleep mode (0.00003W).
Last edited:
Thanks for your time Saturnus
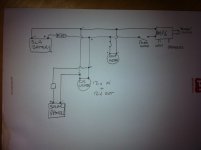
Here is a revised diagram
The voltmeter that I bought is lit with colour changing LED's, it looks really cool so I was hoping to be able to leave it on. When it is off you can only see a black panel (I was a bit dissapointed with that).... I do get your point about measuring unloaded battery voltage tho. so I'll consider changing it in the circuit, I could even have an on/off switch instead of a momentary switch so I could choose to have it on or off during playing.
I never thought about the 12v out doubling as the 12v in.... genius.
Considering that the current is reversed during battery charging, does that mean that the boominator can't be played whilst charging?
Does the reversing of the polarity during charging put the AMP6 at risk in any way?
Ta
BJ
Attachments
Roskilde Festival 2013: Makerspace Speaker Project
Hi all,
I'm working at this year's Roskilde Festival's "Dream City" camp area with a group of people arranging a makerspace/hackerspace, where festival-goers can join in on different creative projects. One of the projects proposed for this year is to engage people in making a simple and portable festival speaker. In our makerspace we will have a wood-shop with a CNC router as well as all the tools needed to make such a speaker. The idea is to buy all the parts to make around 100 speakers. This is not a commercial project. We want to keep the costs as low as possible so we can make a larger amount of speakers and engage as many people as possible. We don't want to make any profit from this.
The last couple of days I've been reading through this thread to get some inspiration for a design. I have made the following design parameters as the objectives for this speaker project (in order of importance):
To keep it low-cost and simple I was thinking of using these 6.5" full-range drivers, which are fairly sensitive (93dB), light-weight (700g) and very cheap (15 EUR):
BG 17 - 8 Ohm
The idea is to use two of these drivers and mount them 'Boominator-style' in a bipolar magnet-to-magnet construction in something like a 25x25x25 cm cube box. I'm aware that these drivers probably only will go down to around 150Hz, but I guess this is a sacrifice I'll have to make considering the above-mentioned design parameters.
The amplifier could be a cheap Chinese TA2024 amplifier. I don't think they come much cheaper than this (5 EUR):
High Efficiency MKLL TA2024 Fully Finished Test PCB Power Amplifier Board | eBay
The battery needs to be low-cost and although SLAs are a bit heavy I think this could be a good option for this project (13 EUR):
Y7-12 Yuasa Batteries Yucel Yuasa Battery £9.99 Ex VAT £11.99 inc VAT - In Stock
I have a few questions that I was hoping you could help me answer:
Last but not least, I hope that whoever sees this post and is going to Roskilde this year will pass by the "Dream City: Makerspace". There will be plenty of possibilities of sharing ideas and building and/or enhancing your festival speaker
Thanks to all of you and especially to you Saturnus for this great thread!
Hi all,
I'm working at this year's Roskilde Festival's "Dream City" camp area with a group of people arranging a makerspace/hackerspace, where festival-goers can join in on different creative projects. One of the projects proposed for this year is to engage people in making a simple and portable festival speaker. In our makerspace we will have a wood-shop with a CNC router as well as all the tools needed to make such a speaker. The idea is to buy all the parts to make around 100 speakers. This is not a commercial project. We want to keep the costs as low as possible so we can make a larger amount of speakers and engage as many people as possible. We don't want to make any profit from this.
The last couple of days I've been reading through this thread to get some inspiration for a design. I have made the following design parameters as the objectives for this speaker project (in order of importance):
- Lowest possible cost
- Simplest possible construction
- Longest possible battery life
- Loudest possible output
- Smallest possible size/weight
To keep it low-cost and simple I was thinking of using these 6.5" full-range drivers, which are fairly sensitive (93dB), light-weight (700g) and very cheap (15 EUR):
BG 17 - 8 Ohm
The idea is to use two of these drivers and mount them 'Boominator-style' in a bipolar magnet-to-magnet construction in something like a 25x25x25 cm cube box. I'm aware that these drivers probably only will go down to around 150Hz, but I guess this is a sacrifice I'll have to make considering the above-mentioned design parameters.
The amplifier could be a cheap Chinese TA2024 amplifier. I don't think they come much cheaper than this (5 EUR):
High Efficiency MKLL TA2024 Fully Finished Test PCB Power Amplifier Board | eBay
The battery needs to be low-cost and although SLAs are a bit heavy I think this could be a good option for this project (13 EUR):
Y7-12 Yuasa Batteries Yucel Yuasa Battery £9.99 Ex VAT £11.99 inc VAT - In Stock
I have a few questions that I was hoping you could help me answer:
- First of all, what do you think about my choice of components? I would really appreciate some inputs and ideas! Keep in mind however, that the most important objective for this speaker project is to keep costs down. I hope to get someone to sponsor the wood for this project so I think it will be possible to keep the total unit cost at around 50 EUR.
- In a 'Halfinator' construction like this, would you suggest separating the chambers so each driver has its own enclosure with one side playing the left channel and the the other side the right channel? Or should I instead sum the two stereo channels before amplifaction, so both channels get the same signal and then have the two drivers share the same enclosure?
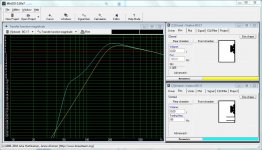
- Should I go vented or sealed? Attached is a screenshot of WinISD showing both scenarios.
Last but not least, I hope that whoever sees this post and is going to Roskilde this year will pass by the "Dream City: Makerspace". There will be plenty of possibilities of sharing ideas and building and/or enhancing your festival speaker
Thanks to all of you and especially to you Saturnus for this great thread!
Attachments
You can't get the batteries from there. they don't ship outside UK.
Yuasa NP7-12L - 12V - 7Ah (F250 6.3mm) batteribyen has ok prices + free shipping (Y)
Yuasa NP7-12L - 12V - 7Ah (F250 6.3mm) batteribyen has ok prices + free shipping (Y)
Hi hager
The wiring is up to you, there are many configurations that you could do and lots of wiring diagrams a scattered around this forum....
You can have all of the things that you mention and more but you'll have to use your initiative for mounting, placement etc... One of the only customisable part of the boominator is the electronics component....
BJ
Okey thanks for the reply!Thanks
What I have suggested earlier for a very basic, and easy to build system is to use a recessed dish like this 8705BLK Adam Hall Hardware 8705 BLK - Dish black unpunched. Mount it in the top or the one of the sides as makes most sense to your build.
Drill whatever holes are needed but the suggested is (it goes without saying that choosing round panel mount plugs and switches makes the cutting-out easier):
- cigarette lighter power socket. Use this for car charger adapters, and can also be used for charging input from external wall charger or solar cells.
- mini-jack input socket. Anything panel mount will work.
- power on/off switch. Again, anything panel mount that can carry minimum 5A will work fine.
After that options are open. There's a lot of space left in that recessed dish linked above for more.
The linked recessed dish is a perfect fit as it's a 65mm wide cut-out which match the 66mm width of the electronics compartment.
I've left the electronics compartment arrangements fuzzy on purpose because choices are so many and demands so different for different people.
You can't get the batteries from there. they don't ship outside UK.
Yuasa NP7-12L - 12V - 7Ah (F250 6.3mm) batteribyen has ok prices + free shipping (Y)
Thanks for the tip
Hi all,
I'm working at this year's Roskilde Festival's "Dream City" camp area with a group of people arranging a makerspace/hackerspace, where festival-goers can join in on different creative projects. One of the projects proposed for this year is to engage people in making a simple and portable festival speaker. In our makerspace we will have a wood-shop with a CNC router as well as all the tools needed to make such a speaker. The idea is to buy all the parts to make around 100 speakers. This is not a commercial project. We want to keep the costs as low as possible so we can make a larger amount of speakers and engage as many people as possible. We don't want to make any profit from this.
The last couple of days I've been reading through this thread to get some inspiration for a design. I have made the following design parameters as the objectives for this speaker project (in order of importance):
- Lowest possible cost
- Simplest possible construction
- Longest possible battery life
- Loudest possible output
- Smallest possible size/weight
To keep it low-cost and simple I was thinking of using these 6.5" full-range drivers, which are fairly sensitive (93dB), light-weight (700g) and very cheap (15 EUR):
BG 17 - 8 Ohm
The idea is to use two of these drivers and mount them 'Boominator-style' in a bipolar magnet-to-magnet construction in something like a 25x25x25 cm cube box. I'm aware that these drivers probably only will go down to around 150Hz, but I guess this is a sacrifice I'll have to make considering the above-mentioned design parameters.
The amplifier could be a cheap Chinese TA2024 amplifier. I don't think they come much cheaper than this (5 EUR):
High Efficiency MKLL TA2024 Fully Finished Test PCB Power Amplifier Board | eBay
The battery needs to be low-cost and although SLAs are a bit heavy I think this could be a good option for this project (13 EUR):
Y7-12 Yuasa Batteries Yucel Yuasa Battery £9.99 Ex VAT £11.99 inc VAT - In Stock
I have a few questions that I was hoping you could help me answer:
- First of all, what do you think about my choice of components? I would really appreciate some inputs and ideas! Keep in mind however, that the most important objective for this speaker project is to keep costs down. I hope to get someone to sponsor the wood for this project so I think it will be possible to keep the total unit cost at around 50 EUR.
- In a 'Halfinator' construction like this, would you suggest separating the chambers so each driver has its own enclosure with one side playing the left channel and the the other side the right channel? Or should I instead sum the two stereo channels before amplifaction, so both channels get the same signal and then have the two drivers share the same enclosure?
- Should I go vented or sealed? Attached is a screenshot of WinISD showing both scenarios.
Last but not least, I hope that whoever sees this post and is going to Roskilde this year will pass by the "Dream City: Makerspace". There will be plenty of possibilities of sharing ideas and building and/or enhancing your festival speaker
Thanks to all of you and especially to you Saturnus for this great thread!
The Visaton driver is unfortunately as useless for this purpose as the price suggests I'm afraid. No bass under 200hz to speak of really means it will not sound good. Fortunately, I already designed something that is exactly what you seek. It's called a Qubinator. Google it for drawings and description.
I designed that for the exact possibility that Roskilde Festival decided they wanted to accommodate a very cheap sponsored design.
However. Seeing that the price of HP10T is now almost double what it was when I designed. It might be an idea to revisit the design and use 2 or 4 Monacor SP60 drivers instead, and real tweeters in the Dayton ND16FA-6.
2x SP60/4, 2x ND16FA and needed filter caps would cost about €28 from europe-audio for example. Probably less in larger quantities.
You'd probably want to order soon as most distributors don't normally have hundreds of drivers in stock.
Last edited:
Thanks for the input! Too bad about the Visaton driverThe Visaton driver is unfortunately as useless for this purpose as the price suggests I'm afraid. No bass under 200hz to speak of really means it will not sound good. Fortunately, I already designed something that is exactly what you seek. It's called a Qubinator. Google it for drawings and description.
I designed that for the exact possibility that Roskilde Festival decided they wanted to accommodate a very cheap sponsored design.
However. Seeing that the price of HP10T is now almost double what it was when I designed. It might be an idea to revisit the design and use 2 or 4 Monacor SP60 drivers instead, and real tweeters in the Dayton ND16FA-6.
2x SP60/4, 2x ND16FA and needed filter caps would cost about €28 from europe-audio for example. Probably less in larger quantities.
You'd probably want to order soon as most distributors don't normally have hundreds of drivers in stock.
Do you have hands-on experience with this driver?The SP60/4 + ND16FA combo seems nice, but I it's almost double the price compared to the Visaton BG17.
I know I'm probably asking the impossible, but are there any cheaper alternatives? I'm afraid that a price of more than 500 kr per speaker (70 EUR) would deter many festival guests from enaging in this build.
Anyway, I guess it won't hurt to ask europe-audio for a quote.
The SP60/4 + ND16FA combo seems nice, but I it's almost double the price compared to the Visaton BG17.
No. It's cheaper. The BG17 is (at least) €15 each. The €28 I mentioned above was in total for all 4 drivers plus 2 filter caps.
Btw. PM me. I have a suggestion for cabinet that would be incredibly cheap to build, look fantastic and that you could probably get a sizable sponsorship out of.
Last edited:
- Home
- Amplifiers
- Class D
- The Boominator - another stab at the ultimate party machine