I do not have any response from the dam like cccccc. When I download and then send the file, I get in the receive data window many cryptic characters. After the send process is finished, I wait a moment, but nothing happens. When I turn off and on, is still the old (1.21) firmware on it ...
the output from the DAM should not be "cryptic" (see attachement).
I can write a small tutorial for the firmware update with the raspberry pi if you like. When you have the raspberry pi already connected for I2S, you need only two additional wires to have the serial port over the rpi too.
Attachments
firmware update with the raspberry pi
Howto connect, control and update the DAM1941 with a Raspberry Pi
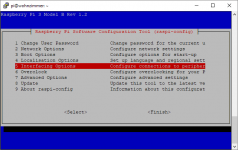
1. disable serial port terminal shell output on the Raspbian/Raspberry Pi
If you do not disable the shell output, the DAM will receive all the console output from the Raspberry Pi and will crash immediately. When this happens the front-panel-switches do not react anymore and you have to powercycle the DAM.
#
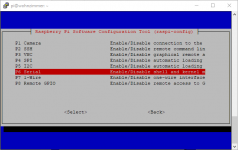
select "5 Interfacing Options"
select "P6 Serial"
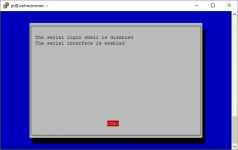
select "<No>" at "Would you like a login shell to be ...?"
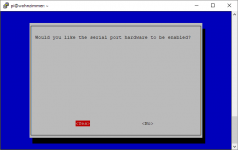
select "<Yes>" at "Would you like the serial port hardware to be enabled?"
select "<Ok>" and exit the config tool
2. reboot the raspberry pi
3. install the terminal program
#
4. Connect yor Raspberry Pi with the DAM1941 for I2S and serial port
5. Test the connection with the DAM using minicom
#
now you can test the commands...
I4 <enter> ... switches to TOSLINK
L048 ... a status message comes back from the DAM
I5 <enter> ... switches to I2S input
L000 ... another status message
V-10 <enter> ... sets the volume to level -10dB
V-10 ... another status message
Note: You cannot see the characters you type into the terminal but you get a status message after a succsessful command from the DAM.
6. The firmware update
Download the latest firmware file from the soekris server (1941full_123.skr) and copy it to your Raspberry Pi.
Be sure that minicom works correctly (see chpater 5)
type +++ to start the uManager
6a. The file upload procedure
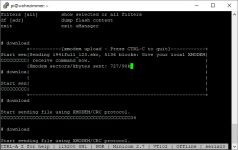
type download <enter>
when you se the CCCCCCCC on the console you have about 45 seconds time to select the file. and start the upload of the firmware file
type <CTRL> A S
then select xmodem
use the up and down arrow keys and a doubleclick on the spacebar to navigate through the filesystem.
highlight the .skr file with the spacebar and press the <enter> to start the upload.
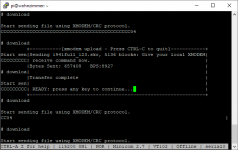
The byte-counter should conunt up. If the counter is not visible (as shown in the attachement) you were too slow with the file selection. press <ctrl> c and go back to step 6a.
press any key when the upload has finished.
Finish the firmware update. cannot remember the last procedure exactly but i think you have to confirm the flash procedure for the uManager part.
After everything is done type exit to close the uManager. Exit minicom with <ctrl> A Q
Powercycle the DAM.
greets
tonno
EDIT: add some screenshots for raspi-config and the file upload procedure
Howto connect, control and update the DAM1941 with a Raspberry Pi
1. disable serial port terminal shell output on the Raspbian/Raspberry Pi
If you do not disable the shell output, the DAM will receive all the console output from the Raspberry Pi and will crash immediately. When this happens the front-panel-switches do not react anymore and you have to powercycle the DAM.
#
Code:
sudo raspi-configselect "P6 Serial"
select "<No>" at "Would you like a login shell to be ...?"
select "<Yes>" at "Would you like the serial port hardware to be enabled?"
select "<Ok>" and exit the config tool
2. reboot the raspberry pi
3. install the terminal program
#
Code:
sudo apt-get update
sudo apt-get install minicom
Code:
RPI                              DAM1941(J9)
 6   GND   ---------   GND         1
 8   TXD   ---------   COM_RXD     9
10   RXD   ---------   COM_TXD    10
12   BCK   ---------   I2S_2_BCLK  2
35   LRCK  ---------   I2S_2_LRCLK 4
40 DOUT --------- I2S_2_DAT 6#
Code:
sudo minicom -b 115200 -o -D /dev/serial0I4 <enter> ... switches to TOSLINK
L048 ... a status message comes back from the DAM
I5 <enter> ... switches to I2S input
L000 ... another status message
V-10 <enter> ... sets the volume to level -10dB
V-10 ... another status message
Note: You cannot see the characters you type into the terminal but you get a status message after a succsessful command from the DAM.
6. The firmware update
Download the latest firmware file from the soekris server (1941full_123.skr) and copy it to your Raspberry Pi.
Be sure that minicom works correctly (see chpater 5)
type +++ to start the uManager
6a. The file upload procedure
type download <enter>
when you se the CCCCCCCC on the console you have about 45 seconds time to select the file. and start the upload of the firmware file
type <CTRL> A S
then select xmodem
use the up and down arrow keys and a doubleclick on the spacebar to navigate through the filesystem.
highlight the .skr file with the spacebar and press the <enter> to start the upload.
The byte-counter should conunt up. If the counter is not visible (as shown in the attachement) you were too slow with the file selection. press <ctrl> c and go back to step 6a.
press any key when the upload has finished.
Finish the firmware update. cannot remember the last procedure exactly but i think you have to confirm the flash procedure for the uManager part.
After everything is done type exit to close the uManager. Exit minicom with <ctrl> A Q
Powercycle the DAM.
greets
tonno
EDIT: add some screenshots for raspi-config and the file upload procedure
Attachments

Last edited:
Control the DAM with the Raspberry Pi using shell commands
Simple method to control the dam with shell scripts or from the console
# dam1941 serial commands
# Set volume $LEVEL is a variable with a value from 0 to 100
sudo echo -ne "V-$((100 - $LEVEL))\r\n" > /dev/serial0
# input selector
# 0=USB, 1=AES/EBU, 2=BNC, 3=RCA, 4=TOSLINK, 5=I2S, 7=Auto
sudo echo -ne "I0\r\n" > /dev/serial0
sudo echo -ne "I1\r\n" > /dev/serial0
sudo echo -ne "I2\r\n" > /dev/serial0
sudo echo -ne "I3\r\n" > /dev/serial0
sudo echo -ne "I4\r\n" > /dev/serial0
sudo echo -ne "I5\r\n" > /dev/serial0
sudo echo -ne "I7\r\n" > /dev/serial0
# Set filter
# 4=linear, 5=mixed, 6=minimum, 7=soft
sudo echo -ne "F4\r\n" > /dev/serial0
sudo echo -ne "F5\r\n" > /dev/serial0
sudo echo -ne "F6\r\n" > /dev/serial0
sudo echo -ne "F7\r\n" > /dev/serial0
Thanks for sharing; it should work for 1121 too.
Yes, should work with the other DAMs too.
Its easy to add a IR sensor to the Rasperry Pi to switch the inputs and the filters with LIRC. I use Moodeaudio on the Rasperry Pi and can control the player (stop, pause, play, fwd, rwd, prev, next...) with the same remotecontrol too.
Howto connect, control and update the DAM1941 with a Raspberry Pi
.
.
.
The byte-counter should conunt up. If the counter is not visible (as shown in the attachement) you were too slow with the file selection. press <ctrl> c and go back to step 6a.
press any key when the upload has finished.
type update <enter>
confirm the flash procedure for the uManager part with "y".
After everything is done type exit to close the uManager. Exit minicom with <ctrl> A Q
.
.
.
EDIT: forgot the "update" command for the uManager
Soekris,
The issue with the lost lock on USB-input every 20-30min seems to be a software issue of the auto-select feature. I have now manually selected USB and the link is as stable as it can get, playing now since 18hours without issues.
Thnx for the explanation of the switches on the Display board, played around with them yesterday...nice, fine nuances changes, like the red filter (brickwall I believe) best.
Has anyone used on the 1941 the custom filter packs of TNT and others ? Are there compatibility topics with firmware versions to be considered ?
Obviously I'm too stupid for that ...
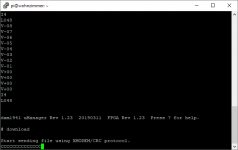
So again from the beginning. The dam is connected via a USB / Serial interface. As terminal program I use putty and thus I get the connection and the correct feedback from the dac without cryptic characters. After the entering from +++ I get the rigth feedback from the dac. On # I enter "download" and get the feedback "Start sending file using XMODEM / CRC protocol" and cccccc ... in the next line.
How can I enter the path to the file now?
Obviously I'm too stupid for that ...
So again from the beginning. The dam is connected via a USB / Serial interface. As terminal program I use putty and thus I get the connection and the correct feedback from the dac without cryptic characters. After the entering from +++ I get the rigth feedback from the dac. On # I enter "download" and get the feedback "Start sending file using XMODEM / CRC protocol" and cccccc ... in the next line.
How can I enter the path to the file now?
I'm not even sure putty can send files.... You can always use instructions for the dac1xxx series, same firmware:
Soekris Engineering ApS, Downloads
Obviously I'm too stupid for that ...
So again from the beginning. The dam is connected via a USB / Serial interface. As terminal program I use putty and thus I get the connection and the correct feedback from the dac without cryptic characters. After the entering from +++ I get the rigth feedback from the dac. On # I enter "download" and get the feedback "Start sending file using XMODEM / CRC protocol" and cccccc ... in the next line.
How can I enter the path to the file now?
-> ccccc
Next action is not a command on the command line #.
Next action is to request the terminal program - putty (using its menues) - to send a file.
//
Look here. He talks about FW upgrade but its the same for .skr filters... :
ExtraPUTTY | Dimdim's Blog
//
ExtraPUTTY | Dimdim's Blog
//

Soekris,
The issue with the lost lock on USB-input every 20-30min seems to be a software issue of the auto-select feature. I have now manually selected USB and the link is as stable as it can get, playing now since 18hours without issues.
Thnx for the explanation of the switches on the Display board, played around with them yesterday...nice, fine nuances changes, like the red filter (brickwall I believe) best.
Has anyone used on the 1941 the custom filter packs of TNT and others ? Are there compatibility topics with firmware versions to be considered ?
When you say USB input, do you mean the onboard USB interface, or something using the 2nd I2S interface ?
Does it happen between songs, or at random places ?
Anybody else seeing this problem ?
Last edited:
Again and again nice...has solved a problem, immediately pops up the next. How can I get the data into the dam1941 now?
I connected the raspberry pi with volumio and a toslink connection with the dam1941, that works very well. Now I wanted to try the I2S input after the firmware update.
What I have done so far: I have connected the signals BCLK, LCLK and Data from the 40pin Raspberry Pi connection to the corresponding pins from J9. I also connected the GND line. In volumio setup, I set the output on I2S and device as soekris dac - I thought that should actually work that way. However, the exit of the dam1941 is silent, no matter if I have set the input on auto or I2S. Does anyone have an idea? Have I forgotten a wire or overread any information?
Best regards...
Again and again nice...has solved a problem, immediately pops up the next. How can I get the data into the dam1941 now?
I connected the raspberry pi with volumio and a toslink connection with the dam1941, that works very well. Now I wanted to try the I2S input after the firmware update.
What I have done so far: I have connected the signals BCLK, LCLK and Data from the 40pin Raspberry Pi connection to the corresponding pins from J9. I also connected the GND line. In volumio setup, I set the output on I2S and device as soekris dac - I thought that should actually work that way. However, the exit of the dam1941 is silent, no matter if I have set the input on auto or I2S. Does anyone have an idea? Have I forgotten a wire or overread any information?
Best regards...
Go to the umanager and verify that both the uManager and the FPGA firmware is at version 1.23
Set the DAM input to I2S. If this is ok then it could be a litte software issue of volumio
Not 100% sure, but i think you have to bring volumio somehow to send the signal in a 32 bit format. Cannot tell you my volumio test configuration because i am not at home during the week.
Some suggestions:
- Try the resample function and set it to 32bit output
or
- look into your /etc/mpd.conf
the line
format "*:32:*"
should be there. look at http://raw-sewage.net/articles/dam1021-raspberry-pi/ and scroll to the bottom.
Last edited:
- Home
- Vendor's Bazaar
- dam1941 - Next Gen Discrete R-2R Sign Magnitude 24 bit 384 Khz DAC module