daansan:
I plan on using one PS per channel rather than two.
Does this mean that you want to run each amp with only one 36V power supply connected? This will not work as the amp needs +/-V.
Does this mean that you want to run each amp with only one 36V power supply connected?
No. What this means is that he will use one pair of RPS-400-36 to power two Modulus-686 modules.
Tom
+1 that rocks!
Thank you. I rather like the new brackets myself. I was inspired by the Parasound JC-1, which uses a similar bracket design. I happened to see a "help me fix my JC-1" thread somewhere here that showed the insides of the JC-1.
I went with pressed in (self-clinching) nuts rather than the self-tapping screws used in the JC-1 (and just about any other commercial product). I never quite trust self-tapping screws to cut clean threads without leaving shards behind. With the self-clinching nuts, I get to use regular M3 machine screws.
Tom
Tom,
Besides these new brackets, will you still have the previous ones available for builders who prefer those?
Btw, the new brackets look good form and function wise. I might be wrong, but probably the older bracket would allow the builder to get away with fewer holes tapped into the heat-sink?
Besides these new brackets, will you still have the previous ones available for builders who prefer those?
Btw, the new brackets look good form and function wise. I might be wrong, but probably the older bracket would allow the builder to get away with fewer holes tapped into the heat-sink?
Last edited:
Besides these new brackets, will you still have the previous ones available for builders who prefer those?
Nope. Maintaining inventory is a pain in general. Also, inventory is basically stacks of cash sitting on a shelf, except you can't spend it (or invest it in your business) until someone buys something. So maintaining two items with identical function is not my cup of tea.
The main advantage of the old brackets is that they made for a very nice module with the critical part of the thermal interface handled on the bracket (so by me for the assembled modules). Unfortunately, I was not able to get them manufactured to the level of quality I needed. The ones I shipped were selected from a batch of brackets and I stand behind those.
The new brackets offer a better thermal interface (direct connection to the heat sink on the LM3886es) and are less critical of production tolerances. They're also much less expensive ($25 instead of $40).
The drawback of the new brackets is that they require more holes in the heat sink (10 vs 7 in the old bracket) and the holes are smaller (M3 vs M4).
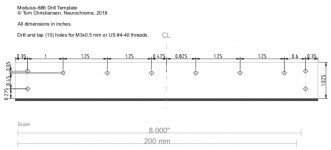
That said, ModuShop charges 25 Euro per heat sink to drill and tap the holes. I find the cost to be well worth it. I will also offer a drill template that you can use to get the holes in the right spots. Gimme a day or two to get that drawn up.
Btw, the new brackets look good form and function wise. I might be wrong, but probably the older bracket would allow the builder to get away with fewer holes tapped into the heat-sink?
True. That's one of the drawbacks. On the other hand, the brackets eliminate the needs for board mounting holes in the bottom panel. It's way easier to drill and tap all the holes in the heat sink than to drill and tap the heat sink and align that pattern with the holes in the bottom panel.
Tom
The main advantage of the old brackets is that they made for a very nice module with the critical part of the thermal interface handled on the bracket (so by me for the assembled modules).
Yes, that was definitely a plus point. The assembled modules had a really nice "finished product" appeal, with all the LM3886es fixed onto the bracket.
On the other hand, the brackets eliminate the needs for board mounting holes in the bottom panel. It's way easier to drill and tap all the holes in the heat sink than to drill and tap the heat sink and align that pattern with the holes in the bottom panel.
Tom
In full agreement.
")
Since there is no back plate with the new brackets, would you still be soldering the LM3886 on to the PCBs?
Have the prices of the fully assembled modules on your website been adjusted to reflect the savings from using the new brackets?
My assumption was that previously the fully assembled module came with the brackets, as the image showed as such, but I might be wrong.
Last edited:
Yes, that was definitely a plus point. The assembled modules had a really nice "finished product" appeal, with all the LM3886es fixed onto the bracket.
I absolutely agree.
Since there is no back plate with the new brackets, would you still be soldering the LM3886 on to the PCBs?
It wouldn't be a "fully assembled and tested module" otherwise.
Have the prices of the fully assembled modules on your website been adjusted to reflect the savings from using the new brackets?
Nah... I charge what the market can bear (or likely less, actually). I think I'll just buy myself lunch with the change.
My assumption was that previously the fully assembled module came with the brackets, as the image showed as such, but I might be wrong.
The previous fully assembled module option was the Modulus-686, fully assembled, on an angle bracket. You bolted the bracket to the heat sink. I even included the thermal paste with the module.
You're asking good questions, though. I'm not bringing the old bracket back, so the question is what the finished module should look like. I have a few options:
- Build a jig to allow me to assemble the modules and get everything aligned correctly. Deliver modules as fully assembled boards with a bracket on each end. The builder would then need to attach the LM3886es and brackets to the heat sink.
- Have a custom back plate machined. That would be pretty simple. A piece of rectangle extrusion, possibly with machined faces, with some threaded holes poked in it. I'd assemble everything and the builder would bolt the module to a heat sink just as with the old bracket.
- Have ModuShop machine a stack of heat sinks for me and deliver the Modulus-686 module mounted on the heat sink.
Tom
You're asking good questions, though. I'm not bringing the old bracket back,
Tom,
Sorry if it came across that way, but no pressure on bringing the old bracket back. I very well understand the challenges of a small business, and also not in favor of sinking $$$ in building up inventory of items that might be sitting there for a long time...!
so the question is what the finished module should look like. I have a few options:
I gotta admit that Option 3 is pretty attractive. Supporting both options 1 and 3 would be workable as well as the heat sinks could double as jigs.
- Build a jig to allow me to assemble the modules and get everything aligned correctly. Deliver modules as fully assembled boards with a bracket on each end. The builder would then need to attach the LM3886es and brackets to the heat sink.
- Have a custom back plate machined. That would be pretty simple. A piece of rectangle extrusion, possibly with machined faces, with some threaded holes poked in it. I'd assemble everything and the builder would bolt the module to a heat sink just as with the old bracket.
- Have ModuShop machine a stack of heat sinks for me and deliver the Modulus-686 module mounted on the heat sink.
Tom
Option 2 also gives nice flexibility for folks with existing heat-sinks and chassis or other brand/make of chassis.
But I guess you will have to go for the options that best cater to your customers. If most of them are doing builds with the ModuShop cases, then it points towards that direction.
Whatever your course of action, thanks again for your open dialogue and thoughtful approach. Wish you all the best!
Sorry if it came across that way, but no pressure on bringing the old bracket back.
No worries.
Option 2 also gives nice flexibility for folks with existing heat-sinks and chassis or other brand/make of chassis.
So would options 1 and 3, actually. If you can cut a rectangular opening in your chassis of choice and drill some holes, you can use ModuShop's heat sinks on any chassis. The only difference between options 1 and 2 is that with option 1 you have to drill three more holes.
Whatever your course of action, thanks again for your open dialogue and thoughtful approach. Wish you all the best!
Thanks. And thanks again for asking.
Tom
Last edited:
Tom:
I thought I would contribute a rationale as to why Option 1 is a non-starter, unless you want to require that the user have his/her heatsinks drilled on a milling machine (Option 3). Here is the math, based upon using the non-insulated, metal tab LM3886:
Nominal dimensions (inches):
Tab Hole: 0.150
Shoulder Washer:
Shoulder O.D.: 0.138
Screw Hole: 0.116
No. 4 Mounting Screw: 0.112
True Position Hole Clearance (TP) of Tapped HS Holes (nominal condition)
TP = (0.150-0.138)/2 + (0.116-0.112)/2 = 0.008 in.
This value is well below the expected positional tolerance that a DIYer could achieve using a template to locate the hole, center punch and drill press. Aligning 6 holes in a 'fixed-fixed' condition is extremely difficult by hand under tight tolerances. There will be no room for any lateral "tweaking" of the LM3886 with it's 11 leads, nor is it recommended at all due to the potential of high strains being placed on the solder joints. "Floating" the part prior to soldering gives the user a much larger margin of adjustment than 0.008 in. Even with a fairly poor drilling job, the end result would only be a slightly mis-aligned part, only cosmetic.
Option 3
Yes, you overcome the tolerance issue, but now you dictate which heatsink the user gets, unless of course you order/stock multiple sizes. Even with this option, I am guessing you would still be soldering the 3886's with the pre-drilled heatsinks in place for alignment.
Option 2
I believe this option to be your best bet, even though it is virtually the same as the original bracket you had designed and built, just a different shape to hold the new side mount brackets. Even with multiple pieces, your cost could come down based upon simplicity of the design. For the user it is a real plus going with clearance holes in the bracket. These can definitely be slightly over-sized to compensate for sloppy HS drilling, just use an over-sized diameter washer. Downside if any is the additional thermal interface, which you have minimized by providing thermal grease.
Just my thoughts,
Steve
One rude stunt that I routinely perform, is to oversize drill holes in brackets. This provides much-needed "slop" due to my lack of machining expertise & precision. So for example, I sometimes use a #29 drill bit (diameter 0.1360" = 3.454 mm) to make a thru hole in a bracket, which passes an M3 bolt (diameter 3mm) that screws into an M3 tapped hole in the heatsink. Ahhh, 0.454 mm of slop.
I thought I would contribute a rationale as to why Option 1 is a non-starter[...]
True Position Hole Clearance (TP) of Tapped HS Holes (nominal condition)
TP = (0.150-0.138)/2 + (0.116-0.112)/2 = 0.008 in.
Hrmpf! Well, those are your facts. (Sorry. I couldn't help myself
). Yeah. That's a non-starter. Thank you for bringing this up.Alright. So Options 2 and 3 it is. I'll go at Option 2 first and design a back plate. It should be trivial to machine from a piece of bar stock or sheet.
I'll entertain Option 3 should the need arise.
Option 3
Yes, you overcome the tolerance issue, but now you dictate which heatsink the user gets, unless of course you order/stock multiple sizes. Even with this option, I am guessing you would still be soldering the 3886's with the pre-drilled heatsinks in place for alignment.
True. AKSA/Aspen Amplifiers take the PCB+heat sink approach. Note their prices.
I'd definitely solder in the LM3886es after all the screws have been tightened.
One rude stunt that I routinely perform, is to oversize drill holes in brackets.
I do that as well. I tend to use 3.2 or 3.3 mm for M3. 3.5 mm if I really need the slop. Nothing wrong with that.
Tom
Tom,
From my DIY experience I would say Option 1 will be hard to handle. I would rather first screw then solder in this case. This his how I did my 686. Drilling wider diamter might help, however perpendicular drilling is whole another story here and it is harder to achieve. Precision drilling requires experience and proper machine.
For Option 3 I forsee huge cost of shipping overseas and lack of flexibility.
Considering ease of use, shipping cost and flexibility I think Option 2 is optimal. It would also keep you away out of many questions comming from potential mounting troubles.
Yeah... I've thought of that. I'd be a bit concerned about warp with material that thin. I also find that assembly is much easier if all I have to do is to drive a screw into a threaded hole. No messing with nuts.
Looking at the materials my vendor stocks, it looks like 0.1285" (~3.3 mm) is an option. I might have to get some shorter screws (I normally use M3x6), but that's easily accomplished.
Edit: I will indeed have to get shorter screws. The nominal thickness of the shoulder washer, LM3886 tab, and back plate would be 6.01 mm. That figures. I could also add a washer or make the back plate 0.2" thick. Options, options.
Good point with the chemfilm. Tumbling could be nice too. The powder coat is not that expensive, though, and it looks pretty. I'll leave the back plate uncoated.
Tom
Looking at the materials my vendor stocks, it looks like 0.1285" (~3.3 mm) is an option. I might have to get some shorter screws (I normally use M3x6), but that's easily accomplished.
Edit: I will indeed have to get shorter screws. The nominal thickness of the shoulder washer, LM3886 tab, and back plate would be 6.01 mm. That figures.
I could also add a washer or make the back plate 0.2" thick. Options, options.Good point with the chemfilm. Tumbling could be nice too. The powder coat is not that expensive, though, and it looks pretty. I'll leave the back plate uncoated.
Tom
Last edited:
You might want to move down slightly the top screw hole in the brackets so that they are in a line with the LM3886 screw holes. It would be much easier to have all 8 in a row. Also move the bottom bracket screws down slightly so that the spacing is still 0.5". There's no reason to make the measuring and drilling harder than it needs to be.
- Home
- Vendor's Bazaar
- Modulus-686: 380W (4Ω); 220W (8Ω) Balanced Composite Power Amp with extremely low THD